Introduction
Lets recap a bit. Below is what we have explored so far
In this post we now look at Sending an IDoc to a new Trading Partner over AS2. This is similar to Part 1 but unlike Part 1 our Target will be a Partner that receives data over AS2.
Scenario in Scope
We will build an IDoc to EDI flow over AS2. We had seen how to use Mendelson AS2 as a AS2 Test Server in the previous post. Like me, I assume most of you have installed Mendelson AS2 on your local machine, and hence we will also look at using Cloud Connector to transmit the AS2 messages from Integration Suite to your local Mendelson AS2.
In summary, what we will achieve is

IDoc DESADV.DELVRY03 ( Same as Part 1 ) -> CPI -> Cloud Connector -> Mendelson AS2
Pre-requisites from Part 1
The idea is to use our MIGs and Mappings from Part 1. The idea is to not change any of our previous IFlows deployed. Hence, you would need to make sure below steps from Part 1 are in place.
In other words, we will need to make sure below is completed,
- Company Profile
- MIGs and Custom Mappings
- Agreement Templates
- Iflows are deployed
Pre-requisites from Part 3
As we will use Mendelson AS2 to receive our EDI Messages we will need to also execute the below steps from Part 3
In other words, we will need to make sure below is completed,
- Installed Mendelson AS2 and set up Mendelson AS2 with the TLS and Encryption Certificates.
- Defined a Local System for Mendelson AS2 ( CUSTOMER2) and ensure that CPI system is also defined in Mendelson.
- Trading Partner Agreement for CUSTOMER2
Current As Is Setup
We have in Part1, defined a end to end process to get an IDoc and Send it over EDI to a Trading Partner. We have in Part 3, installed AS2 and configured Integration Suite and Mendelson AS2 to enable communication with a Trading Partner CUSTOMER2 over EDI.
We will now use the same Trading Partner CUSTOMER2 and change the settings for this CUSTOMER in Integration Suite to be able to Transmit the EDI Message over AS2.
Summary of Steps in Cloud Integration / CPI
- Run Cloud Connector and Mendelson AS2 in parallel
- Cloud Connector – Set up to connect to Mendelson AS2
- TradingPartnerManagement – Add Type System Version for D.96A S3
- TradingPartnerManagement – Change Communications for AS2 Receiver
- TradingPartnerManagement – Create a new Agreement
- Test Your Flow
Run Cloud Connector and Mendelson AS2 in parallel
Mendelson AS2 serves to enable you to Test your AS2 Connections. Before we proceed with the Cloud Connector installation and setup, it is essential that you change the HTTPS port of Mendelson AS2. SAP Cloud Connector by default runs on 8443 and hence to avoid a port conflict, we need to change the HTTPS Port on Mendelson AS2.
Change your Mendelson AS2 HTTPS Port
If you try to run Mendelson AS2 and SAP Cloud Connector at the same time, you will notice that one of them will not start. Reason being both of these tools use the port 8443 as their default HTTPS Port. What we will now do is change the default port of Mendelson AS2 to 8444.
Before you can do this make sure,
- Your SAP Cloud Connector is stopped and not running.
- Start Mendelson AS2 ( see previous Part 3 on how etc.)
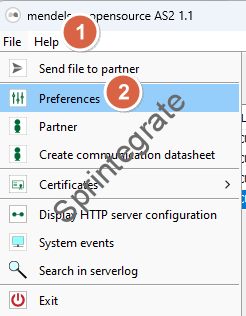
Navigate to Mendelson AS2 -> File -> Preferences -> Connectivity -> and change HTTPS Listen Port from 8443 to 8444. Click OK. You will get a notification that your Port has been changed and you need to restart Mendelson AS2. Restart Mendelson AS2 by exiting the toll and starting it again.

Verify HTTPS Listen Port change
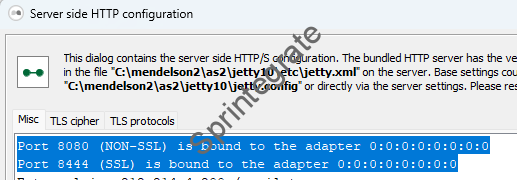
Go to Mendelson AS2, File -> Display HTTP Server Configuration. You will see the message that Port 8444 (SSL) is bound to the adapter 0:0:0:0:0:0:0:0. In other words, the HTTPS Port has changed to 8444. Also check the HTTP Port, it would be the default port 8080. We will use 8080 ( Default HTTP Port ) in our Cloud Connector Configuration.
You can now run SAP Cloud Connector (8443) and Mendelson AS2 ( 8080 and 8444) in parallel.

Cloud Connector – Set up to connect to Mendelson AS2
To make it easy for Cloud Integration to push AS2 messages to your Mendelson AS2, we will use Install a Cloud Connector on your Local Machine. This post will not go into the details of installing a cloud connector and connecting them to your Integration Suite tenant. Most Integration Consultants would have done this at some point and if you haven’t, there are more than enough articles to handle this.
We will assume that you have a Cloud Connector up and running and connected to your Integration Suite subaccount on BTP.
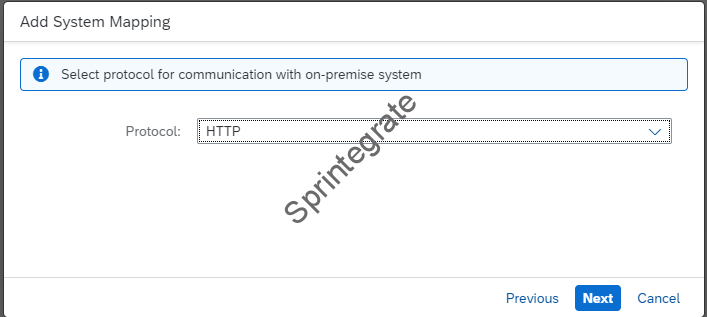
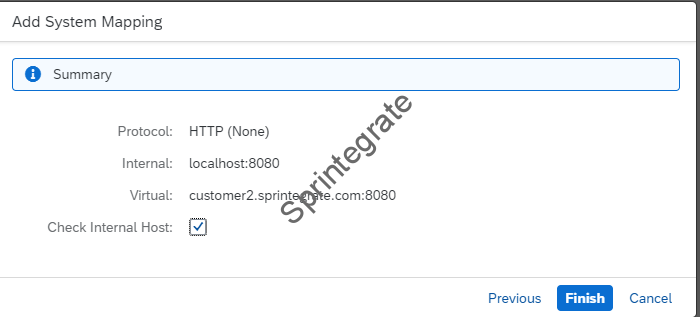
Configure Cloud To On-Premise System Mapping On Cloud Connector
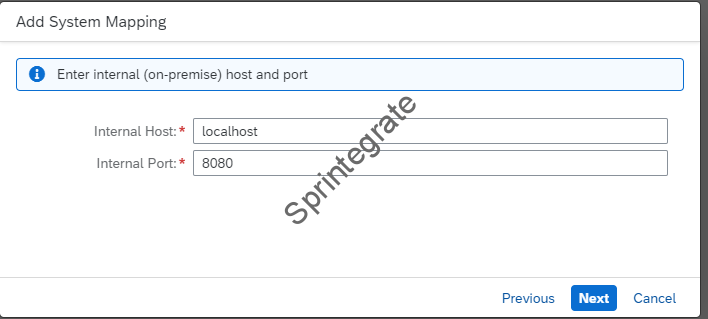
Mendelson AS2 runs on port 8080 for HTTP. We will configure Access Control where we will map 8080 to a virtual host on Cloud Connector.
- Back-end Type : Non SAP System
- Protocol : HTTP
- Internal Host: localhost ( assuming you are running Cloud Connector and AS2 on the same machine)
- Internal Port: 8080
- Virtual Host: <<anyvalue>>. In my case, I use customer2.sprintegrate.com
- Virtual Port: <<anyvalue>>. In my case, I use 8080
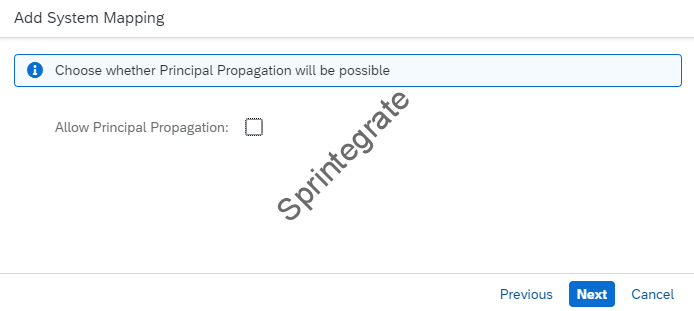
- Allow Principal Propagation: Deselected
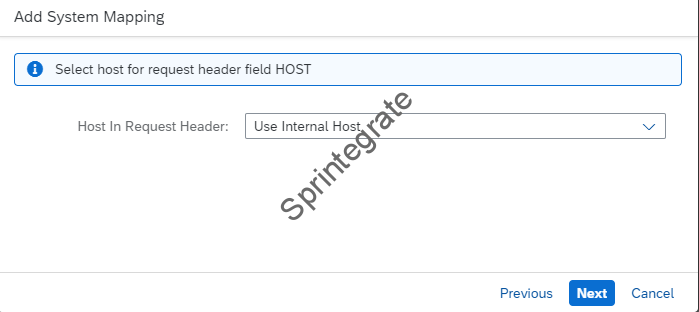
- Host In Request Header : Use Internal Host
- Check Internal Host: Selected


Add Resource on Cloud Connector
You will need to add the AS2 Path in the system we have just added as allowed path. Mendelson AS2 listens to the following path on /as2/HttpReceiver for AS2 requests. Add this path to the cloud connector.
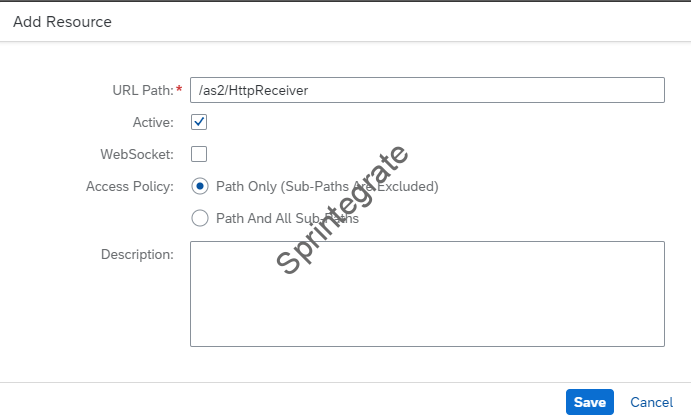
Once done, this is how your Cloud Connector set up should look like.

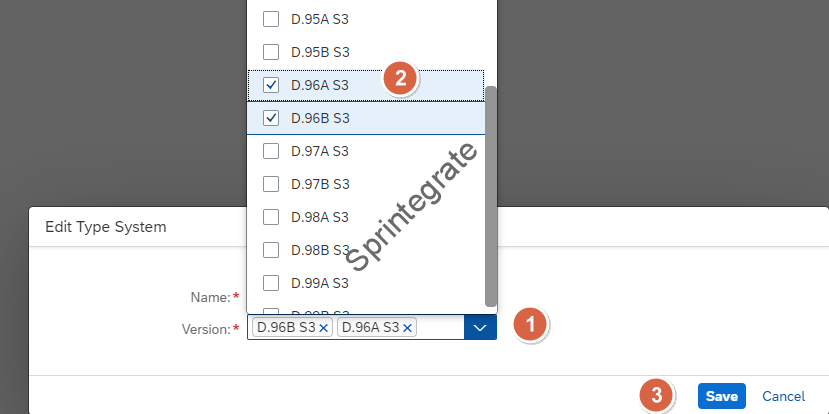
TradingPartnerManagement – Add Type System Version for D.96A S3
As we have seen we will transform the IDoc to a DESADV D 96 A message. We will now extend the Trading Partner : CUSTOMER2 defined in the Post3 to allow the Type System Version for D.96A S3.
Navigate to B2B Scenarios in your Integration Suite Design, and go to Trading Partners -> CUSTOMER2 -> Systems -> Type Systems -> Edit the existing UN/EDIFACT system from Part 3. Select D.96A.S3 and save

TradingPartnerManagement – Change Communications for AS2 Receiver
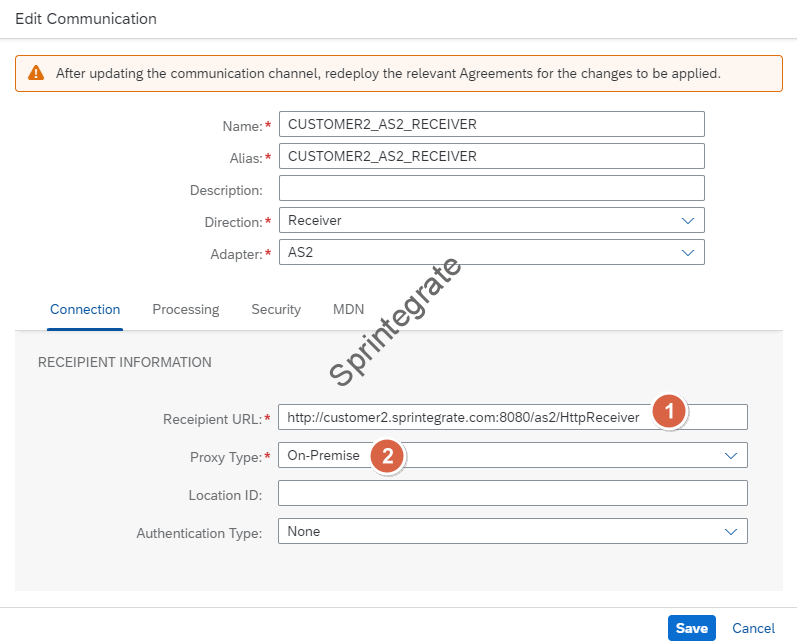
In the Previous Post we had created a CUSTOMER2_AS2_RECEIVER channel in the TPM with dummy details. We had done that to make the system complete as we needed to have a Sender and Receiver channel to make a system complete in TPM.
We will now edit the AS2_RECEIVER channel CUSTOMER2_AS2_RECEIVER to have the right details and pointing to Cloud Connector and Mendelson AS2.
- Navigate to Trading Partners -> CUSTOMER2 -> Systems -> Communications -> CUSTOMER2_AS2_RECEIVER and Click on Edit
- Change to below Connection Settings
- Recipient URL : http://virtualhostnameoncloudconnector:virtualport/as2/HttpReceiver. In our case this will be http://customer2.sprintegrate.com:8080/as2/HttpReceiver
- Proxy Type: On-Premise
- Location ID : If you have a location defined in your cloud connector, provide that. In my case I do not have that!
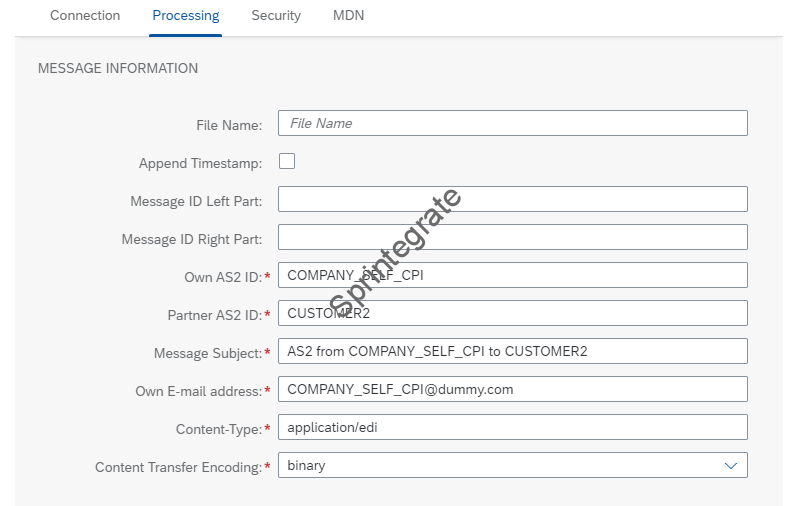
- Processing Settings -> Leave them as is from Part 3 .
- The Own AS2 ID points to CPI’s AS2 ID.
- The Partner AS2 ID points to Mendelson AS2’s AS2 ID
- Rest fields are self explanatory.
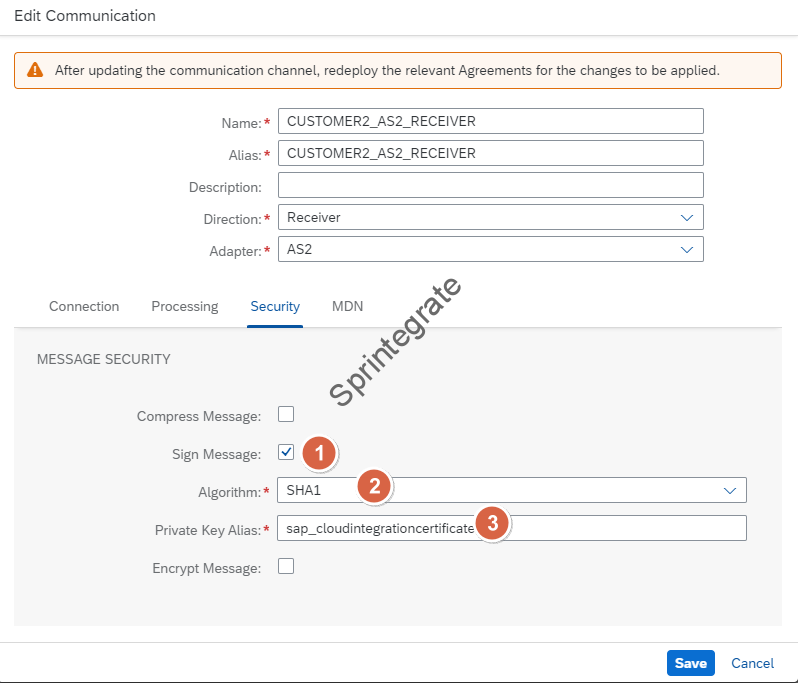
- Select the Below Security Settings
- Sign Message
- Algorithm -> Anything. I have chosen SHA1
- Private Key Alias -> sap_cloudintegrationcertificate
- Encrypt Message is deselected
- I have deselected Encrypt Message as we are using a Self Signed Certificate ( default certificate) from Mendelson AS2. While this works in the Inbound Scenario, in the Outbound Scenario, SAP TPM only allows for Signed Certificates. If you select Encrypt Message with a Self Signed Certificate ( which is what we have loaded in TPM for CUSTOMER2), you will get a runtime error in CPI.
- You can select CompressMessage but I have not for this demo.
- Sign Message
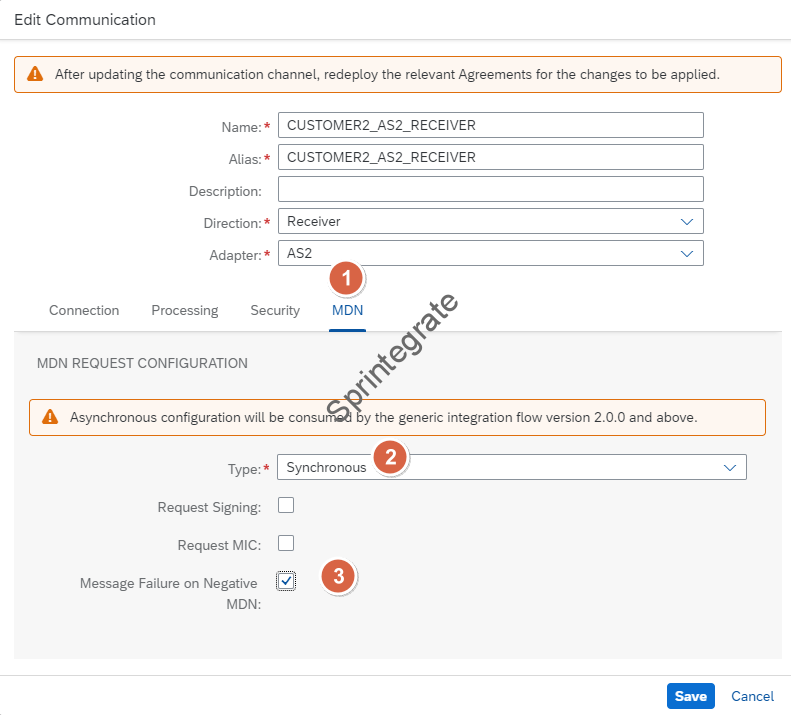
- MDN Settings
- Select Synchronous
- Select Message Failure on Negative MDN
- We will explore more options for the MDN and Message Failure on Negative MDN later in this post.

TradingPartnerManagement – Create a new Agreement
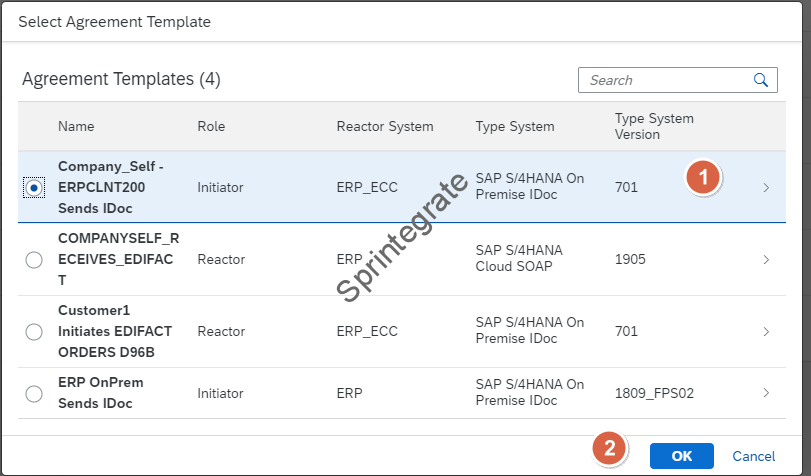
We will now create a new Trading Partner Agreement for SAP ERPCLNT200 to send a EDIFACT Message to CUSTOMER 2. We will re-use the Agreement Template Company_Self – ERPCLNT200 Sends IDoc from Part 1 for this Agreement
- Navigate to B2B Scenarios -> Agreements -> Create
- Select Agreement Template Company_Self – ERPCLNT200 Sends IDoc
- Change Below details in Overview
- AgreementName and Description to Company_Self – ERPCLNT200 Sends IDoc To Customer2 over EDI AS2
- Trading Partner Name :CUSTOMER2
- System: CUSTOMER2_MENDELSON
- Type System : UN/EDIFACT
- Type System Version: D.96A. S3
- Identifier: CUSTOMER2
- Identifier as a Company: CUSTOMER2 ( This will be RCVRN in your IDoc)
- Identifier as a Trading Patner: SELF_1234
- Define the B2B Scenarios
- Communication -> ERP_ECC_IDOC_SENDER
- Interchange -> MIG -> ( Remember clear filters) -> MIG_S4HANA_ONPrem_IDoc_DESADV.DELVRY03
- Mapping -> Select Customized Mapping Processing and provide the ProcessDirect Address from Part 1 (/tpm/Self_To_Customer1/DELVRY03ToDESADV in my case)
- Lesson Learnt : Do not have CustomerName in the PD Address if you want to re-use it.
- Interchange
- Type System Version : D.96A S3
- MIG : MIG_UN_EDIFACT_DESADV_D96A
- Communication : CUSTOMER2_AS2_RECEIVER


Test Your Flow
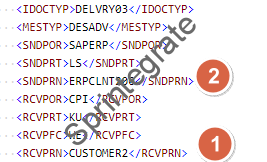
Set RCVPRN as CUSTOMER2
Thats it, we are now ready to Test our Flow. We will like we did in Part1, trigger an IDoc from ERP. In this case, as our Customer2 has the Identifier as CUSTOMER2, we will need to make sure that the IDoc is triggered from ERP using RCVPRN as CUSTOMER2
Also ensure you have the SNDPRN as ERPCLNT200 ( confirming to our COMPANY_SELF) from Part 1.
Make sure Mendelson AS2 is up and running
As we will be sending the message to Mendelson AS2 ensure that it is started and running
Make sure Cloud Connector is up and running
As we will be sending the message to Mendelson AS2 via Cloud Connector ensure that it is started and running.
Test Your Flow – Error Occurs
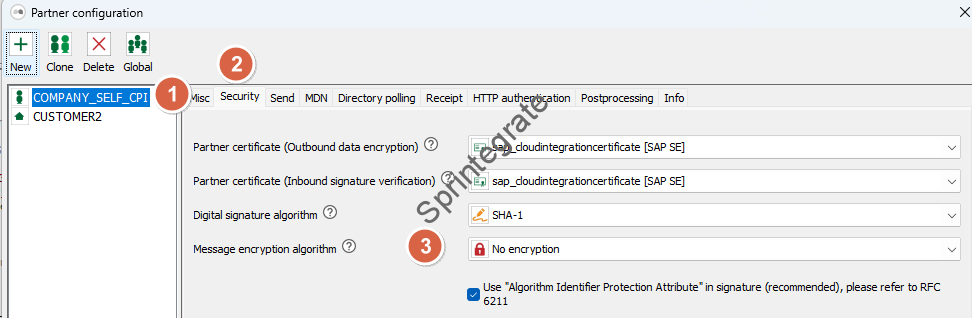
You will notice that the message fails both In Integration Suite and in Mendelson AS2. You will read through the logs and realise what Mendelson is saying “Incoming messages from AS2 partner COMPANY_SELF_CPI are defined to be encrypted.“

As I had pointed previously, Encryption requires a Signed Certificate in Integration Suite. Our Mendelson Certificate is self signed and hence we did not choose Encryption. So for now , lets change the Mendelson setting to remove Encryption.
Go to Partner -> COMPANY_SELF_CPI ->Make Message Encryption Algorithm as No Encryption.
Side Note : This will stop the Scenario in Part 1 to working. If you would like to run both scenarios to run in parallel, either use a Signed Certificate in Mendelson or remove Encryption required in Part 1 in the TPM Agreement
Test Your Flow – Successful
Now when you re-push the IDoc from Integration Suite, you will see that the message is successful. You can also view the MDN Attachment in Cloud Integration.


Final Thoughts
We have just enabled an Outbound EDI flow on an Existing Trading Partner. We did this with no underlying Integration Flow development but only using TPM. We adjusted the TPM Settings of our Trading Partner, created a new Agreement and thats about it.
This is not the end of the journey yet though. We have just built the basic flows. If you have followed the journey so far, you might ask yourselves some of these questions
- How do I handle Custom IDocs?
- What if I want to handle Custom XML ( AS2 allows any payload)?
- What if I do not have a Mendelson AS2 on my Landscape ?( security, non trial landscapes etc)
We will continue to look at these and more in the next posts!
Additional Blogs from this Series
- Trading Partner Management – Part 1 – IDoc to EDI Flow(s)
- Trading Partner Management – Part 2 – EDI to IDoc Flows(s)
- Trading Partner Management – Part 3 – EDI over AS2 to IDoc Flows(s)
- Trading Partner Management – Part 5 – Custom IDoc Flow
- Trading Partner Management – Part 6 – Custom Search Attributes
- Trading Partner Management – Part 7 – EDI Functional Acknowledgements for Inbound EDI Messages
- Trading Partner Management – Part 8 – EDI Functional Acknowledgements for Outbound EDI Messages
- Trading Partner Management – Part 9 – Outgoing IDoc Bundling
- Trading Partner Management – Part 10 – Outgoing IDoc Bundling With EDI Bundling
- Trading Partner Management – Part 11 – Handling Parameters
- B2B on SAP Integration Suite – Part 12 – Migrating SAP PI / PO B2B Mappings without TPM
- Trading Partner Management – Part 13 – Migrating SAP PI / PO B2B Mappings with TPM
- Trading Partner Management – Part 14 – Handling Bundled Incoming EDIs
- Trading Partner Management – Part 15 – Handling Message Retries
- Trading Partner Management – Part 16 – B2B Failed Message Alerting
- Trading Partner Management – Part 17 – TPM Naming Convention Guideline