**Note: This post was updated in Nov 2023 to reflect the new IFlows from SAP for Trading Partner Management and the support of ProcessDirect Sender.
Introduction
EDI has been around for ages. 20 years ago when SOA was the new kid in the block, it was proclaimed EDI is dead. Times have changed, Integrations have changed, Integration Platforms have changed ,evolved, demised, moved to the cloud but EDI continues to be ALIVE and KICKING. The world of B2B Integration continue to use EDI based Integrations and there is no running away from that fact.
SAP’s B2B product strategy has evolved – Customers have gone from using Seeburger EDI Add-on on SAP XI/ PI to SAP B2B Add-on on SAP PO. Cloud Integration along with its various name changes also has seen various evolutions of its B2B strategy over the years, EDI to XML and XML to EDI Convertors came first, then came Integration Content Advisor with the Message Implementation Guidelines ( MIGs) and Mapping Guidelines (MAGs) and then Trading Partner Management with B2B Monitoring. With so many changes, its no wonder that EDI On Cloud Integration makes seasoned Integration consultants want to walk away or push the problem on the backburner.
SAP’s Trading Partner Management on Integration Suite is comprehensive but it is also “complex” if you are new to the world of EDI. You can get lost, the standard Trading Partner Management Package from SAP and its Groovy scripts can give anyone nightmares.
My idea of this series is to demystify this – move away from the Jargons and start simple and build on top of it. My idea is to keep it simple; grasp the concepts before rushing into building the most complex EDI and B2B Solutions with various what-if scenarios.
If this has you intrigued, curious and someone who likes to keep it simple and wanting to know more, read on.
Starting Scenario – IDoc to EDI Conversion

As you can see from the image above, the scenario is a very typical scenario at any Customer’s B2B Landscape.
- Get an IDoc from ERP in Cloud Integration
- Map the IDoc to EDI format ( EDIFACT)
- No Use of MAGs ( Mapping Guidelines)
- Use TPM in CPI to Leverage the standard monitoring for B2B ( which in my opinion is very very powerful)
- Deliver the EDI file over SFTP to a Partner
- IDoc from ERP for this example: DESADV.DELVRY03
- EDI File format for Trading Partner: EDIFACT DESADV D 96A
Why EDI Over SFTP?
Why did I choose EDI over SFTP you might ask. Standard Packages of Cloud Transport Management DOES NOT Support SFTP out of the box yet. This is the roadmap from SAP. This is also amongst a very common Integration Pattern I have seen in multiple Enterprise Landscapes where the EDI Gateway is out of SAP Integration Suite or SAP Integration tools. EDI Gateways like ODEX ( and many more ) are used in multiple customer contexts and landscapes to handle the data transmissions out.
Update: 03/11/2023
SAP has released a ProcessDirect Adapter for Sender and Receiver Trading Partners. This allows us to use a ProcessDirect Adapter to send EDI Files over SFTP rather than build a custom IFlow. This post was updated to allow for TPM to use Process Direct and then SFTP Receiver.
Defining Self and Partners Identifiers
| Who? | ERP aka IDoc Identifiers (EDI_DC40) | EDI Identifiers |
| Initiator Sending Partner ( COMPANY_SELF) | ERPCLNT200 SNDPRN of your IDoc Control Record | SELF_1234 Sender EDI Identifier |
| Reactor Receiving Partner (CUSTOMER1) | CUSTOMER1 RCVPRN of your IDoc Control Record | CUST_1234 Receiver EDI Identifier |
This table will be used when we set up our Trading Partner Management aka B2B Scenarios in Cloud Integration. For now it is essential to note that you need 2 sets of Identifiers for yourself and the Partner. Your EDI Control Record and EDI Identifiers.
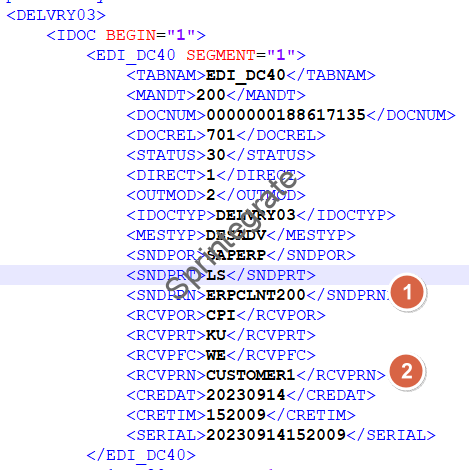
Meanwhile; So what does this table mean? Your partners are identified with different values in different system. Deciphering this Table.
- Initiator ( or the Sending Company ) –
- As ERP is sending the data -> This will be SNDPRN from your IDoc Control Record. This typically is the Logical System Name of your ERP. In my case, we have defined this as ERPCLNT200.
- Likewise as we are sending a EDIFACT EDI message; we will set the Sender EDI Identifier for our Sending Company – SELF_1234
- Recipient ( or the Receiving Company)
- As ERP is sending the data -> This will be RCVPRN from your IDoc Control Record. This typically is the Customer Number, Vendor Number of your Partner defined in ERP in the Partner Profile. In my case we have defined this as CUSTOMER1.
- Likewise as we are sending a EDIFACT EDI message; we will set the Receiver Identifier for our Receiving company – CUST_1234
Summary of Steps in Cloud Integration / CPI
- Create the Default Number Range ICN_DEFAULT in Cloud Integration
- Create a MIG for IDoc
- Create a MIG for EDI Message
- Define “Self” Company Profile
- Define Identifiers
- Define Systems
- Define Communications
- Define Trading Partner
- Define Identifiers
- Define Systems
- Define Communication
( Dummy)[ Updated on 03/11 to use a ProcessDirect]
- Define Agreement Templates
- Define Agreements
- Configure / Customize Standard Iflows
- Create your Mapping Iflow
- Test Your Flow
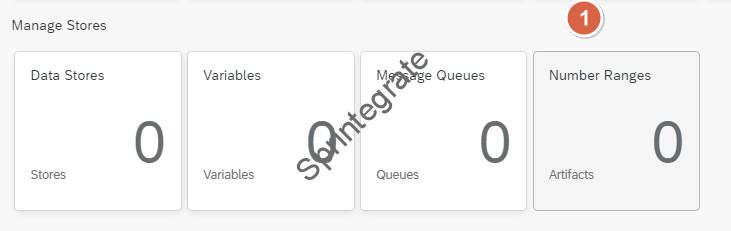
Create the Default Number Range ICN_DEFAULT
In our scenario we use a EDIFACT Transformation and hence we need to define a default number range ICN_DEFAULT in Integration Suite.
Go to Integration Suite -> Monitor –> Integrations –> Number Ranges
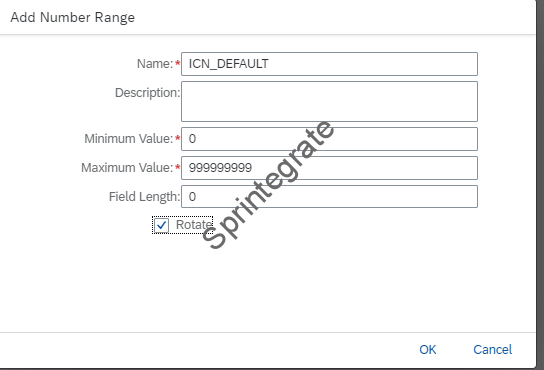
Create a Number Range clicking on Create and provide below details
- Name: ICN_DEFAULT
- Minimum Value : 0
- Maximum Value: 999999999
- Rotate : Selected
Configure Message Implementation Guidelines (MIGs) for IDoc
As mentioned in the previous section, we will receive a DESADV.DELVRY03 IDoc from ERP. The 1st step in your implementation in Cloud Integration is to define a MIGs for this. If you have your DESADV.DELVRY03 IDoc available as a XML file, then the MIG is even easier to define but if you do not have that, that also works.
Go to Cloud Integration and select MIGs

Click on Add

Select SAP S/4HANA On Premise IDoc. You will need to scroll down to find it. Even if you are not on SAP S/4HANA and are on ECC, do not panic. Select SAP S/4HANA OnPremise and move ahead, it will all work.

Search for DESADV and select DESADV.DELVRY03

Select any Version of S/4HANA ( I selected 1709 in my case)

The Next Step is optional but something that will make your life easy – If you have the IDoc XML available to you ; upload the file in this step and select “Use file content as example values“

Provide a Name and Direction. In my case I have given the name MIG_S4HANA_OnPrem_IDoc_DESADV.DELVRY03 and Direction: Both.
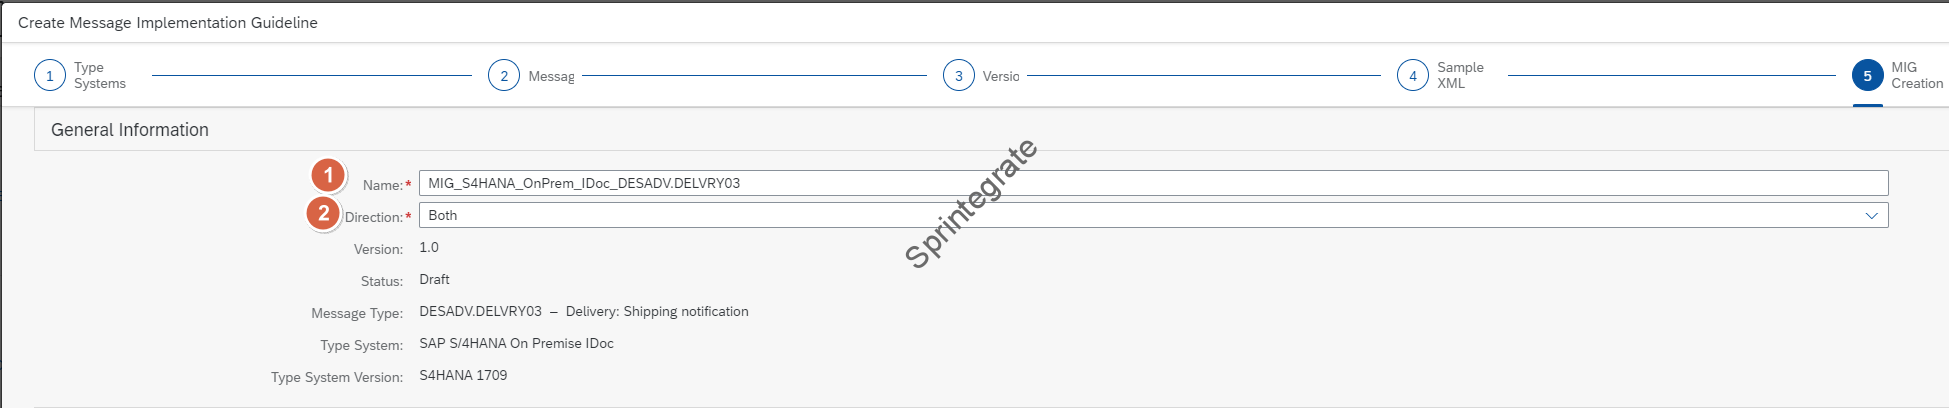
You also need to provide a Own Business Context ( This makes no sense to me but the idea being that this is Crowdsourced and has self learning abilities and so on from SAP but I wont rant and move on ). Provide a random BusinessContent or select one that describes your Business Use Case
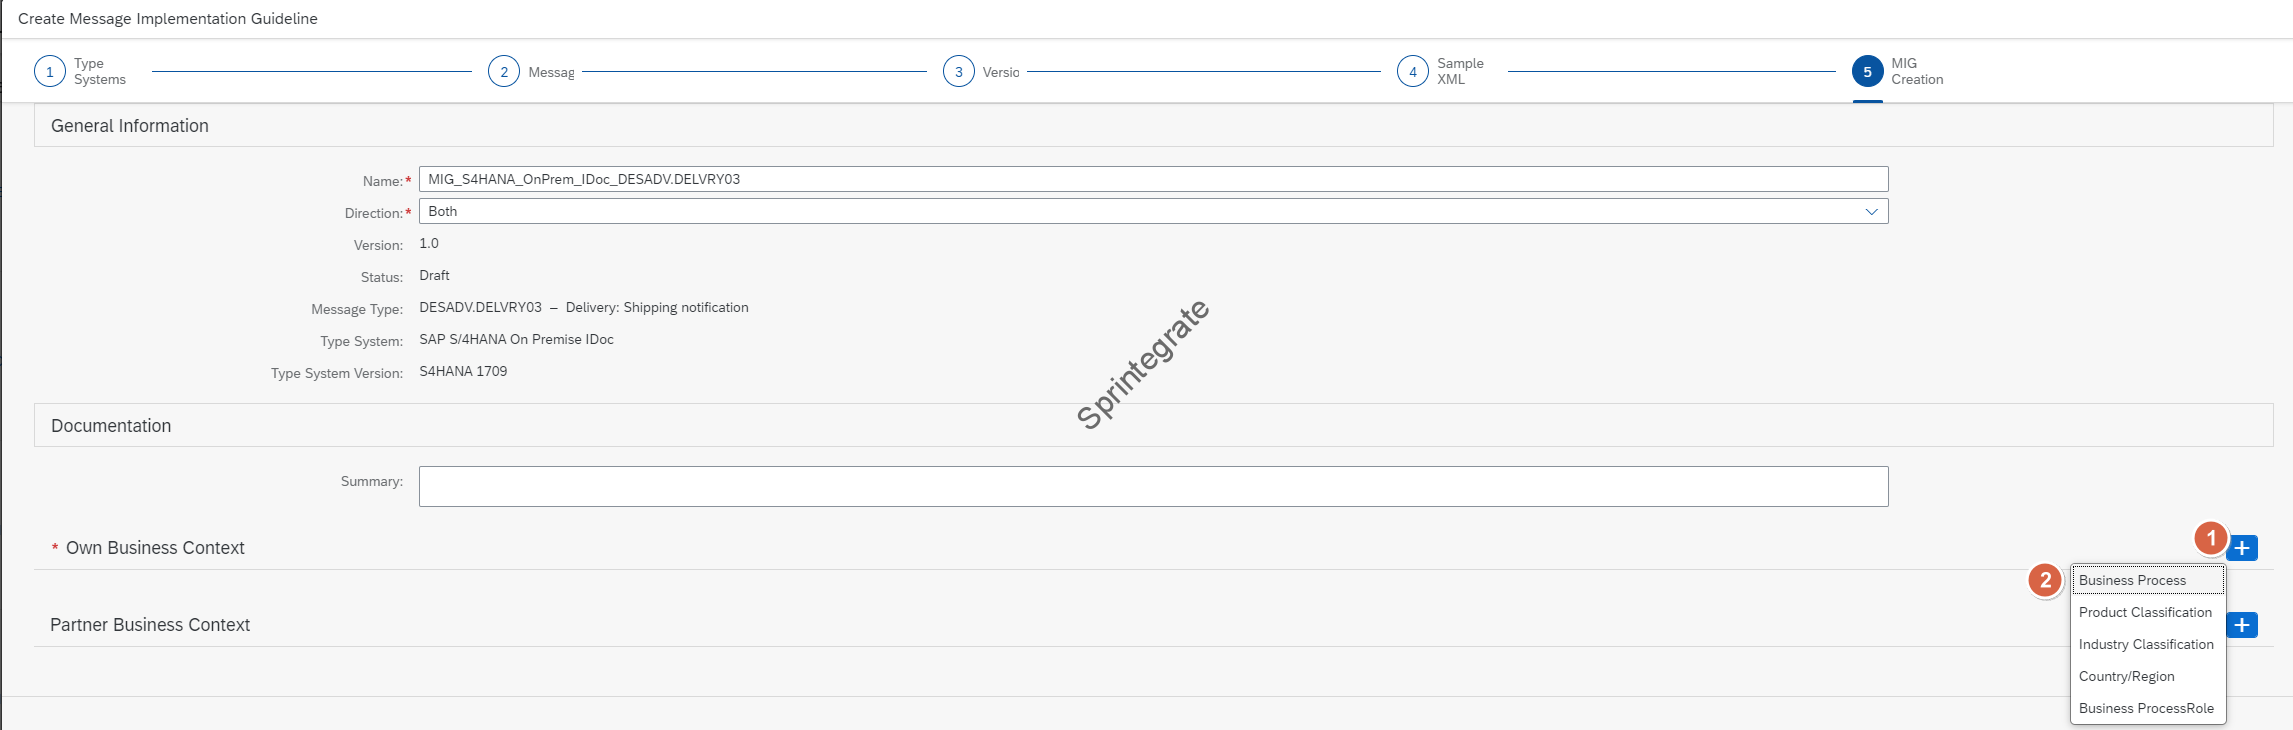

Click on Get Proposals and then Activate

Configure Message Implementation Guidelines (MIGs) for EDI
As mentioned in previous section we will create map the IDoc to a EDI file of format EDIFACT DESADV D96A. We need to create a MIG for this and we will follow the same process as for the IDoc MIG.
Side note : MIGs from SAP PO and Cloud Integration
As per previous section if you have the EDI XML format with you from your custom mapping, then this is recommended to be used. When you define a MIG you will notice that you have 2 Options when you select a XML file
- Process Orchestration
- Cloud Integration
This is very very helpful as when you migrate from PO to CPI, and want to migrate your EDI Mappings you will notice that the ROOT Tag of your EDI XML is different between Cloud Integration and Process Orchestration. If you select Process Orchestration you can use your EDI XML file from SAP PO. If you select Cloud Integration it needs to be as per Cloud Integration format.
Lets continue with creating the MIG
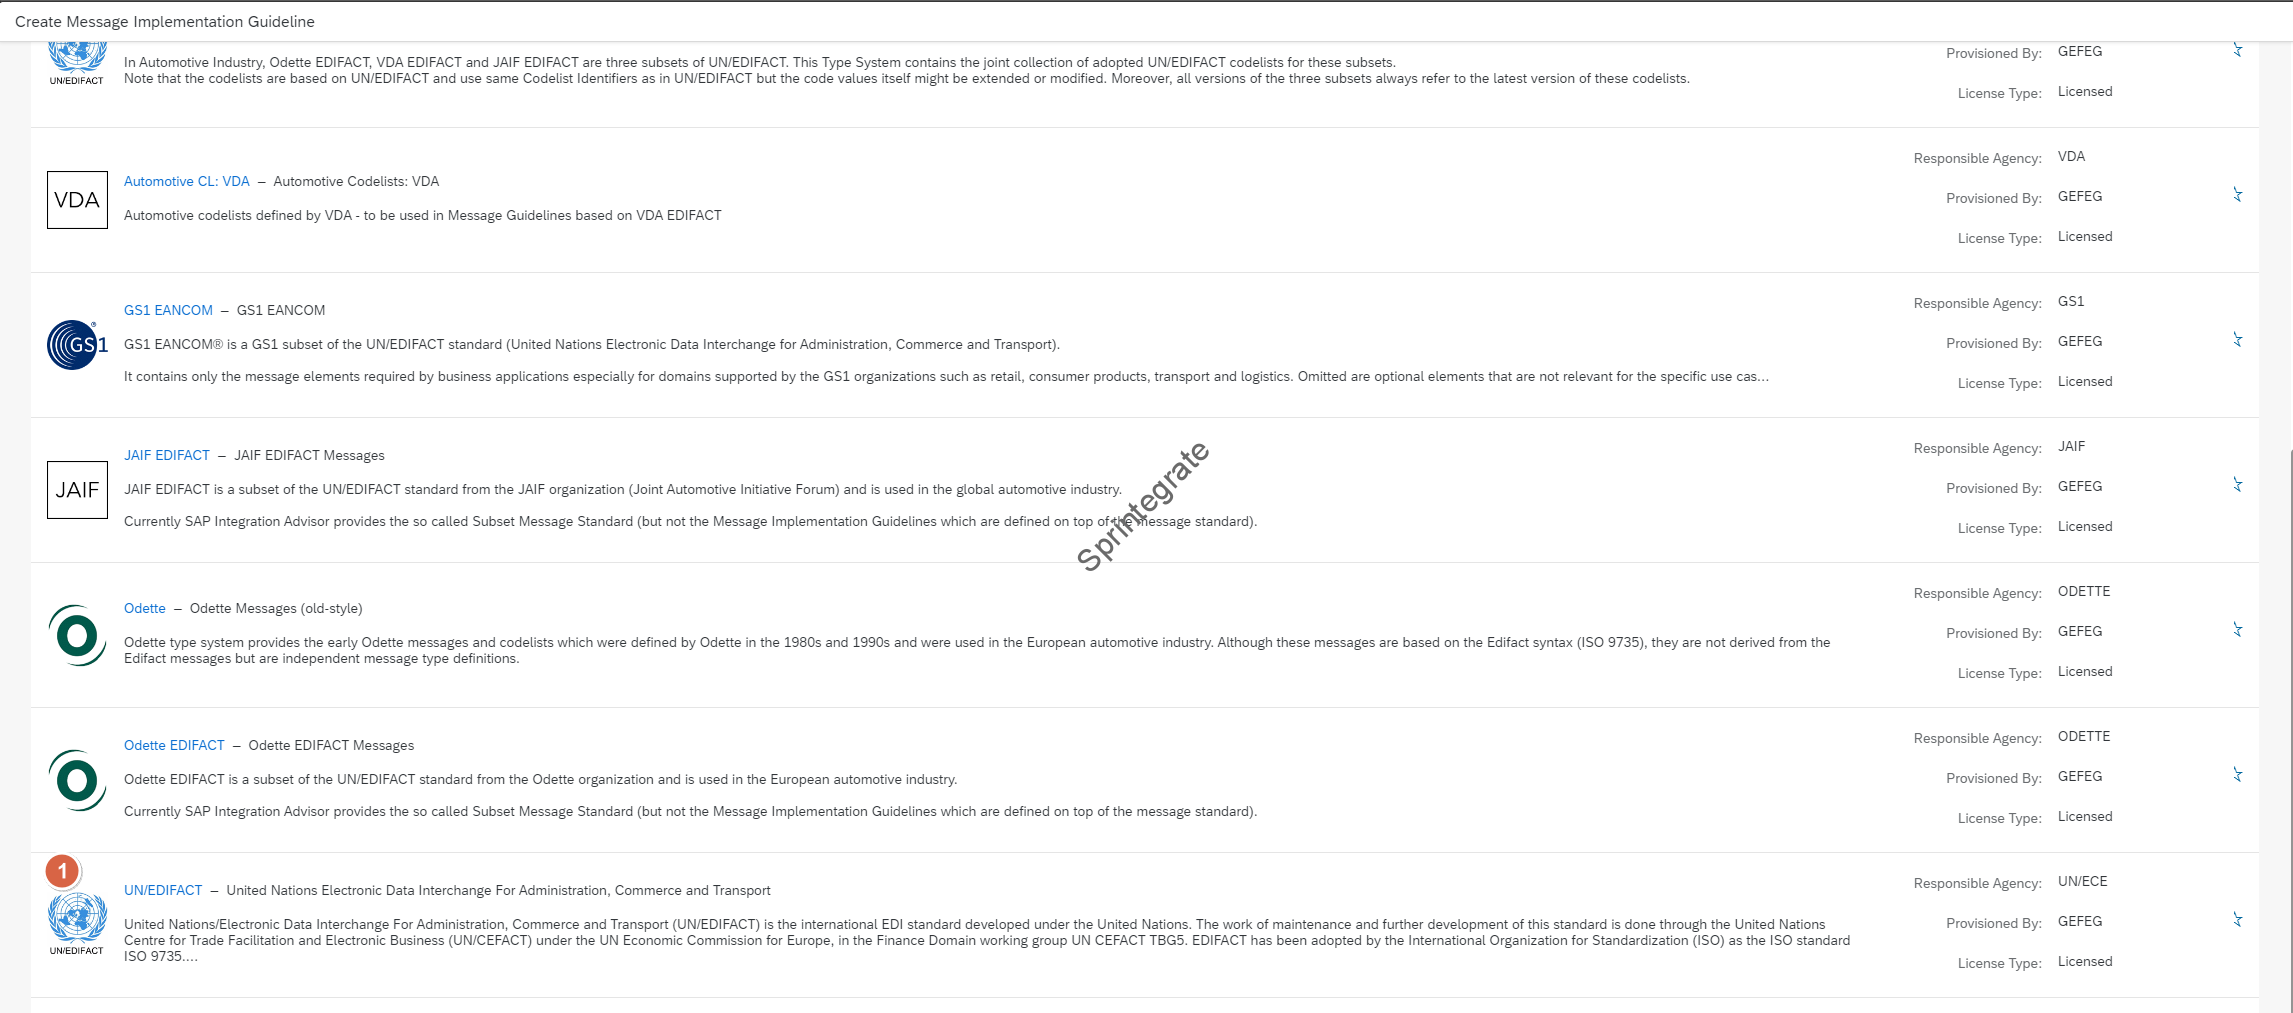
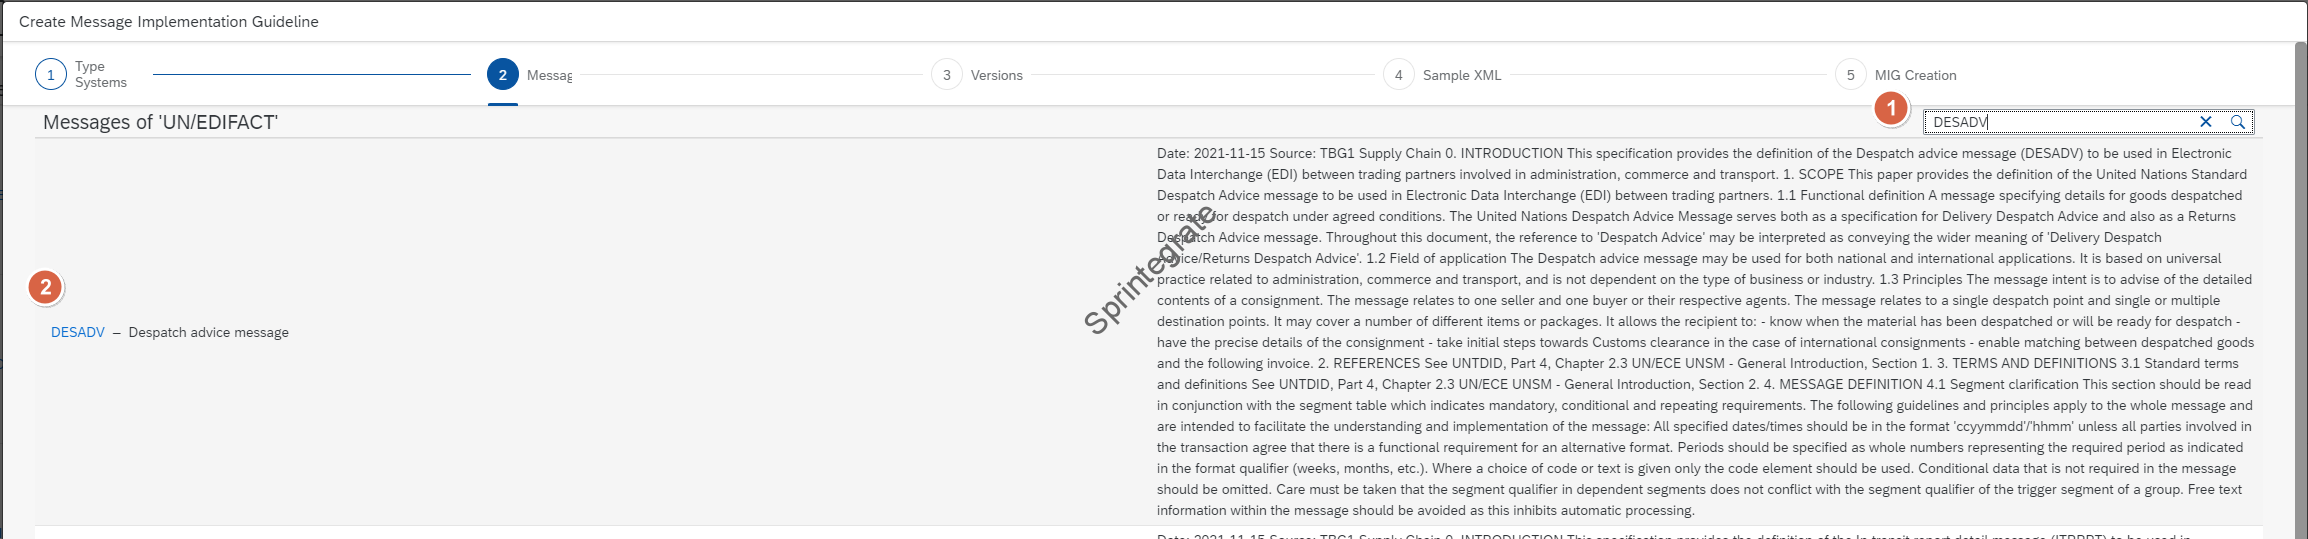
Lets select UN/EDIFACT; then search DESADV and select DESADV – Despatch Advice Message
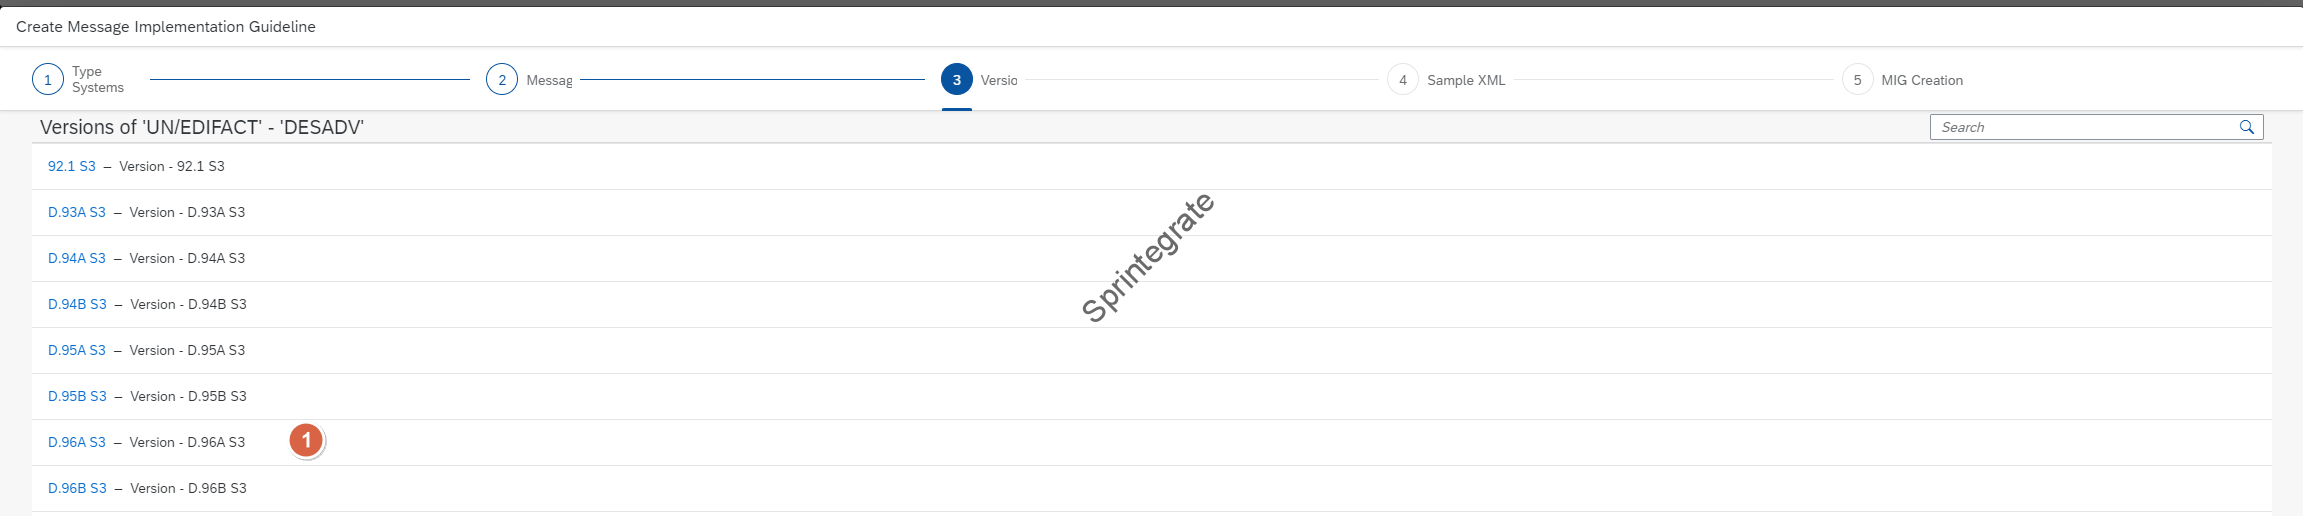
Select D.96A. S3 ( Conforming to our EDIFACT Standard as we need )
Select the EDI XML file you have ( if you have one) from either SAP Process Integration ( Orchestration) or Cloud Integration. Ensure you select Use File Content as Example Values if you have the required data. If you do not have the data, you can skip to next step.

Provide a Name: MIG_UN_EDIFACT_DESADV_D96A ( in our case) and Direction : Both. Provide a Business Context as well.
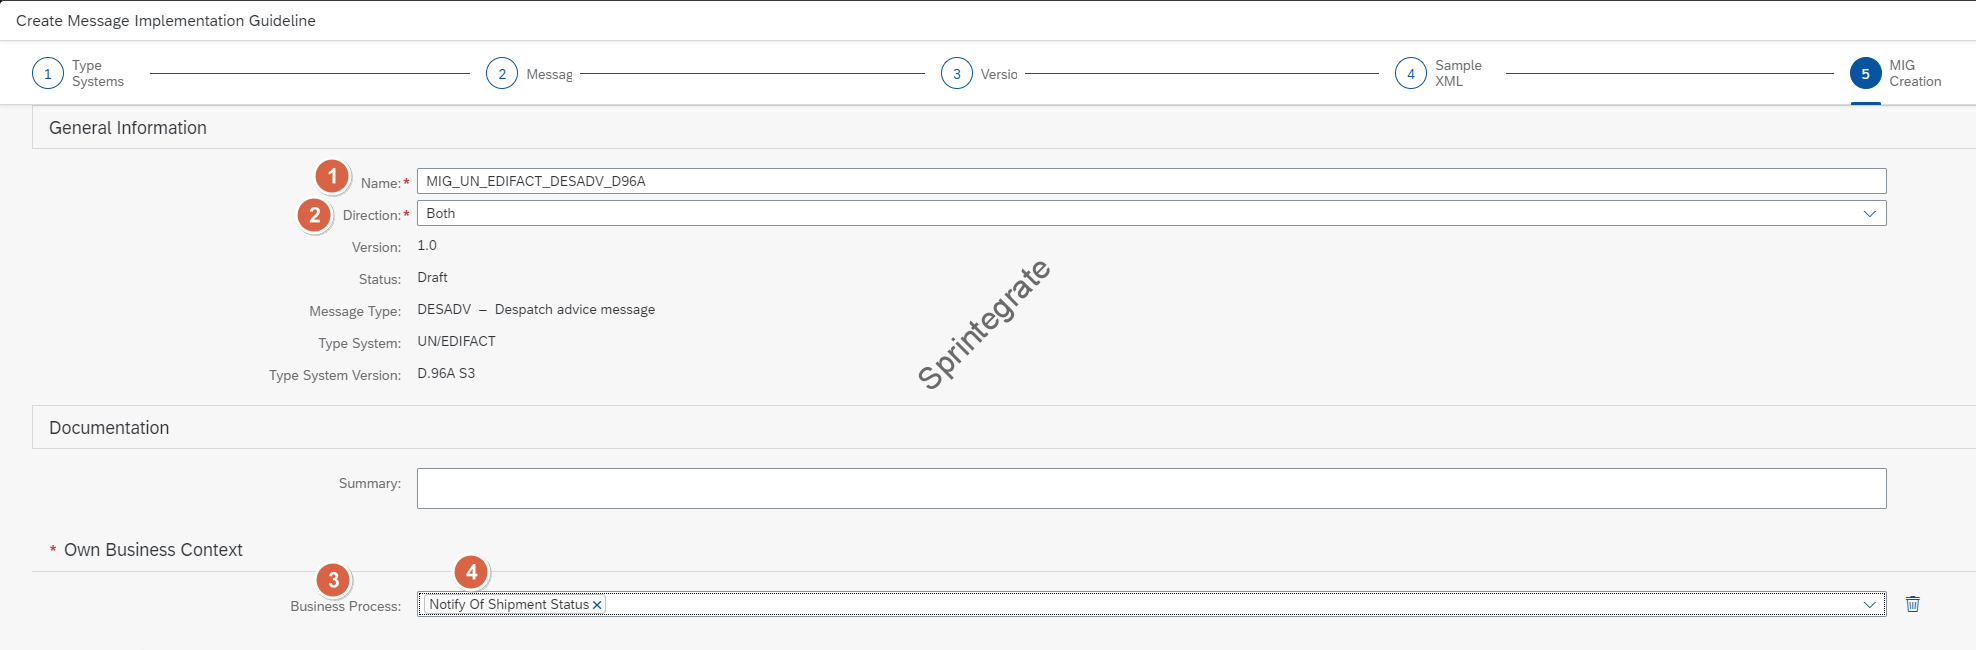
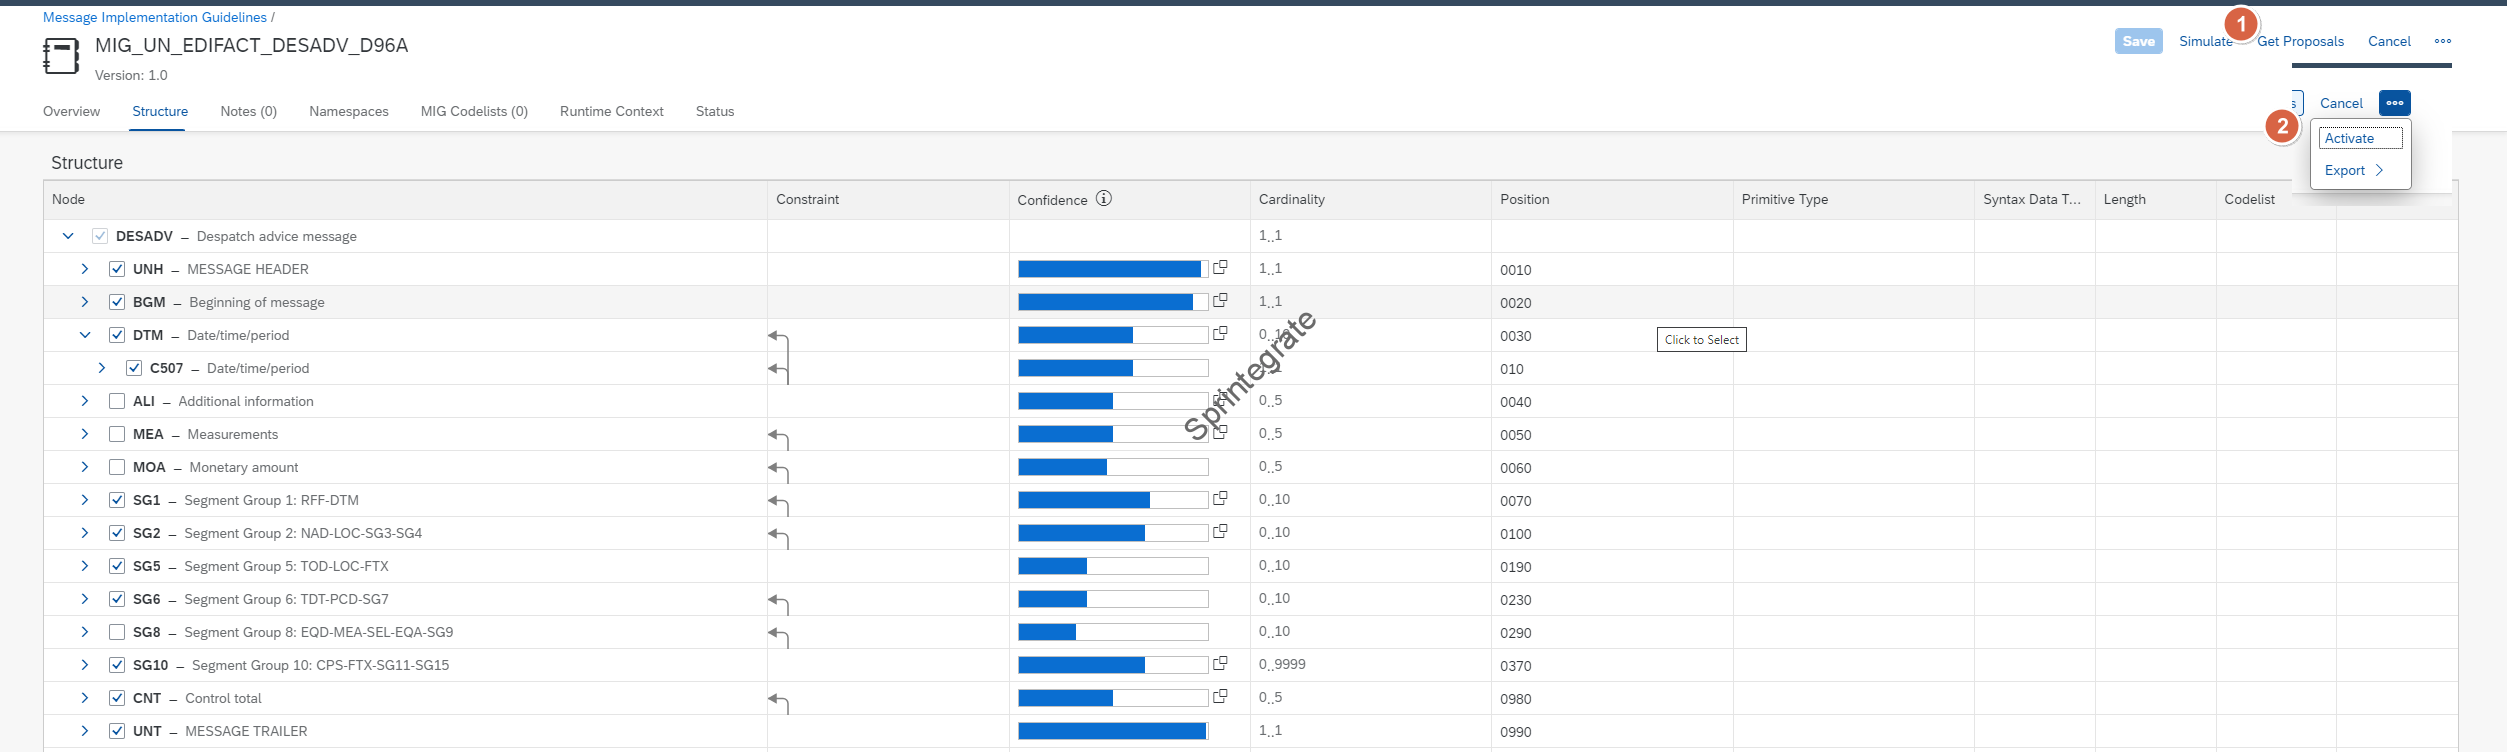
Cloud Integration has automatically created your MIG as per the XML you have provided. If you do not have the XML, you have 2 options
- Manually select the fields you have in scope of your EDI Implementation. Cumbersome and Painful. I have not found a SELECT ALL button. You finger will pain but you have no choice (atleast as far as I could see when I did this in Summer 2023)
- Use Get Proposals and hope you have all the fields auto sourced using your Classification Industry etc.
I always try the Get Proposals and see where I land first before I try to select all fields manually.
In Other words, click on Get Proposals and Activate
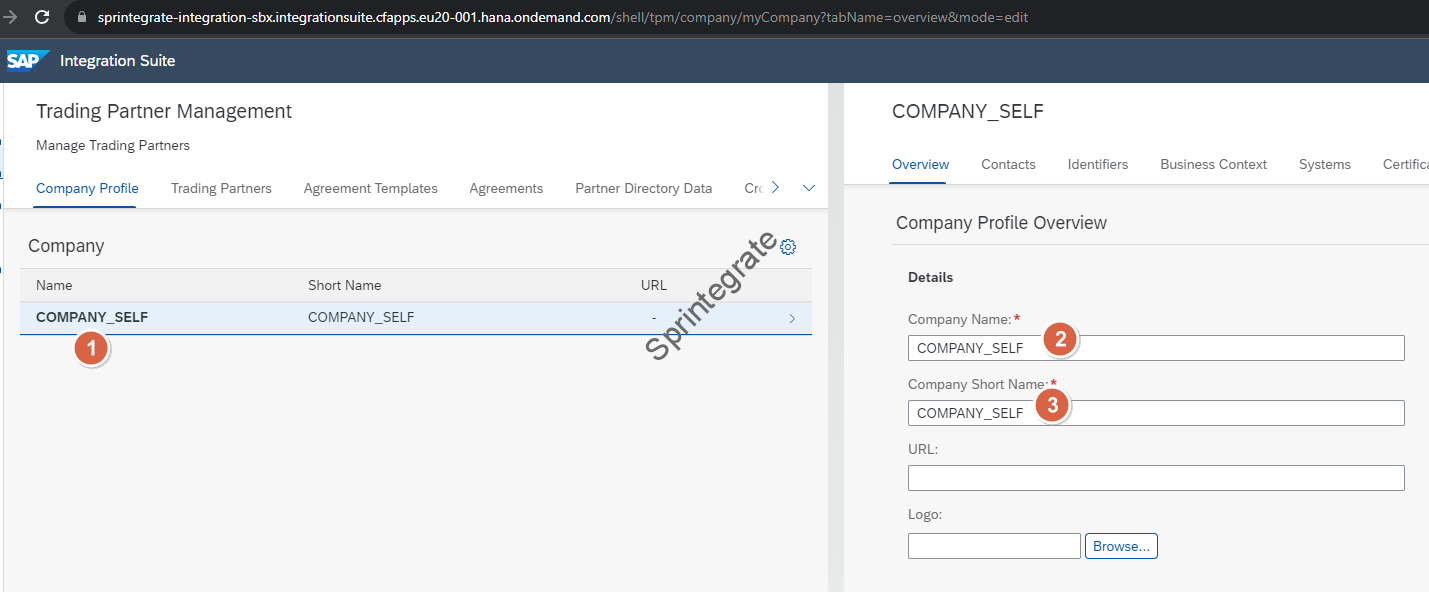
Define “Self” Company Profile in Trading Partner Management
Create Company Profile
Create a new Company for “CPI”. Note only 1 Company Profile can exist per tenant. In my case I have called the Company as COMPANY_SELF
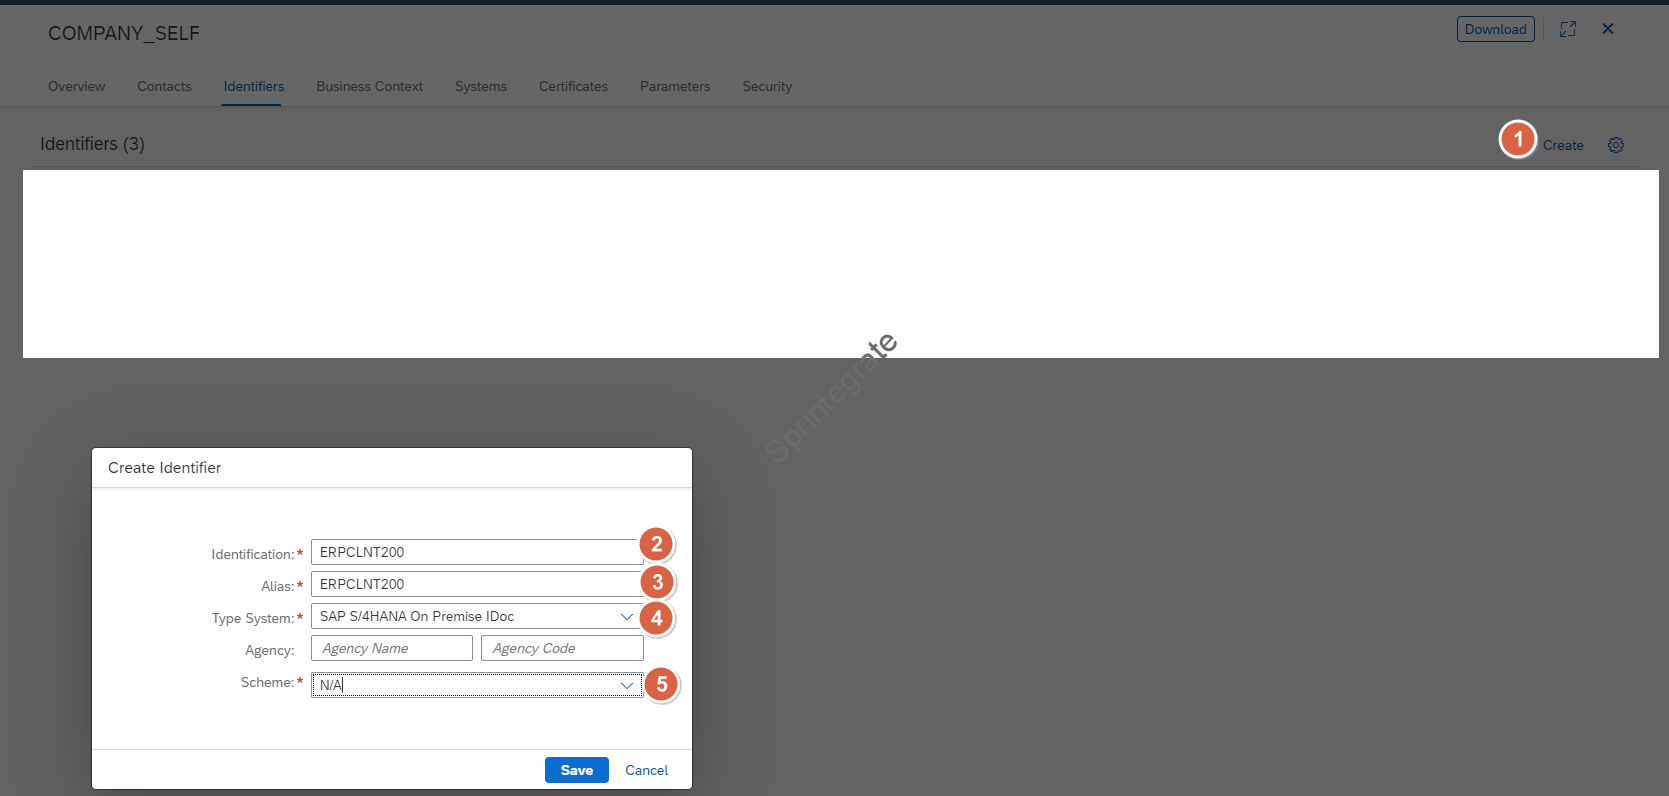
Create Identifiers ( for Self)
You can have as many Identifiers for your SELF Company as you want. As per the table in previous section, we will create 2 Identifiers for our SELF_COMPANY;
- One for ERP – ERPCLNT200 ( SNDPRN)
- Identification: ERPCLNT200
- Alias: ERPCLNT200
- Type System: SAP S/4HANA On Premise IDoc
- Scheme: N/A
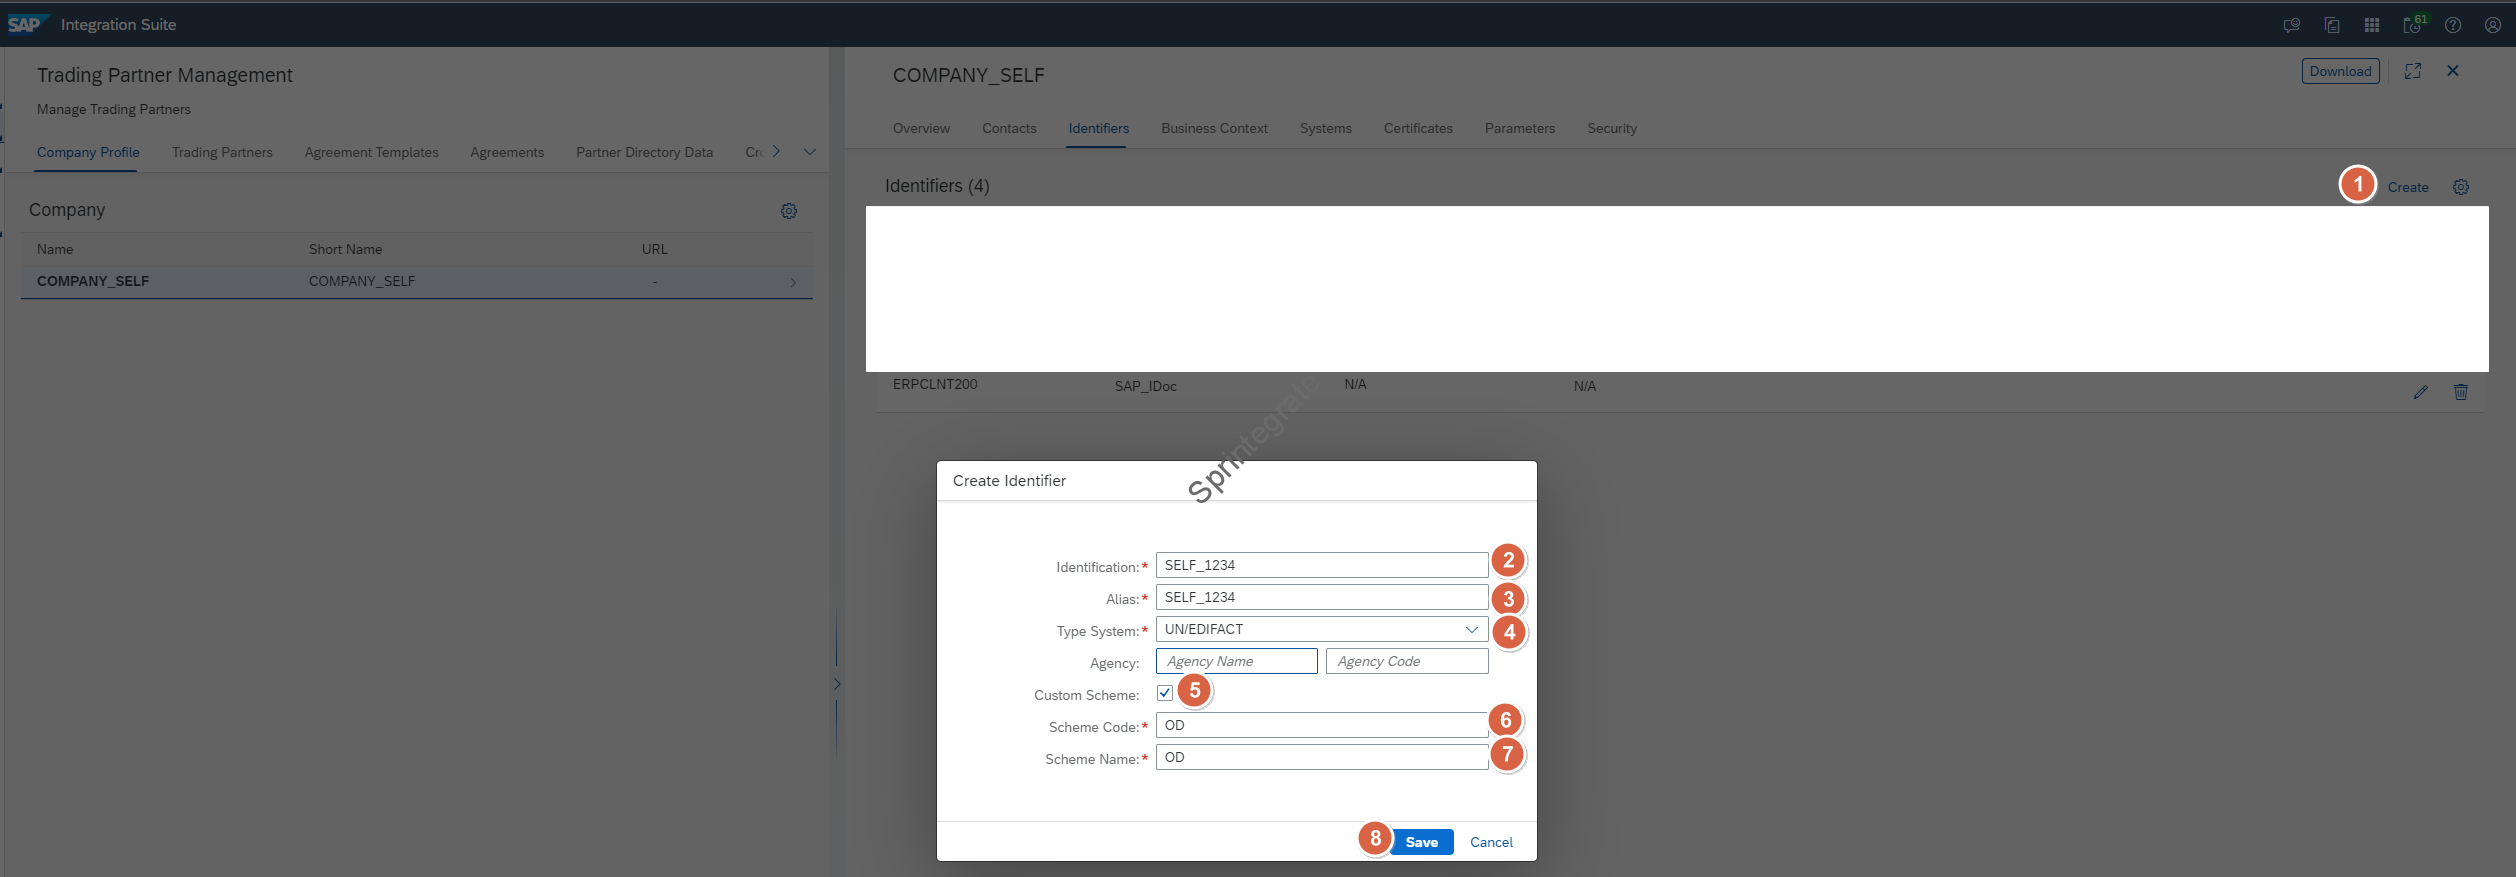
- One for EDI Identifier – SELF_1234
- Identification: SELF_1234
- Alias: SELF_1234
- Type System: UN/EDIFACT
- Custom Scheme
- In my EDI Scenario, I need the EDI Message with a Custom Qualifier OD and hence I am creating a Custom Scheme here.
- If you want you can also use Standard Schemes if that is what you need.
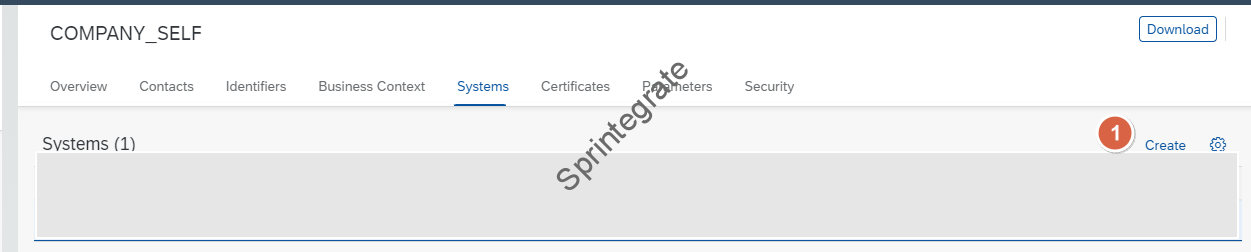
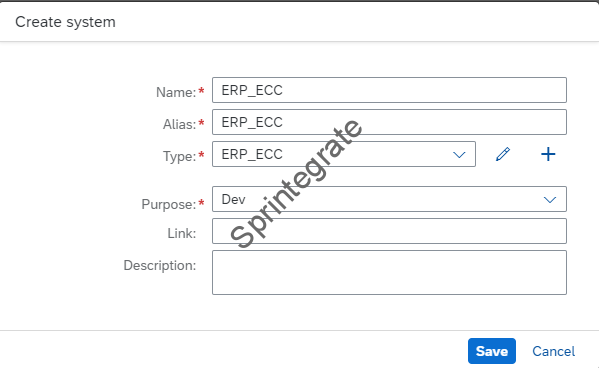
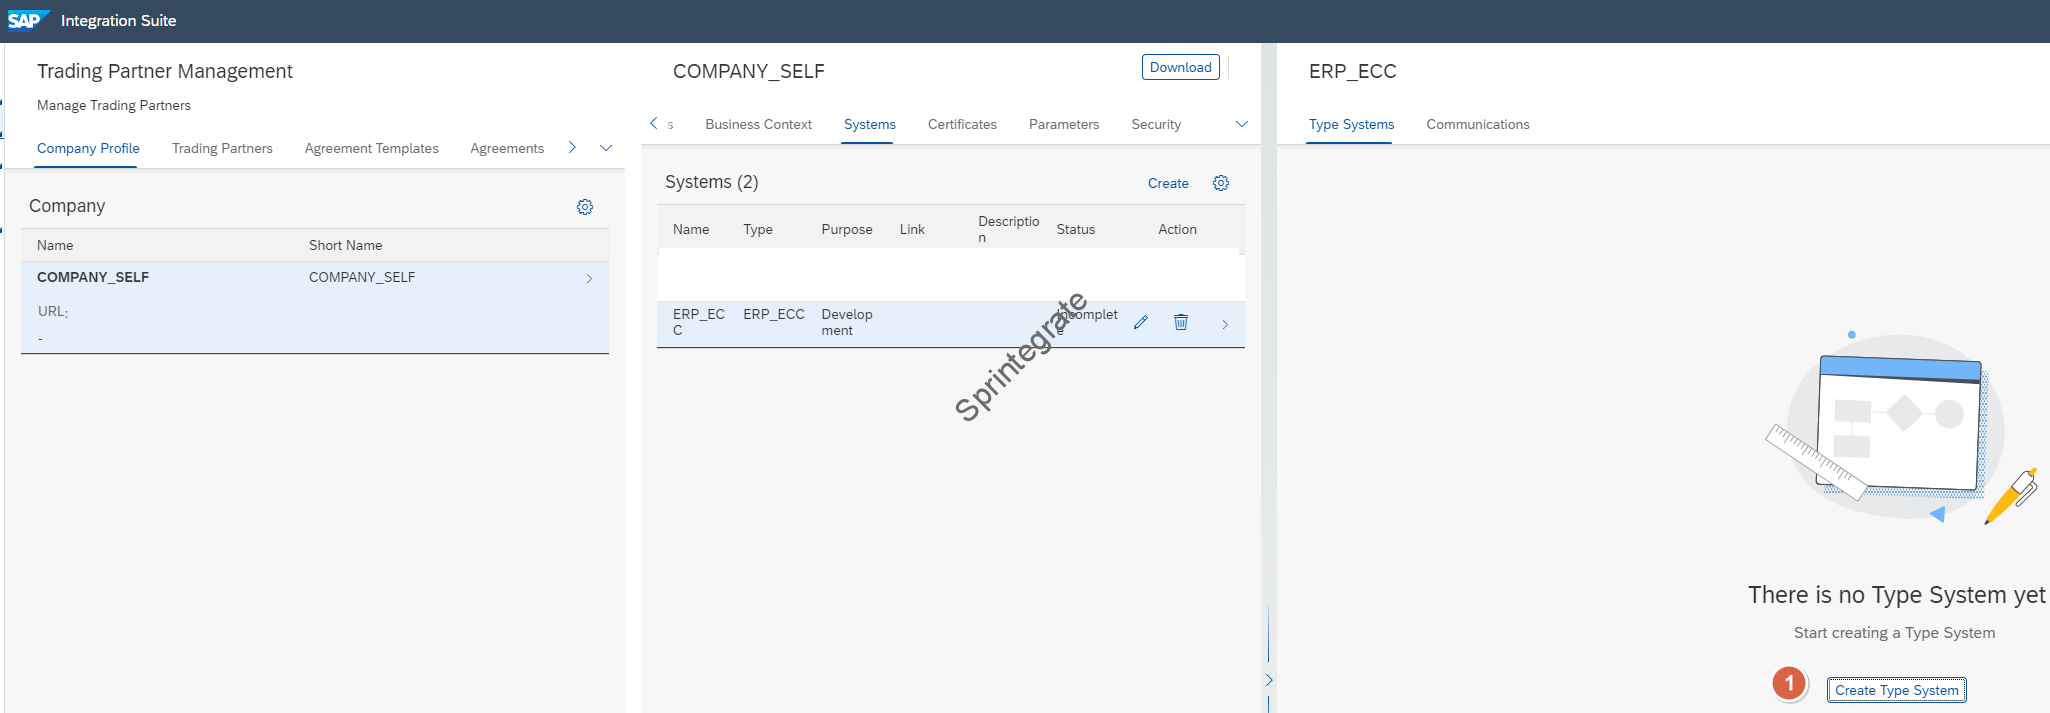
Create Systems ( for Self)
Go to the Systems Tab, and Create a System
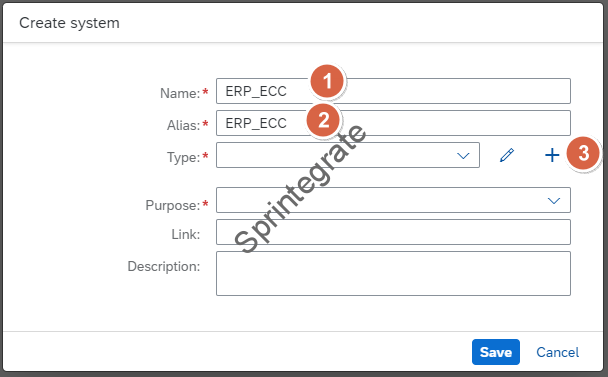
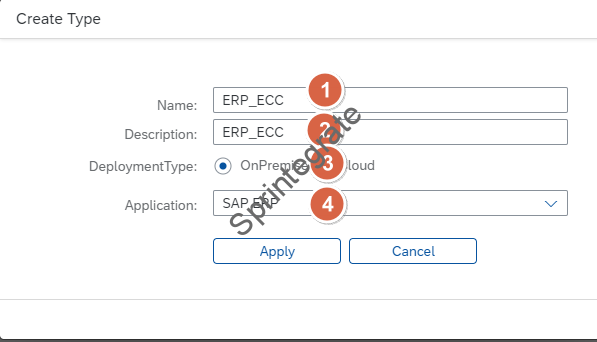
The System you create here can have any values you want. The Type System can also be of any value. These are just display values that you will then see the B2B Monitoring. In this case I have called it ERP_ECC and so on but it can be any name. In other words, these have no technical meaning except display and organizational context.
- Name: ERP_ECC
- Alias: ERP_ECC
- Type: Create New in this case
- Name: ECC
- Description: ECC
- Deployment Type: OnPremise
- Application: SAP ERP
- Purpose: Dev
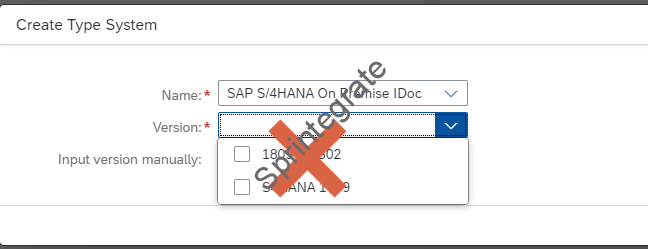
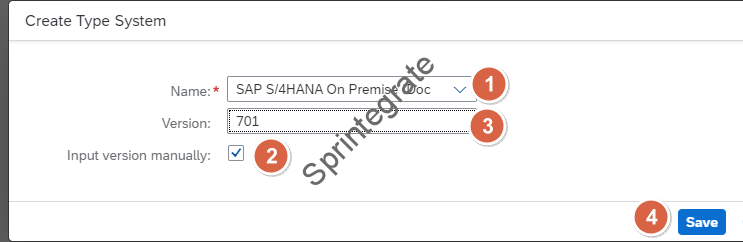
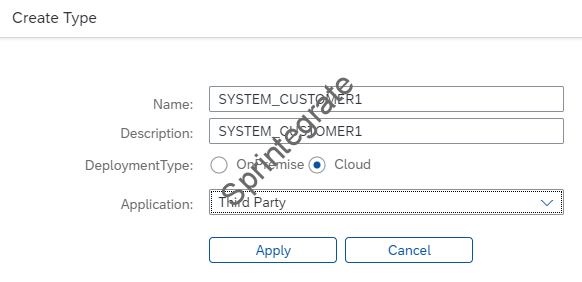
Create Type Systems ( for Self)
Create a Type System of type SAP S/4HANA On Premise IDoc
- Name: SAP S/4HANA On Premise IDoc
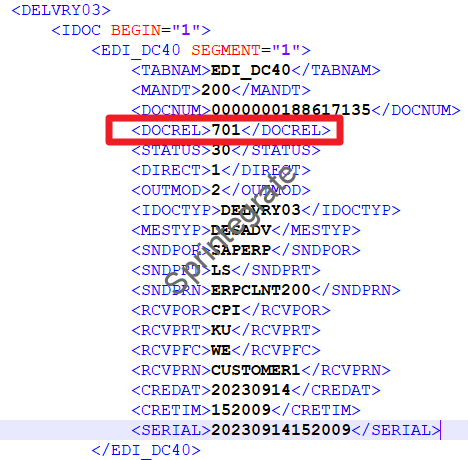
- Version: If you are on S/4Hana Select your Version BUT if you are unsure then enter the version Manually. Please note that the Version here should match the DOCREL In your EDI Control Record (EDI_DC40) in your IDoc
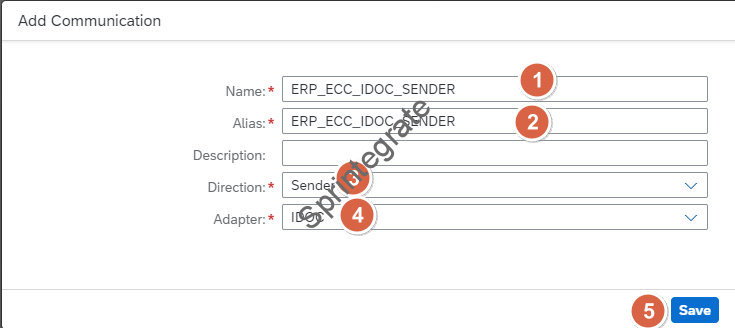
Create Communications
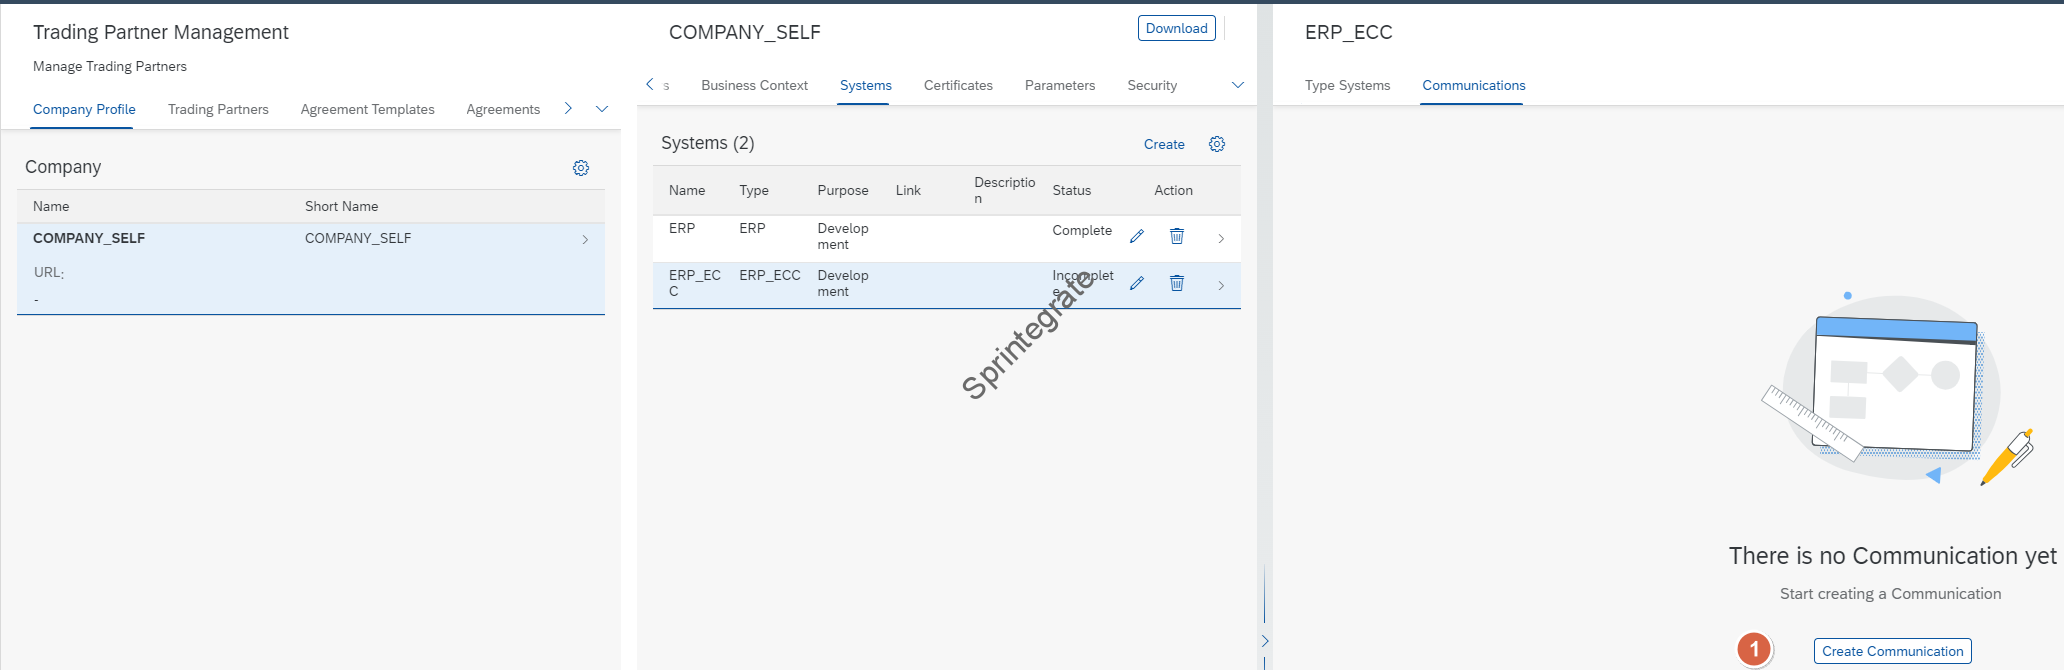
Create a Communication ( This is like a Communication Channel). As ERP sends a IDoc to CPI, we set the below details
- Name: ERP_ECC_IDOC_SENDER
- Alias: ERP_ECC_IDOC_SENDER
- Direction: Sender
- Adapter: IDOC
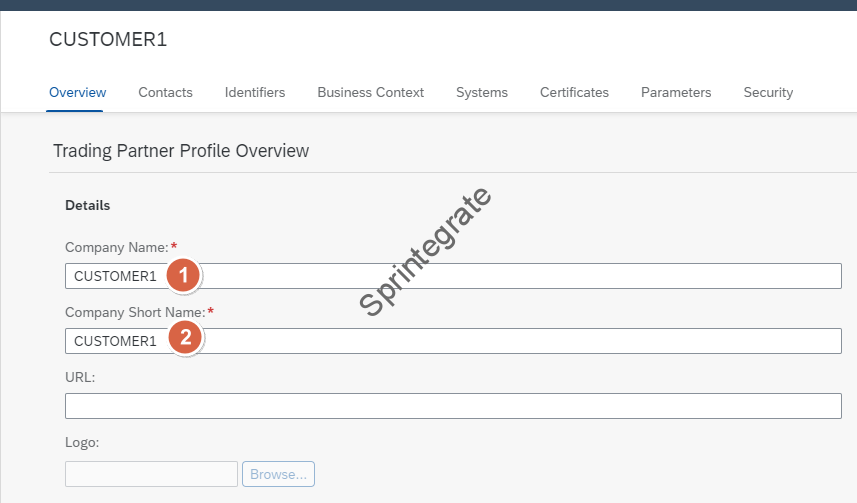
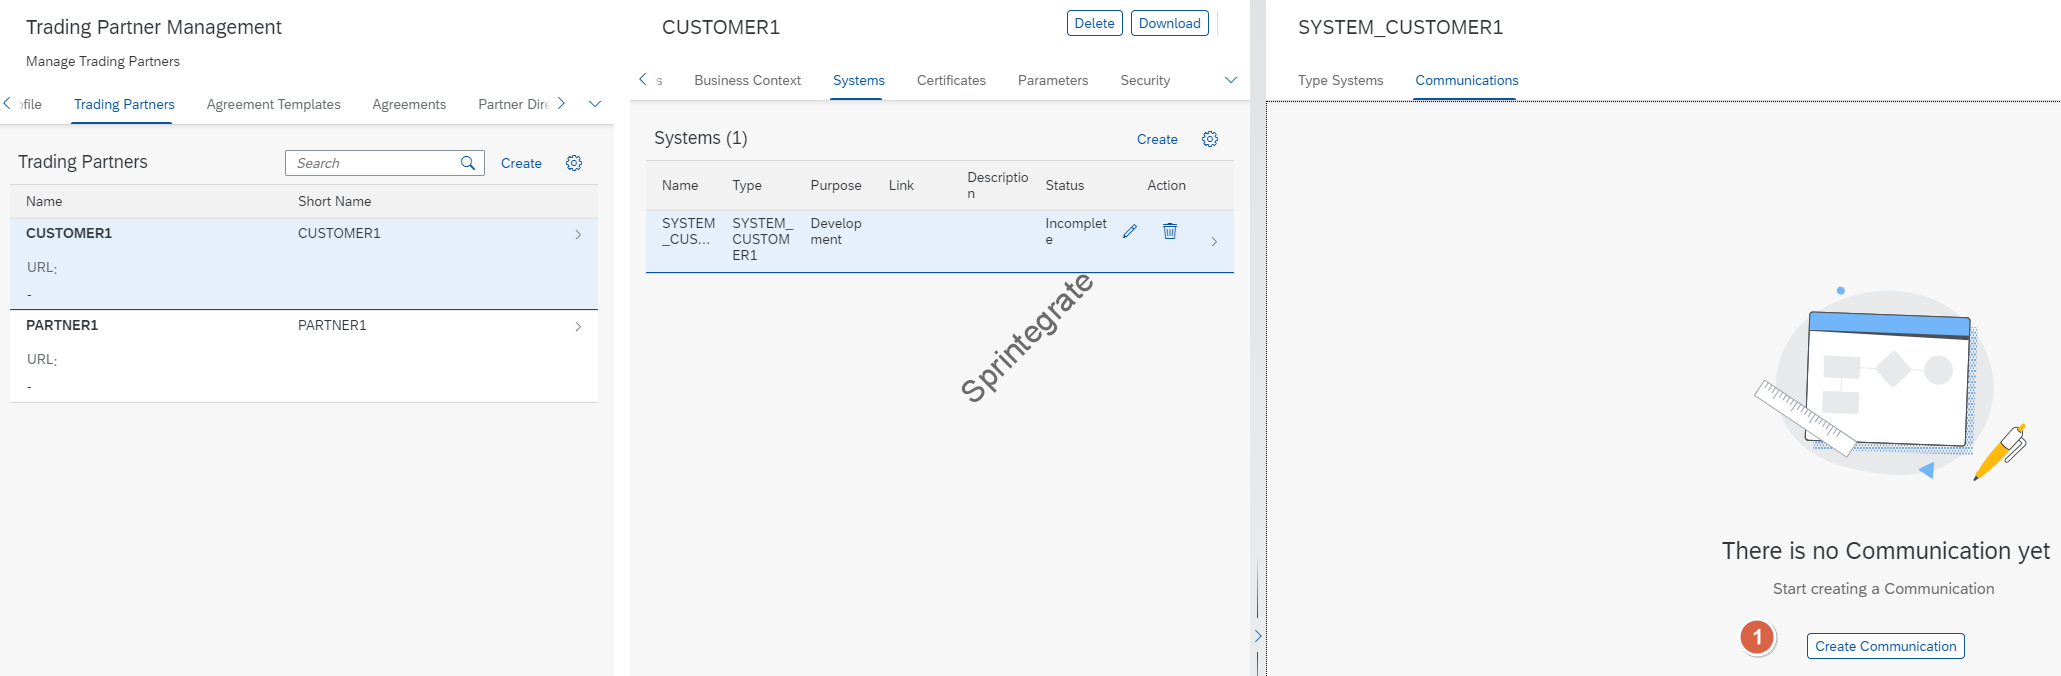
Define Trading Partner in Trading Partner Management
Create Trading Partners
Go to your Trading Partner Management ( B2B Scenarios) and Trading Partners Tab. Click on Create
- Company Name: CUSTOMER1
- Company Short Name: CUSTOMER1
Create Identifiers ( for Trading Partner)
You can have as many Identifiers for your your Trading Partner CUSTOMER1 as you want. As per the table in previous section, we will create 2 Identifiers for our CUSTOMER1;
- One for ERP – CUSTOMER1( RCVPRN)
- Identification: CUSTOMER1
- Alias: CUSTOMER1
- Type System: SAP S/4HANA On Premise IDoc
- Scheme: N/A
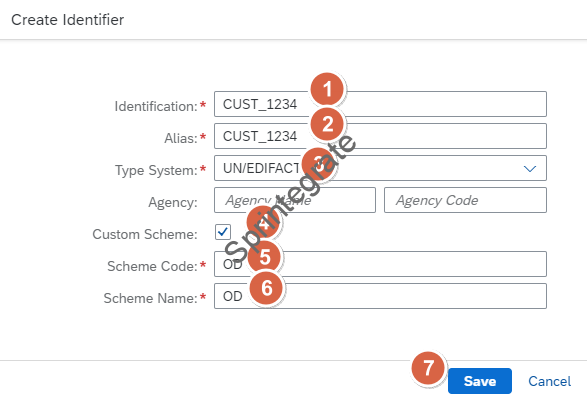
- One for EDI Identifier – CUST_1234
- Identification: CUST_1234
- Alias: CUST_1234
- Type System: UN/EDIFACT
- Custom Scheme
- In my EDI Scenario, I need the EDI Message with a Custom Qualifier OD and hence I am creating a Custom Scheme here.
- If you want you can also use Standard Schemes if that is what you need.

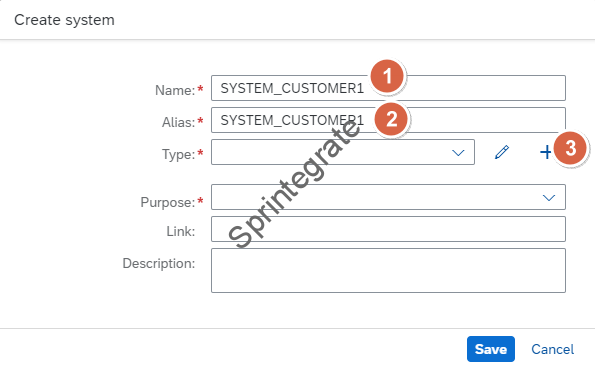
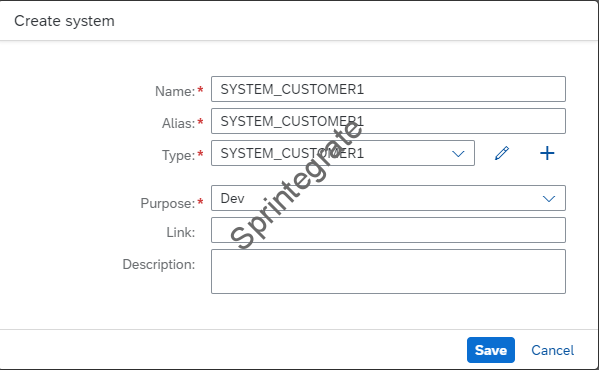
Create System ( for Trading Partner)
Create a System for Trading Partner – CUSTOMER1. As we created for ERP, this System is just a arbitrary value and you can use anything that you like. The details of these re similar to the ERP so I am not explaining them here.
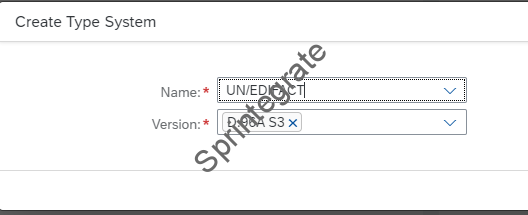
Create Type System ( for Trading Partner)
Create a Type System for the Trading Partner with the Below details
- Name: UN/EDIFACT
- Type: D.96A.S3 ( As we will deliver a EDIFACT DESADV of Type D96A)
Create Communications ( for Trading Partner)
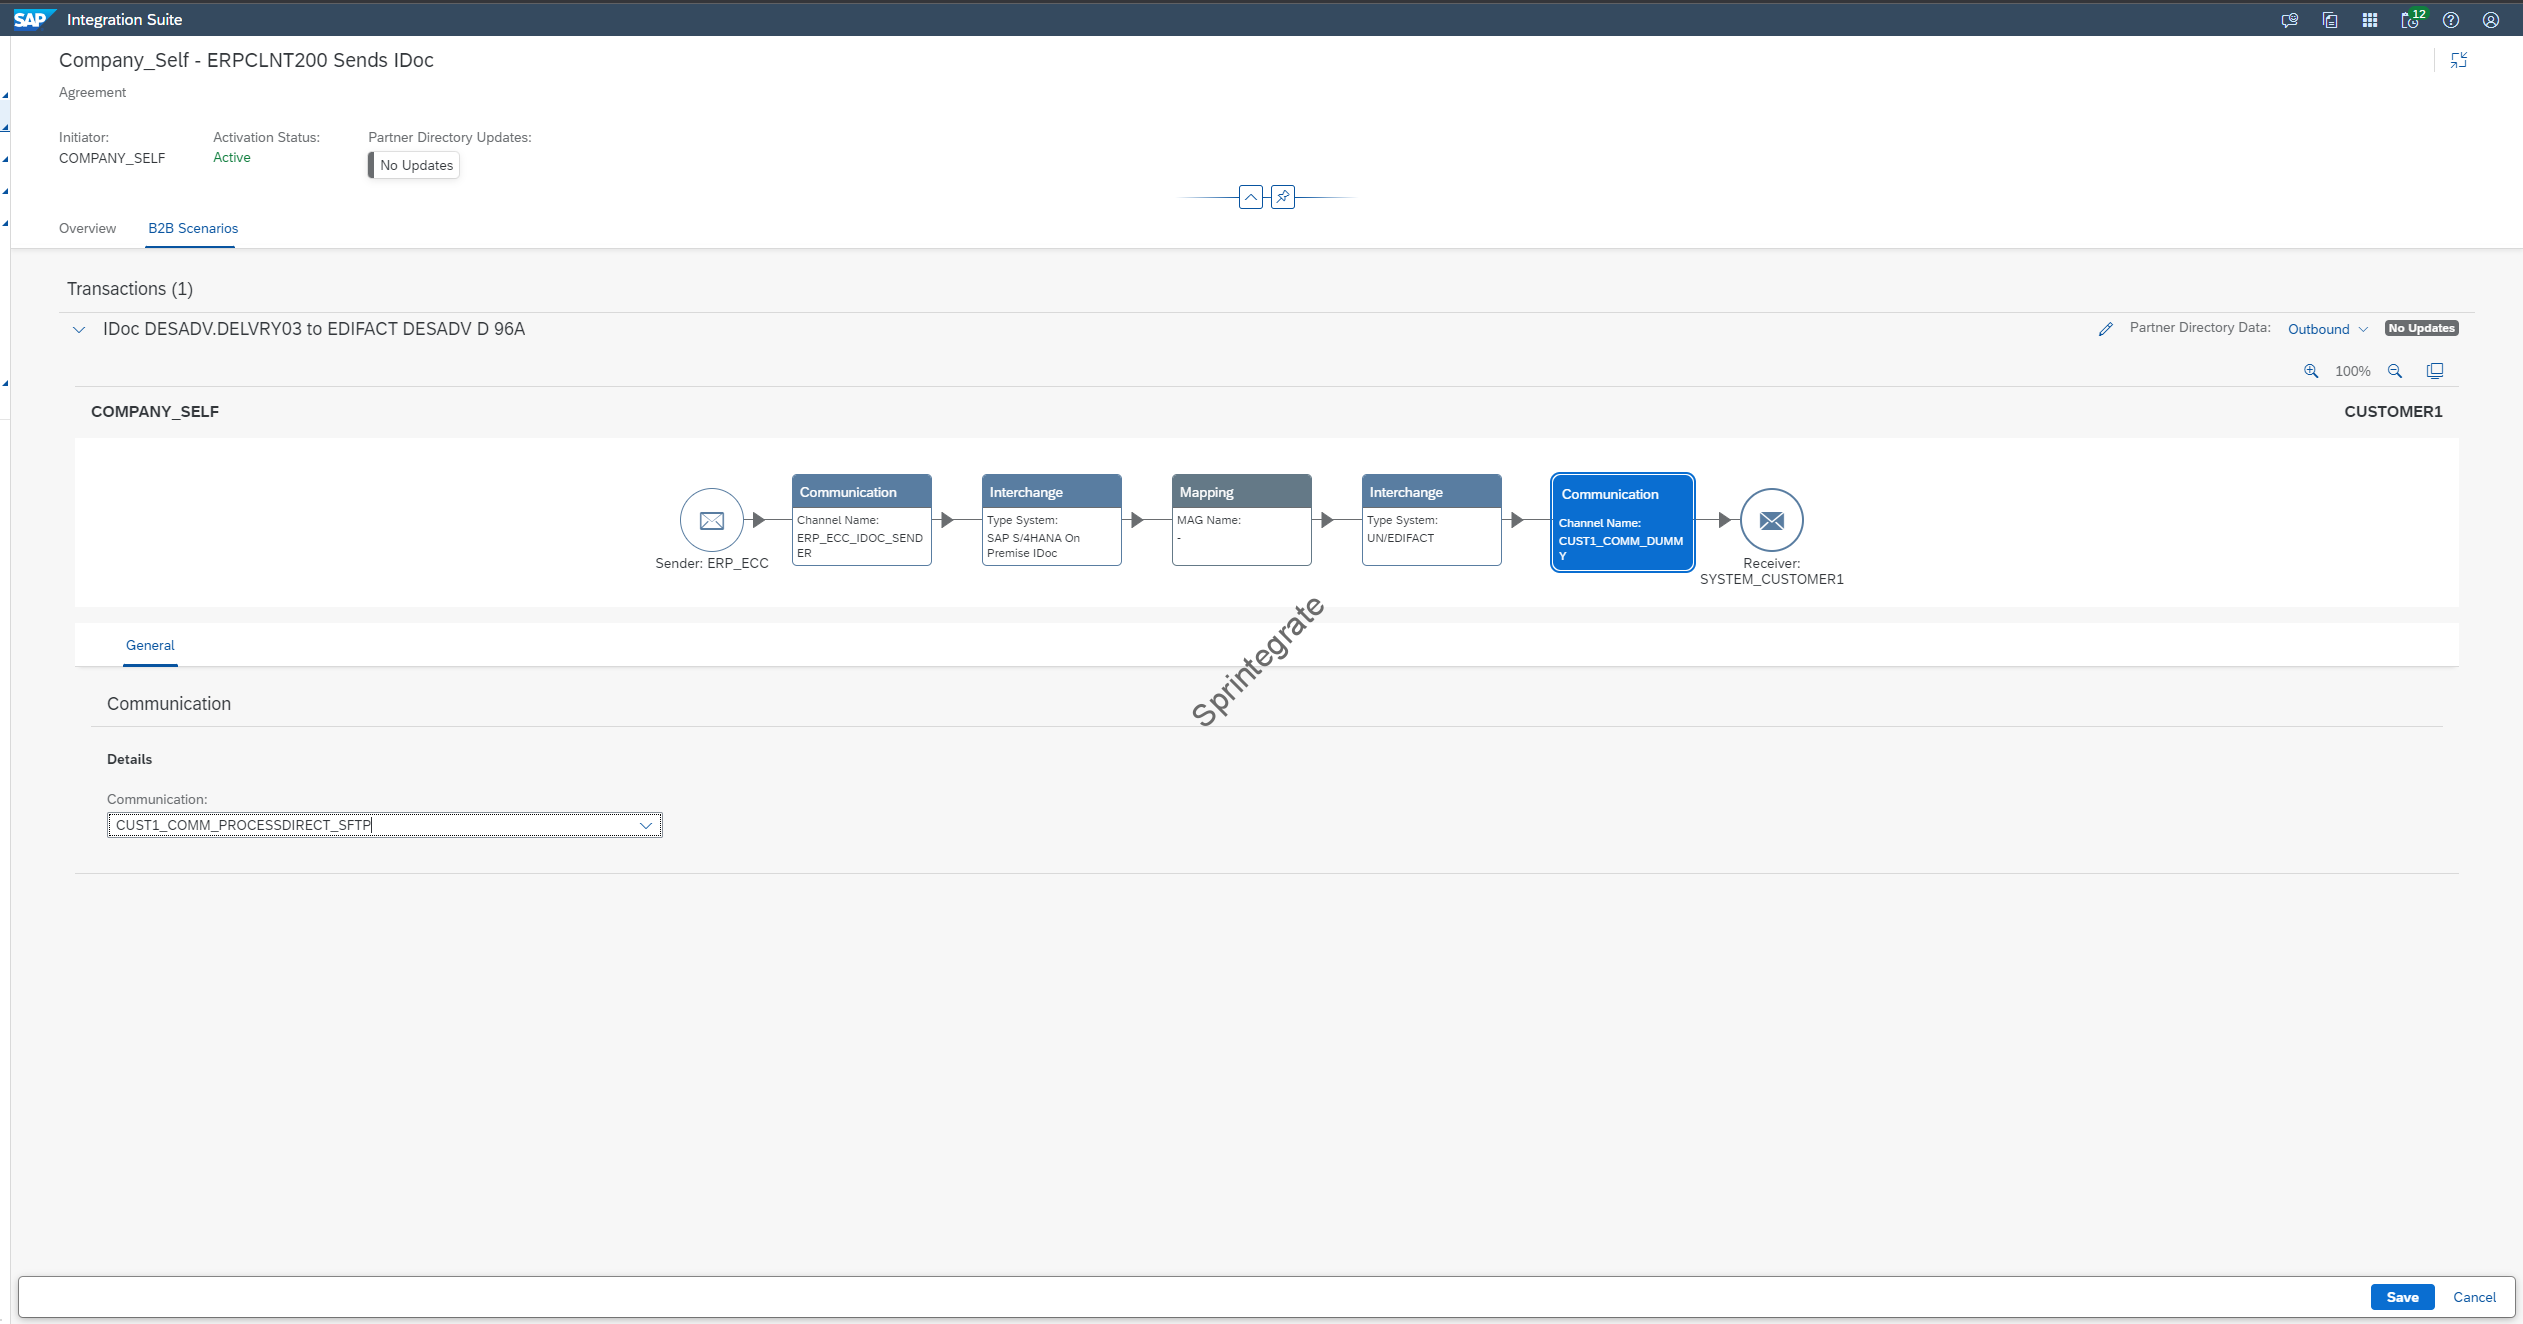
As we had mentioned in our requirement, we would like to deliver the EDI Message over SFTP / FTP to our Trading Partner. At this moment Trading Partner Management on the Receiver Side only Supports AS2, IDoc,SAP RM and SOAP 1.x Adapters. So e will create a “Dummy” channel with a “Dummy” endpoint. In Nov 2023, SAP released the support to use ProcessDirect as a Receiver and Sender Adapter for Trading Partners. We will hence use a ProcessDirect Adapter now to handle our SFTP Based Routing.

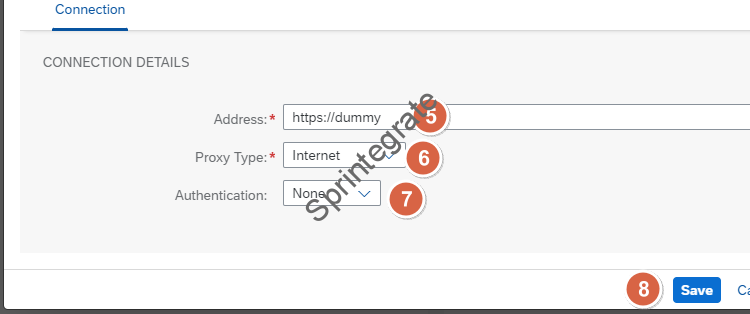

Updated in Nov 2023 to use Process Direct Adapter

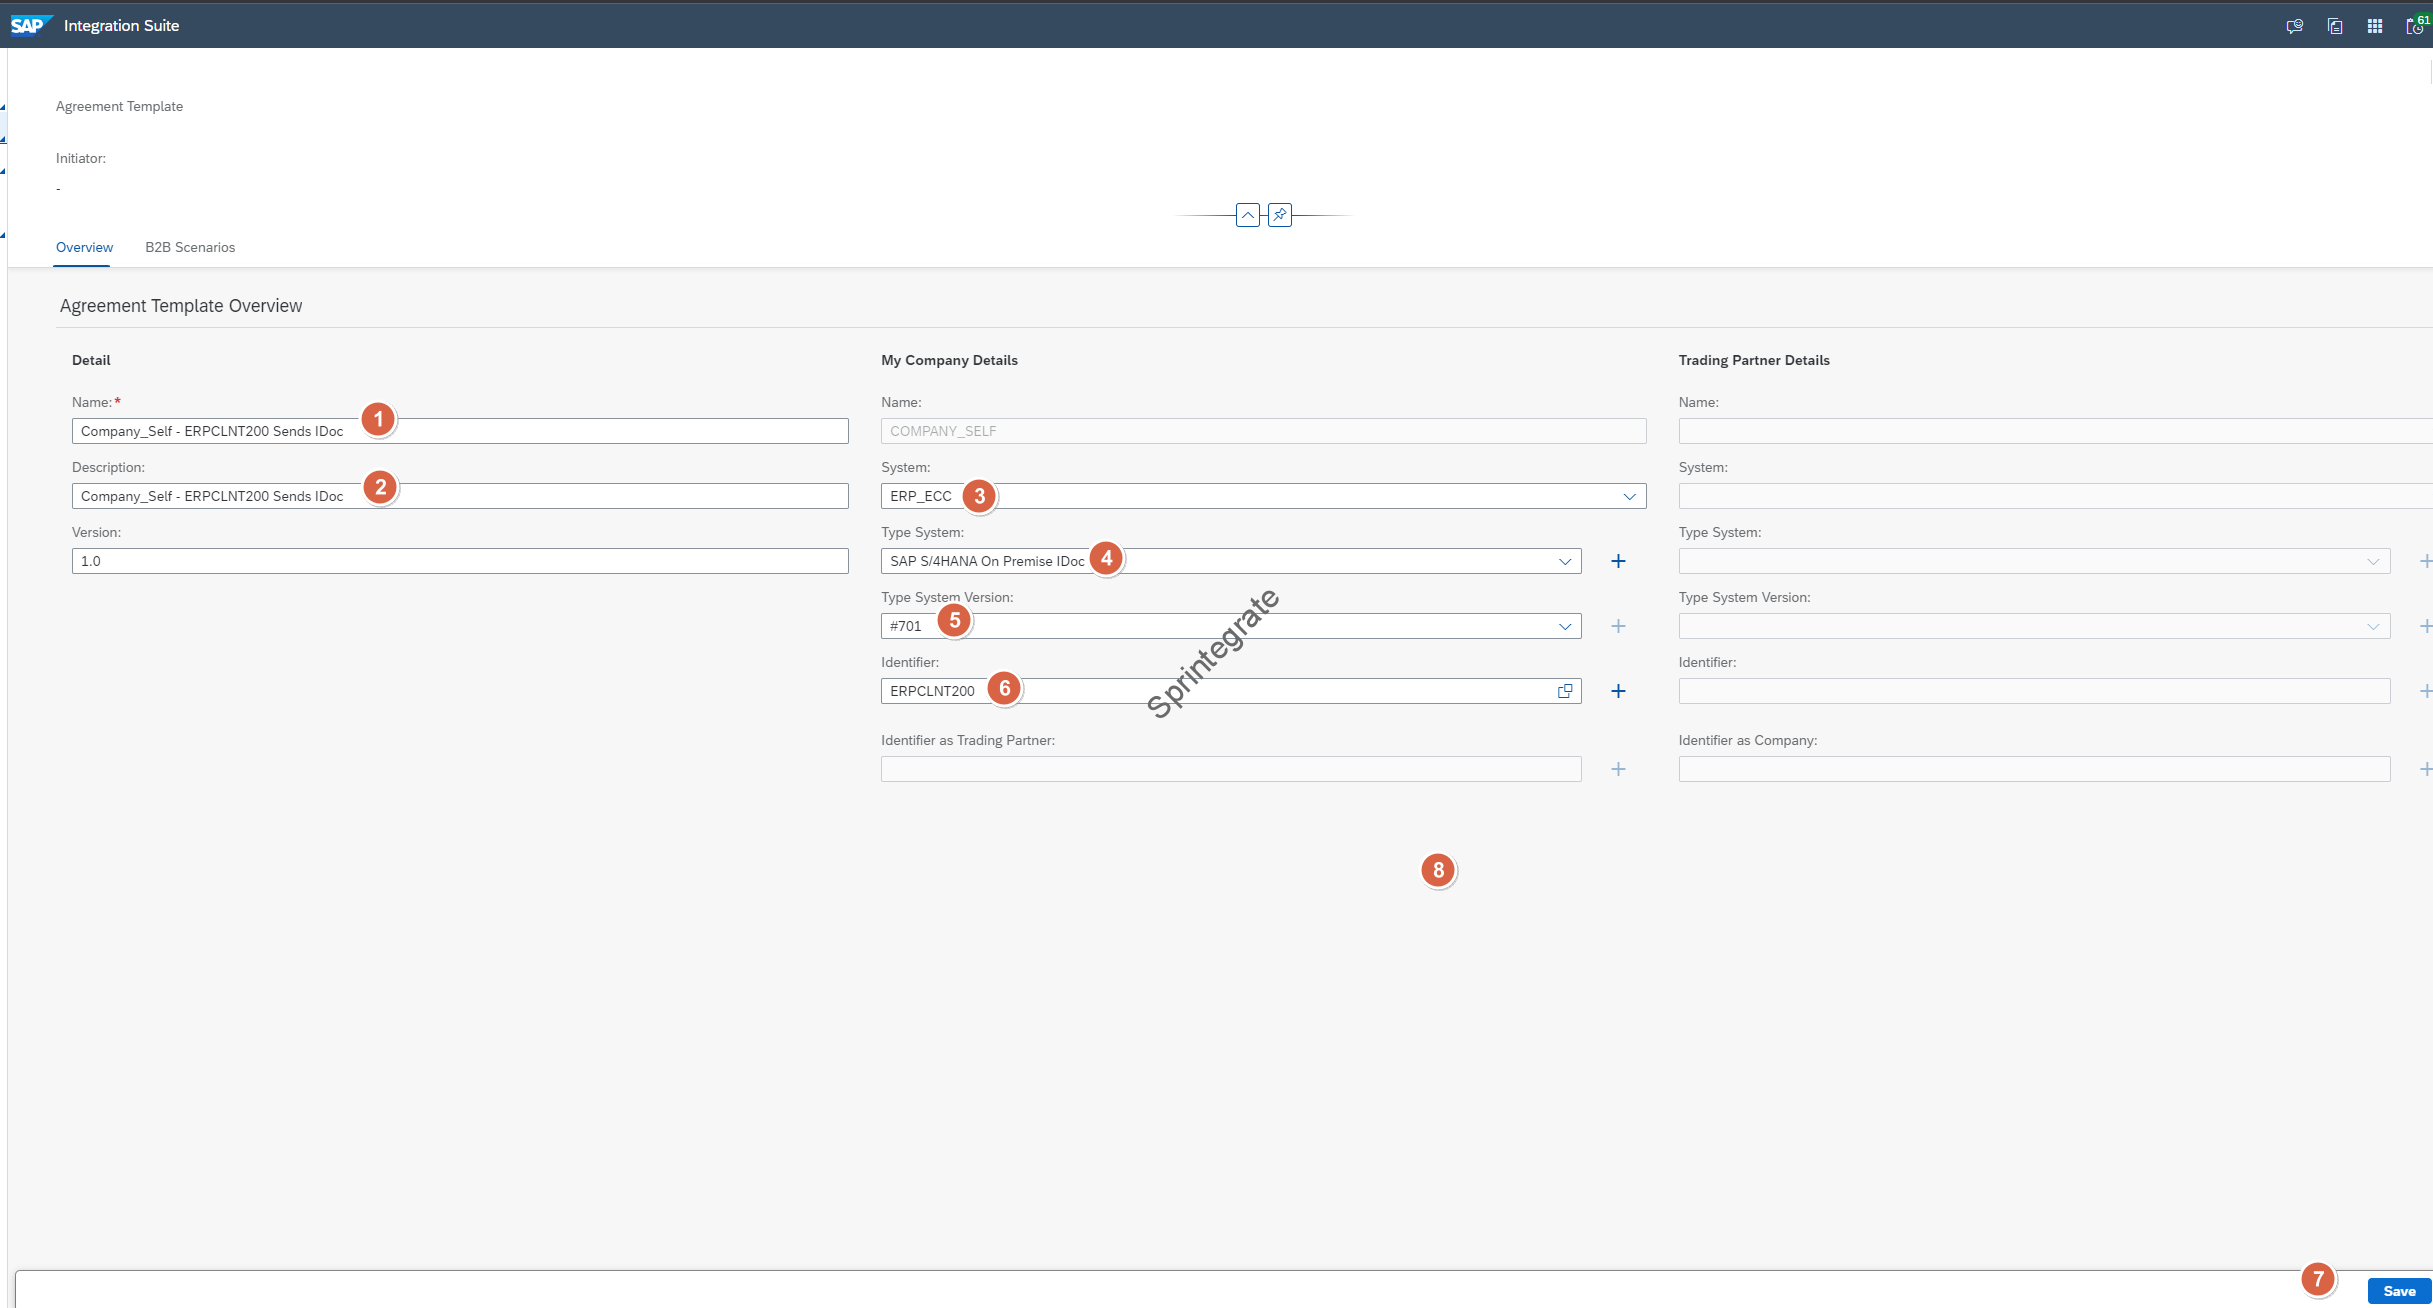
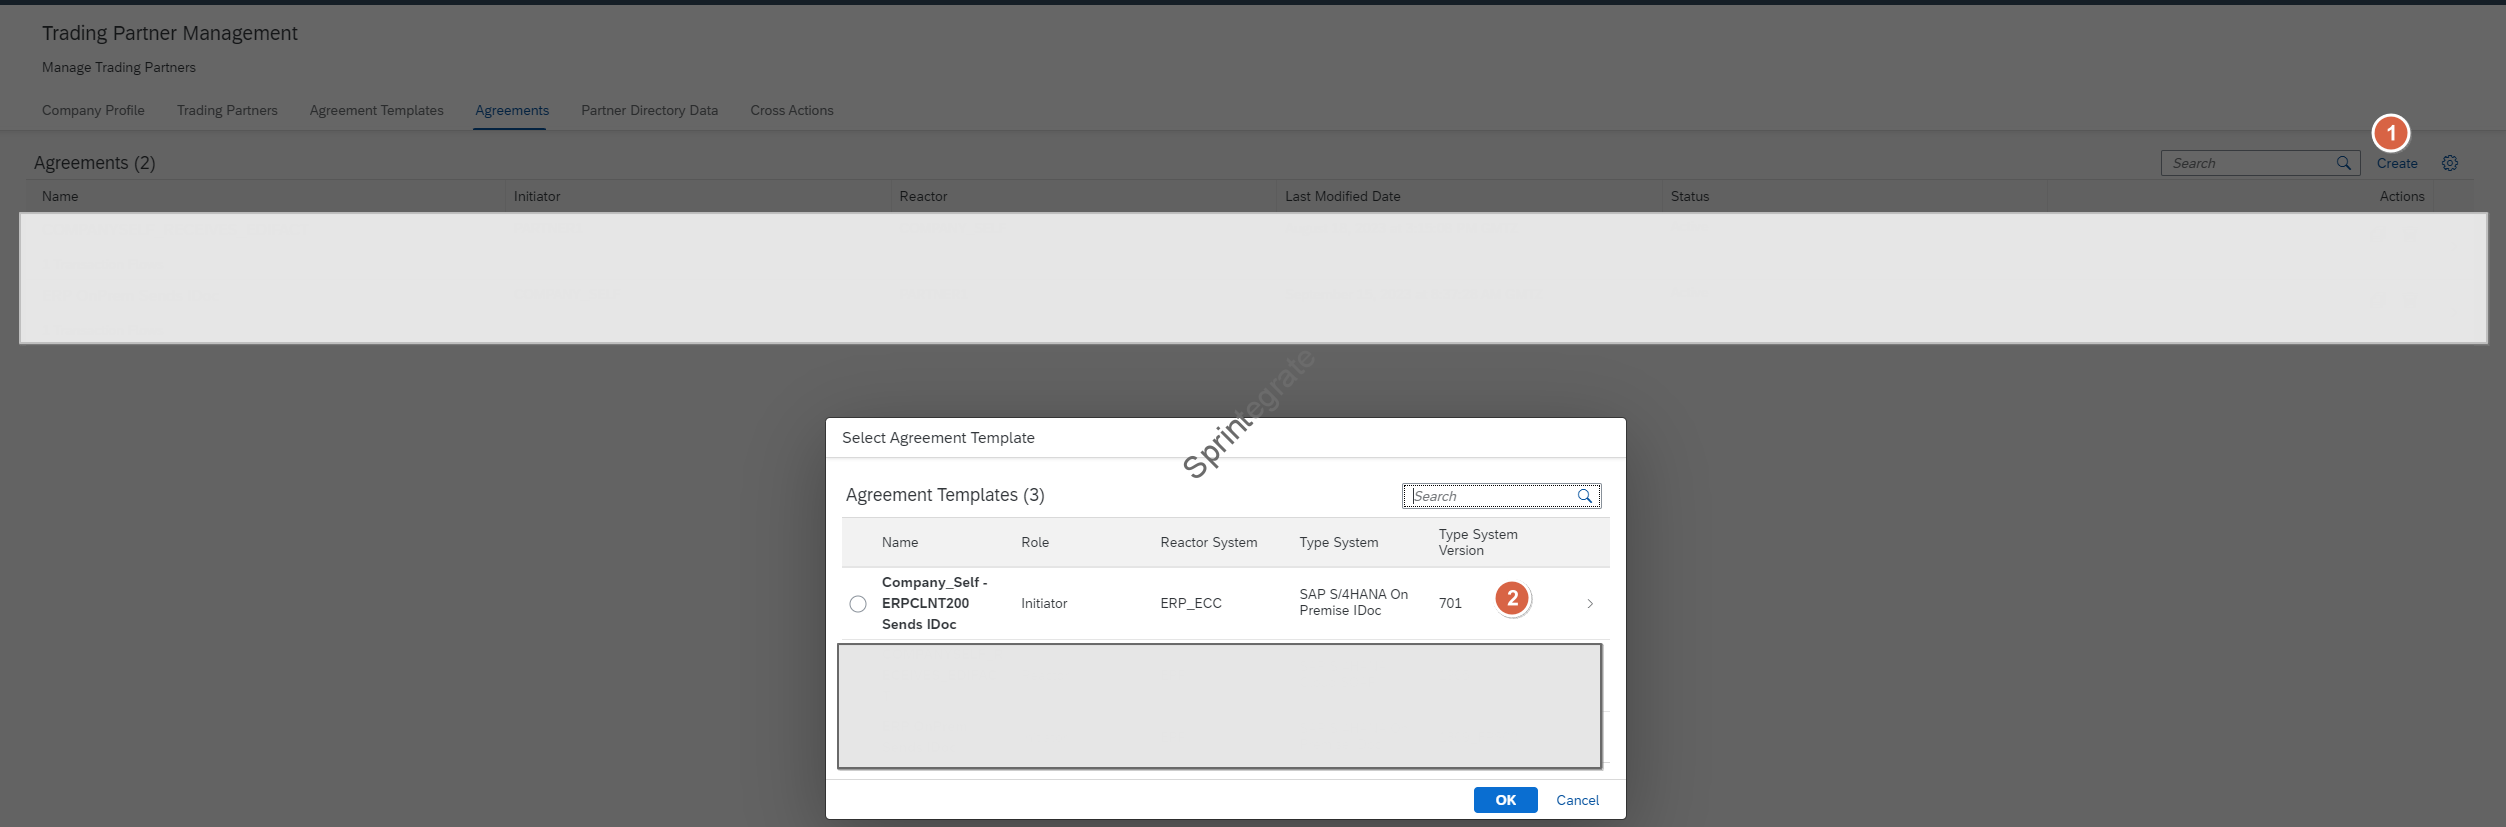
Define Agreement Templates
The Next step is to define a Agreement Template. The Agreement Template is as the name implies a Template that is then used to actually define our Trading Partner Agreement.
- Name: ERPCLNT200 Sends IDoc
- Description: ERPCLNT200 Sends IDoc
- Use the Selection Help to Select the “My Company Details” as you have defined in previous section
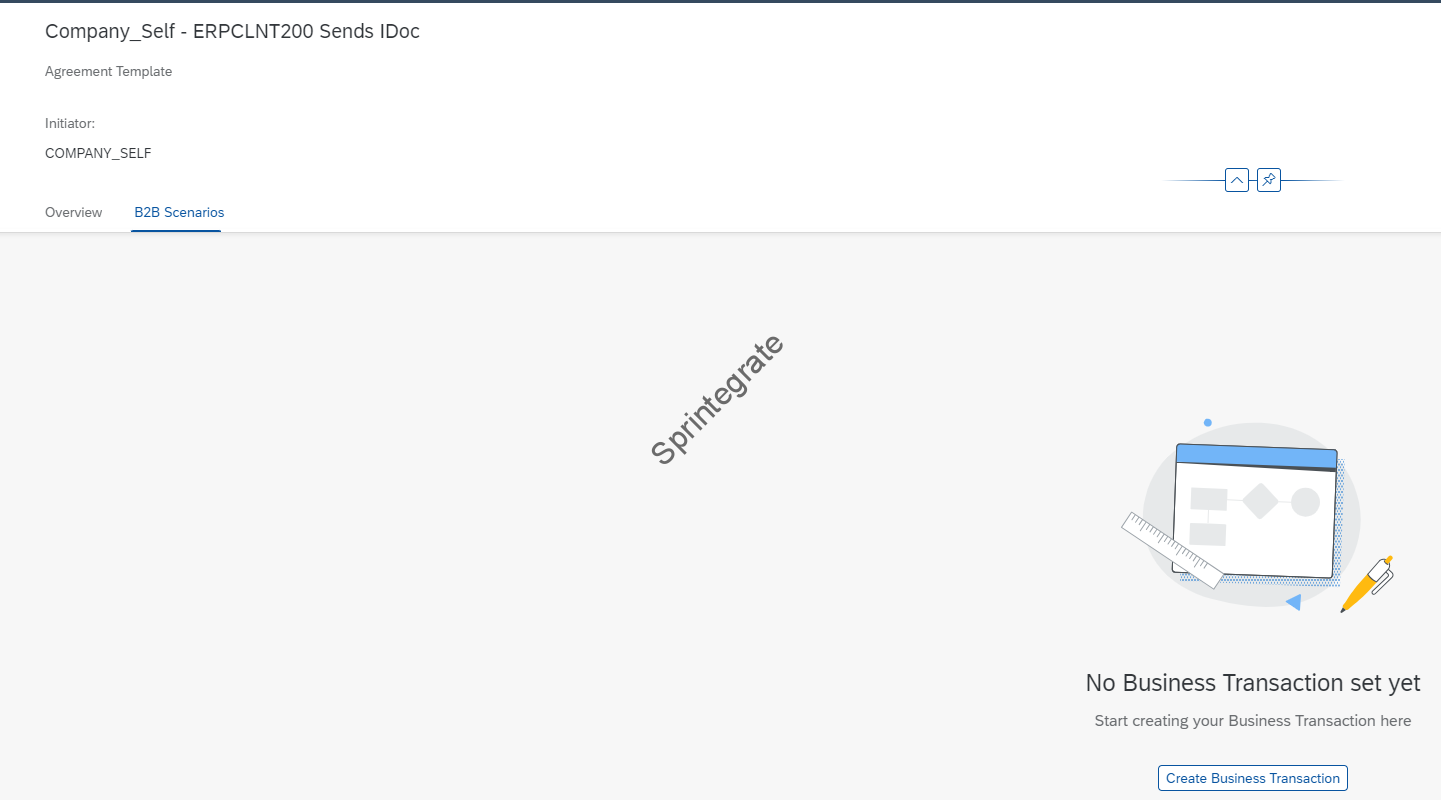
Create B2B Scenarios ( for Agreement Template)
- Name: IDoc DESADV.DELVRY03 to EDIFACT DESADV D 96A
- Business Transaction Pattern : One Way Notification
- My Company Role: Initiator
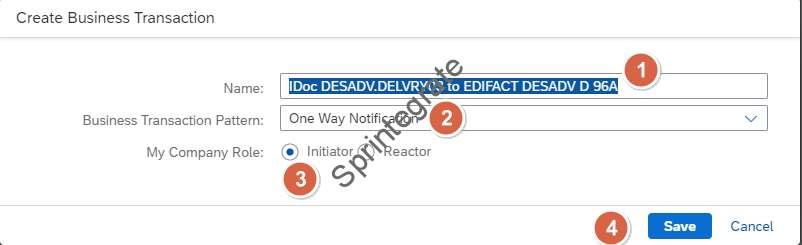
Select the required details as per screenshot below
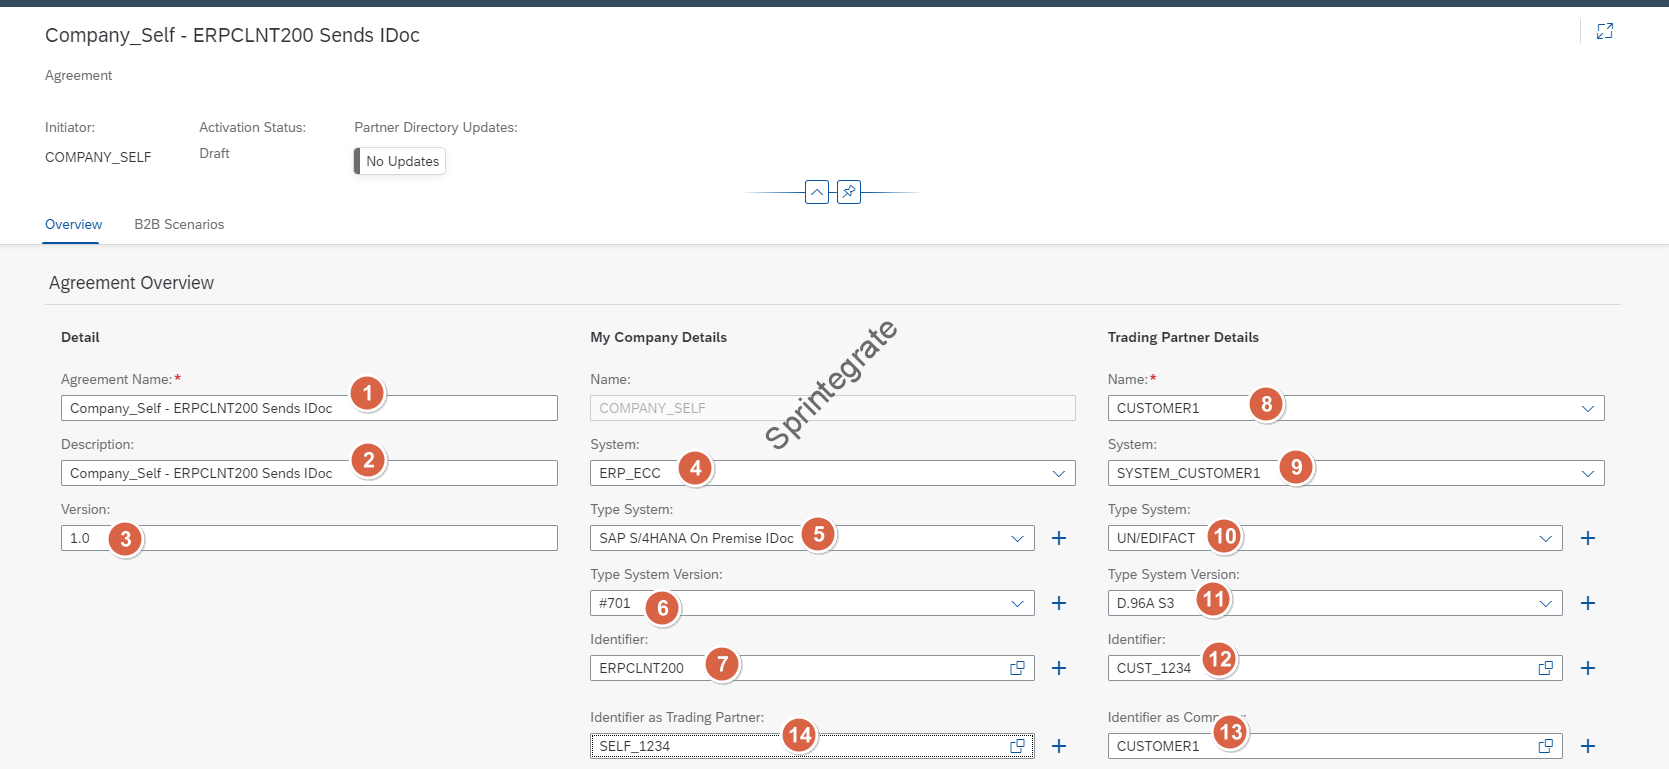
Define Agreements
Create a Agreement With below Details
- Agreement Name: Company_Self – ERPCLNT200 Sends IDoc
- Description: Company_Self – ERPCLNT200 Sends IDoc
- Select other details as per screenshot.
- Note: When you select the details, Identifier as Trading Partner for “My Company Details” can only be selected after Trading Partner Details are entered. See the order in the screenshot.
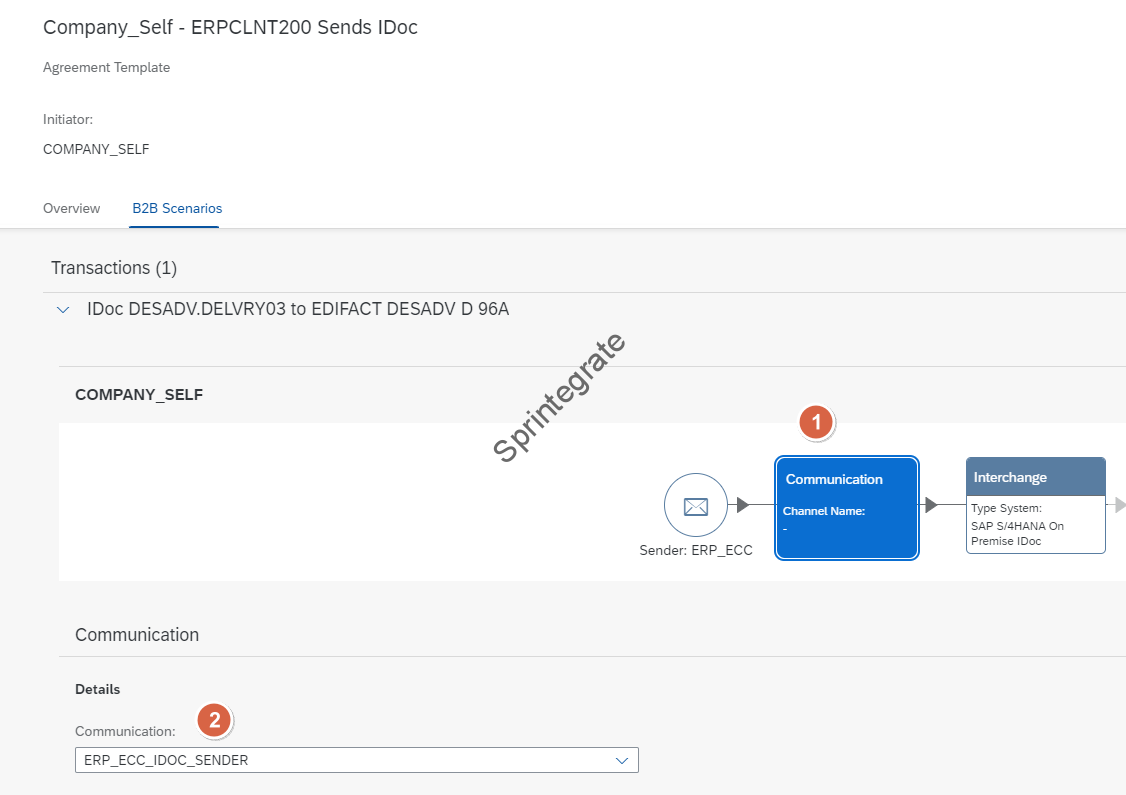
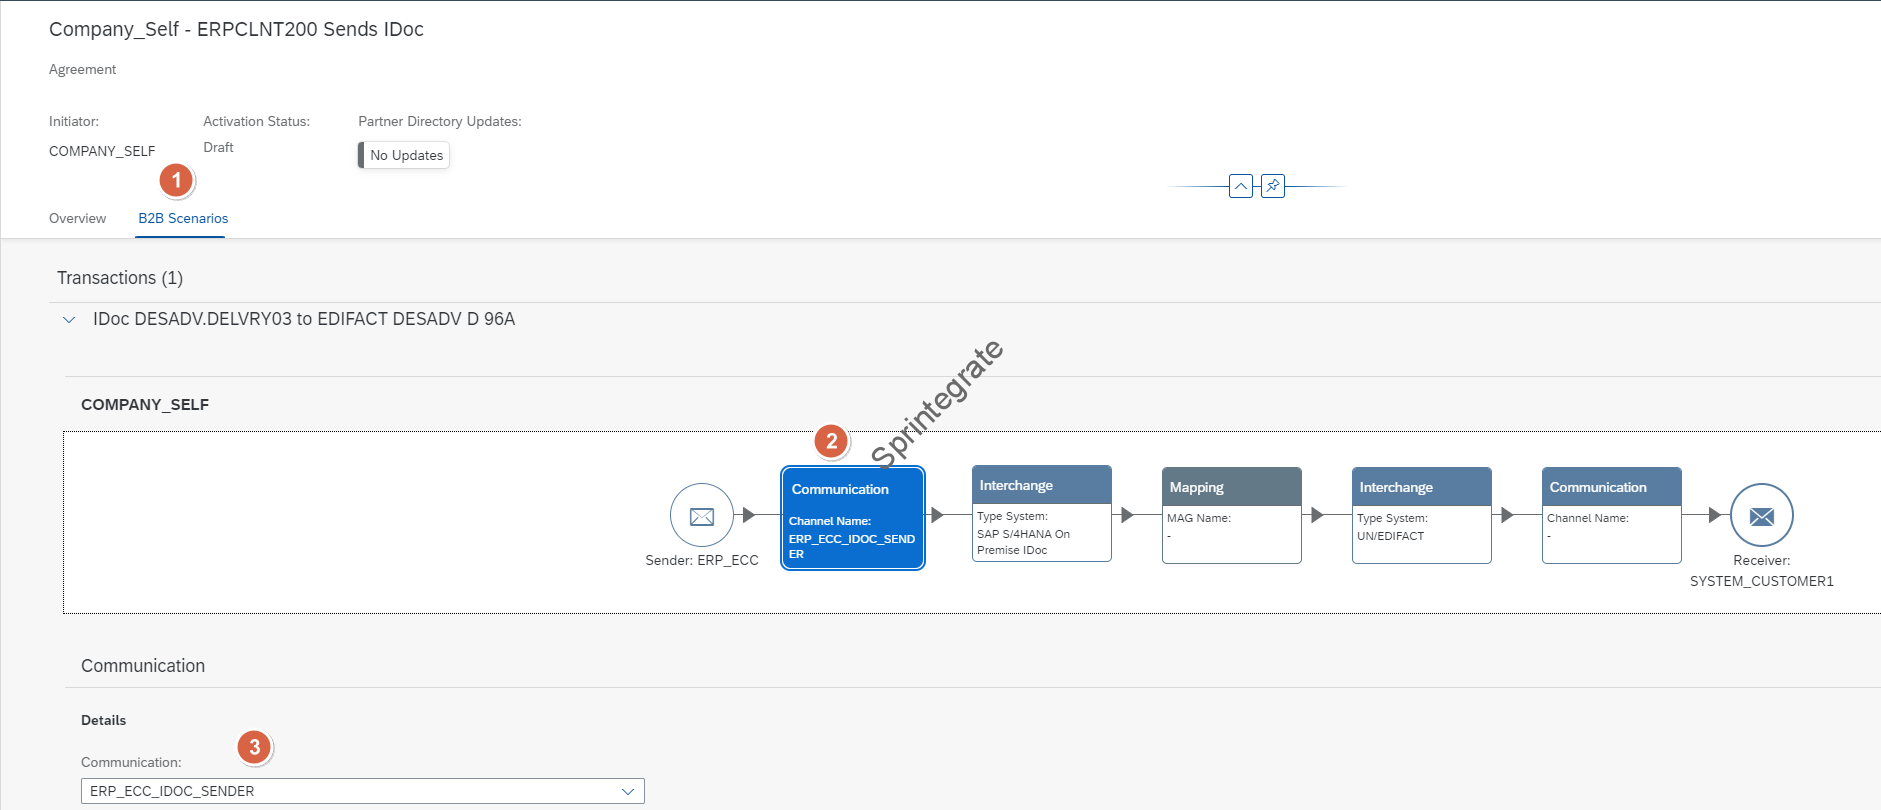
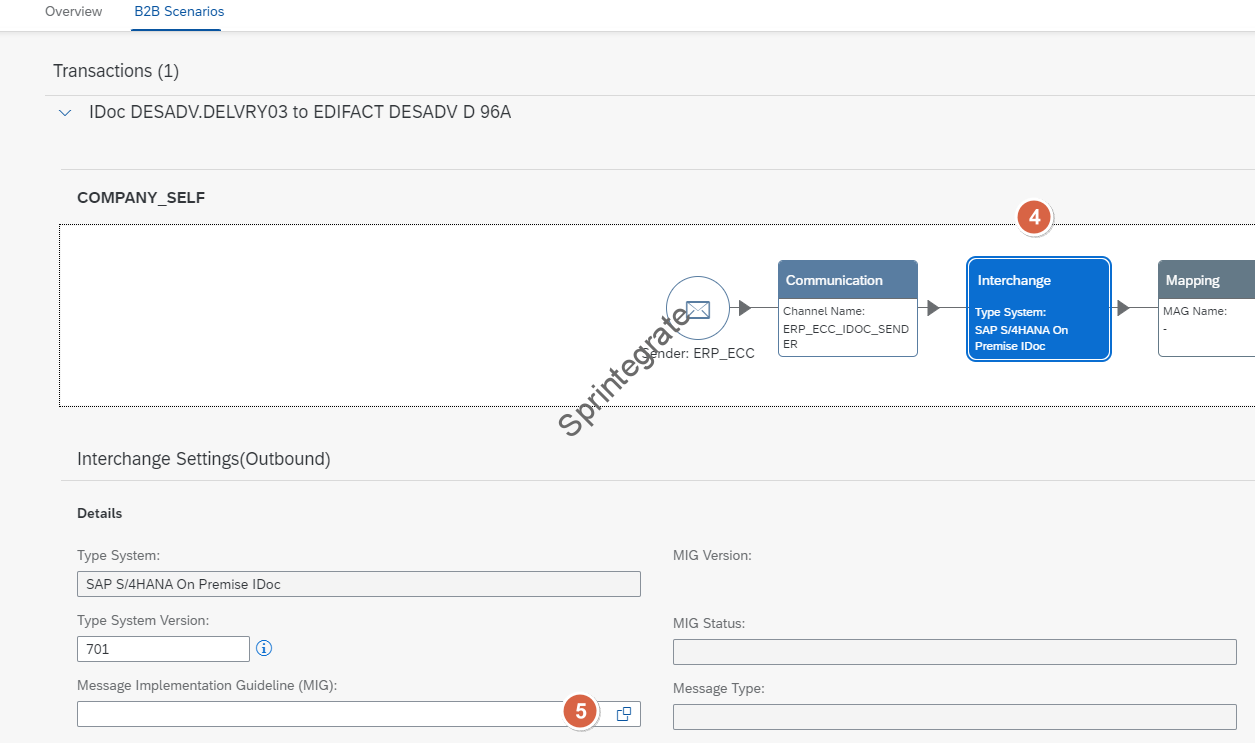
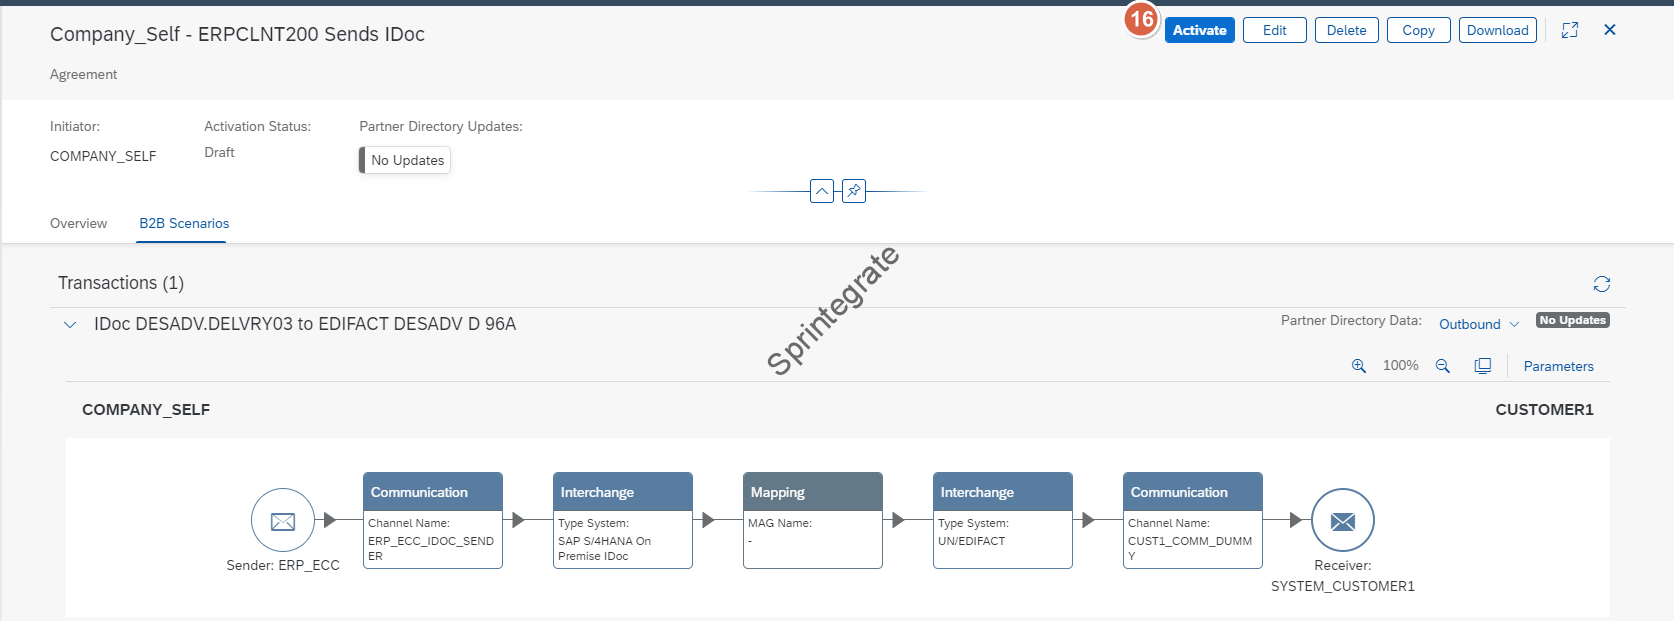
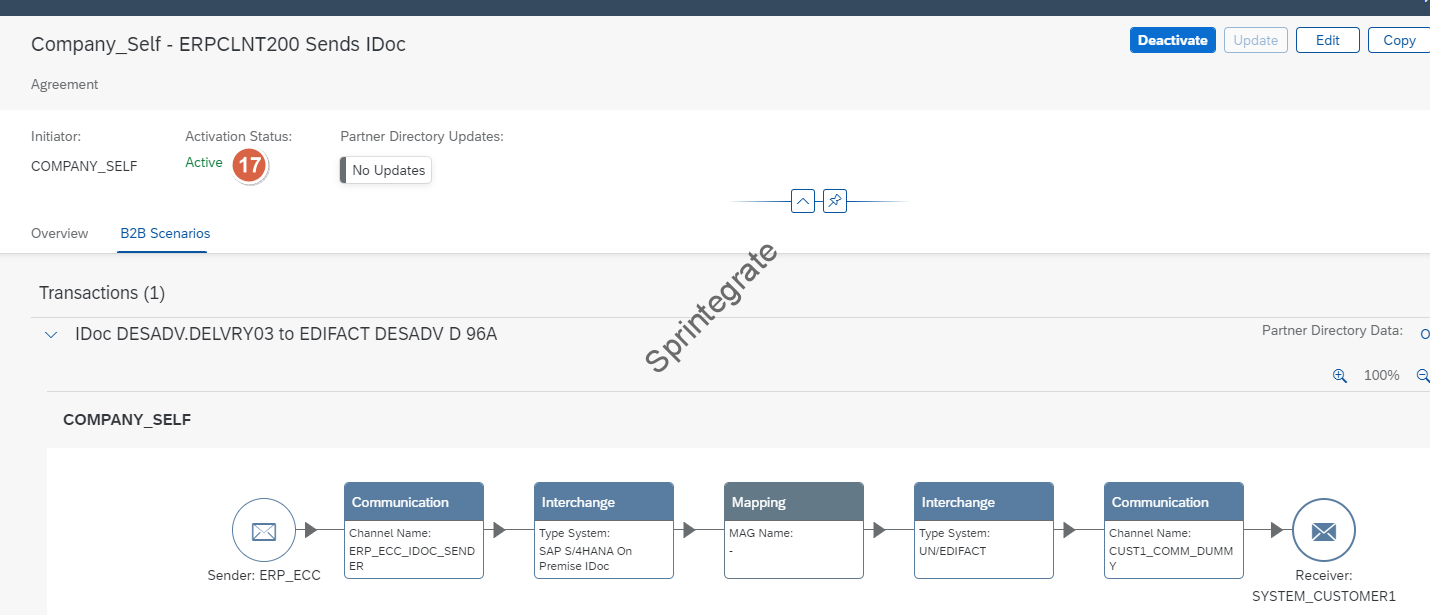
Define B2B Scenarios (for Agreement)
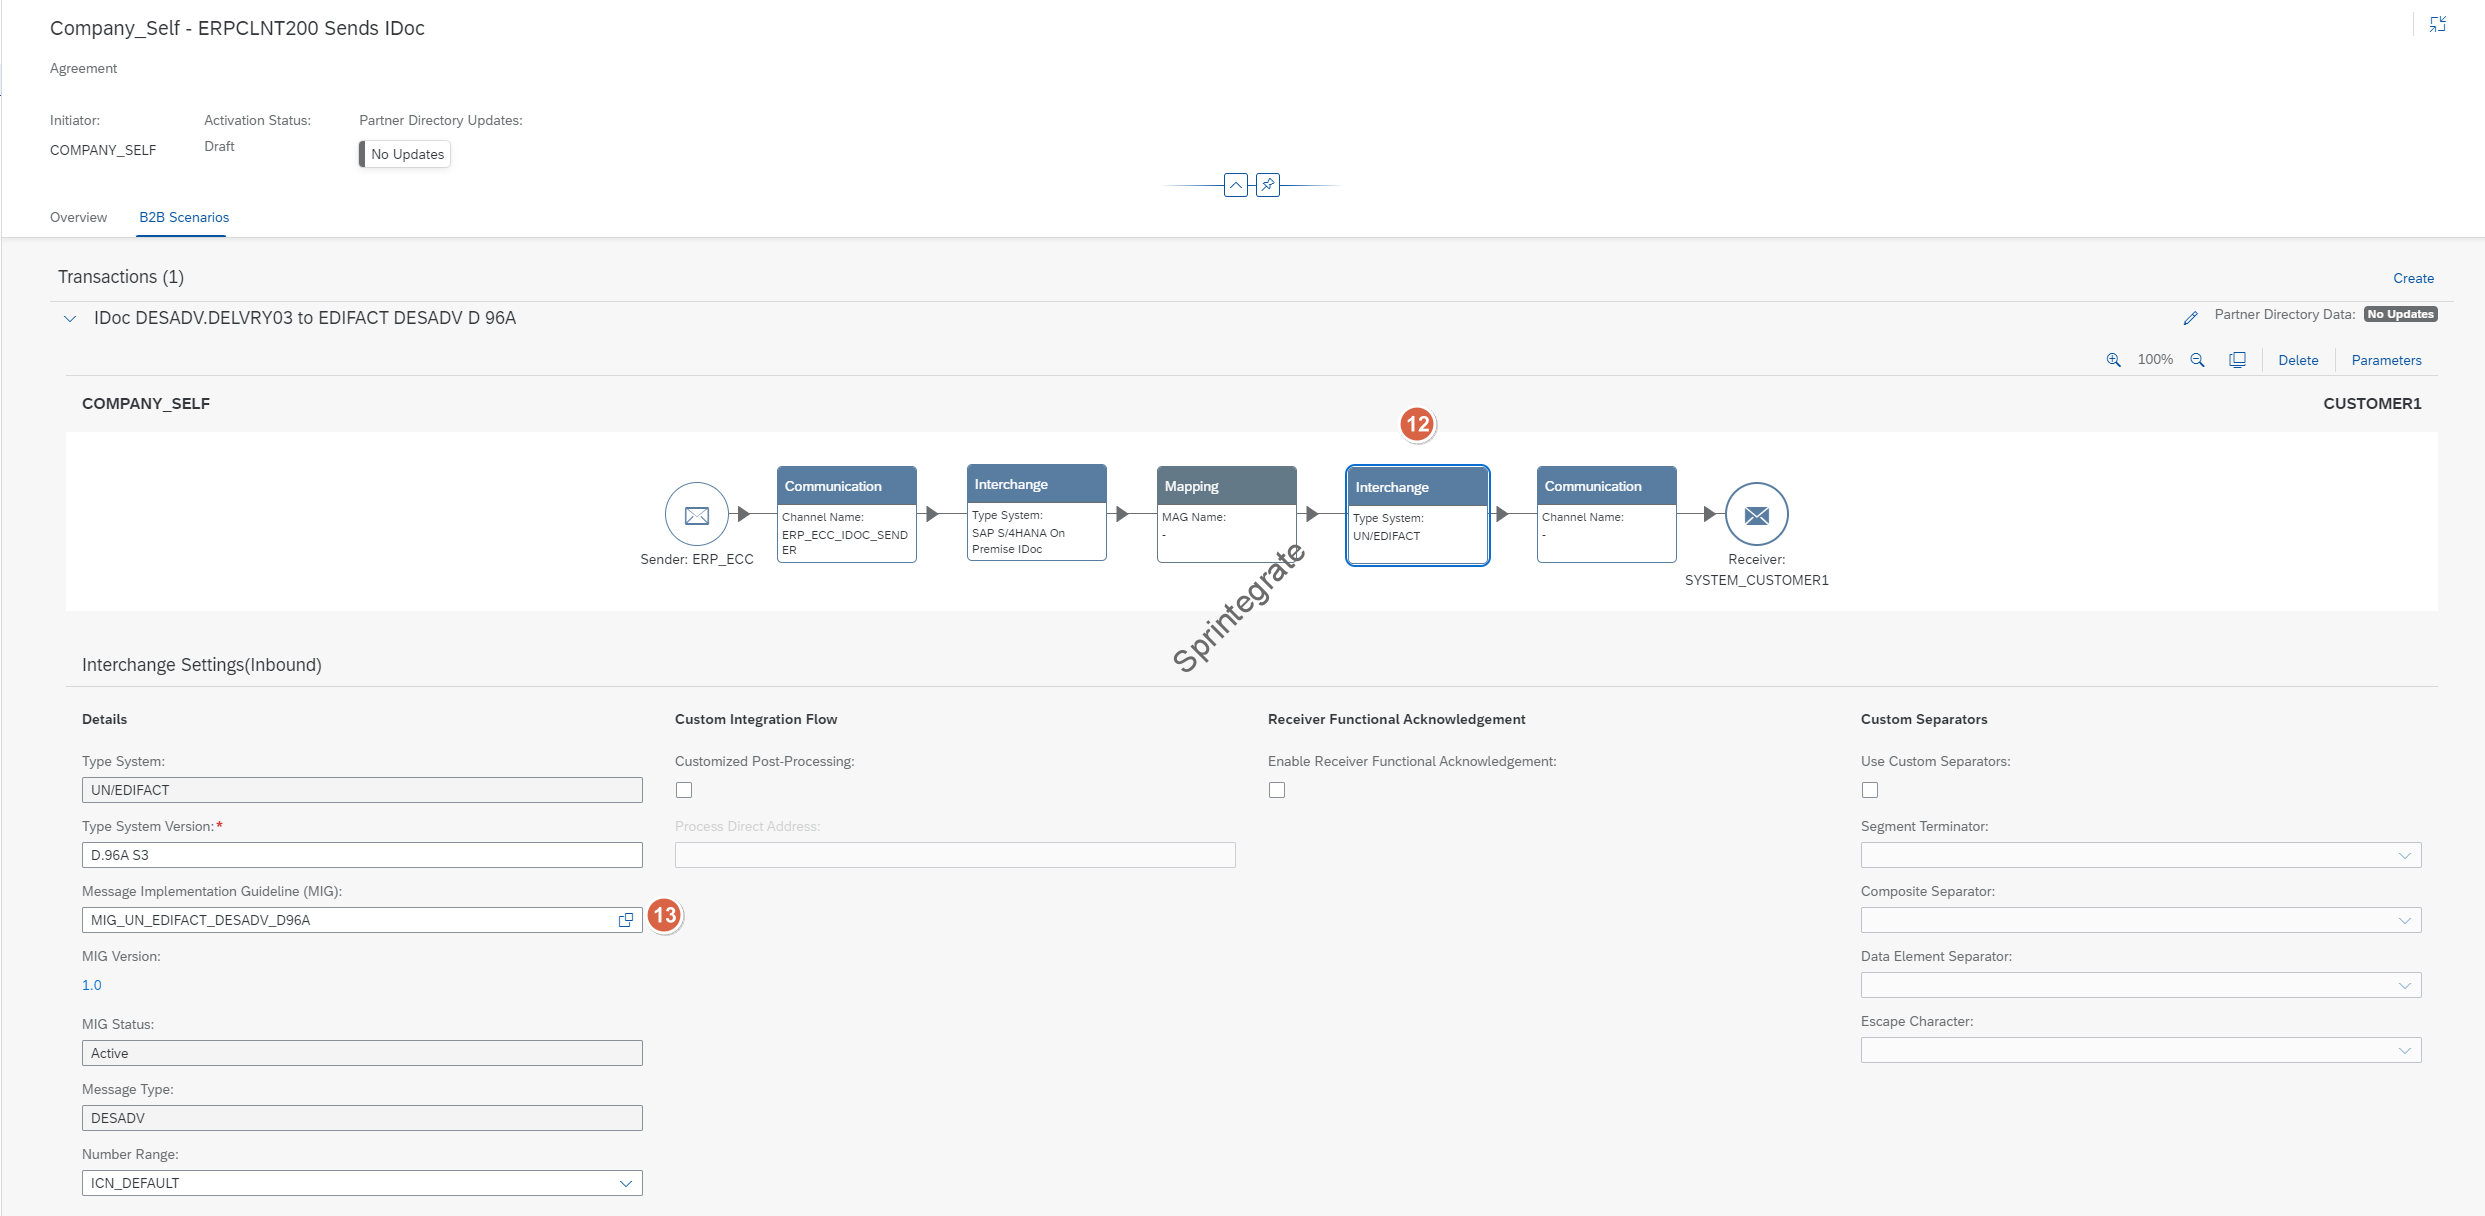
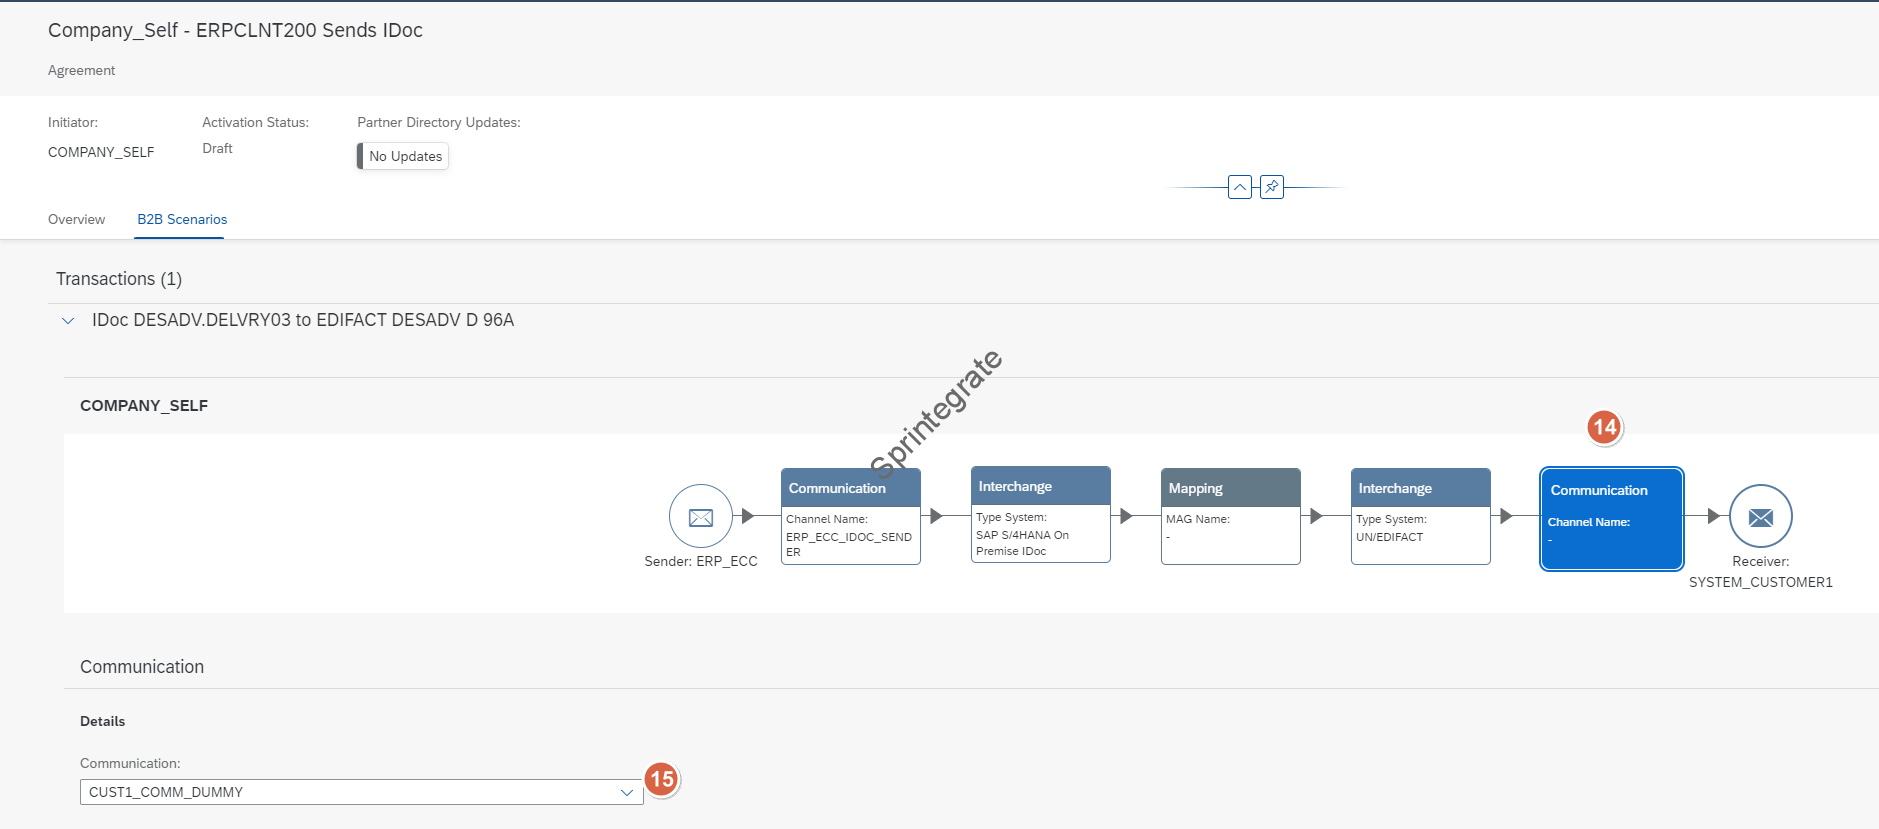
Once your Agreement is created in the previous section, you need to Define your B2B Scenario. Navigate to the Agreement you created and select required details as per screenshot(s). You will need to Create a Transaction in the Agreement under B2B Scenarios.
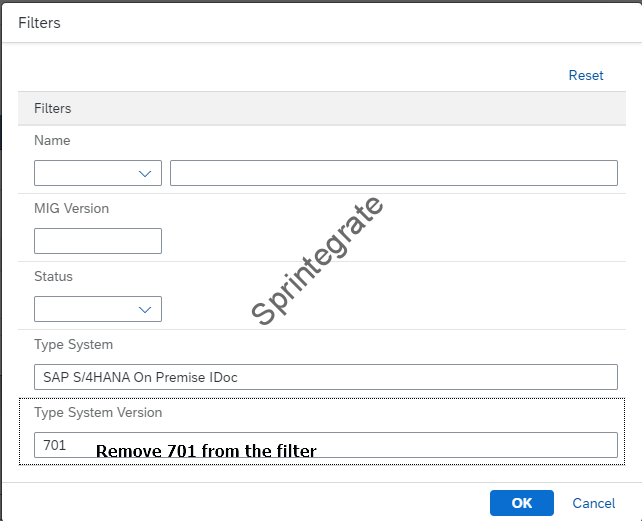
Note: When you choose the Message Implementation Guideline – the system will create a Filter on the Type System Version, make sure you remove the filter. If you do not do that you cannot see your Message Implementation Guideline as that was created for a different SAP S/4Hana System version.


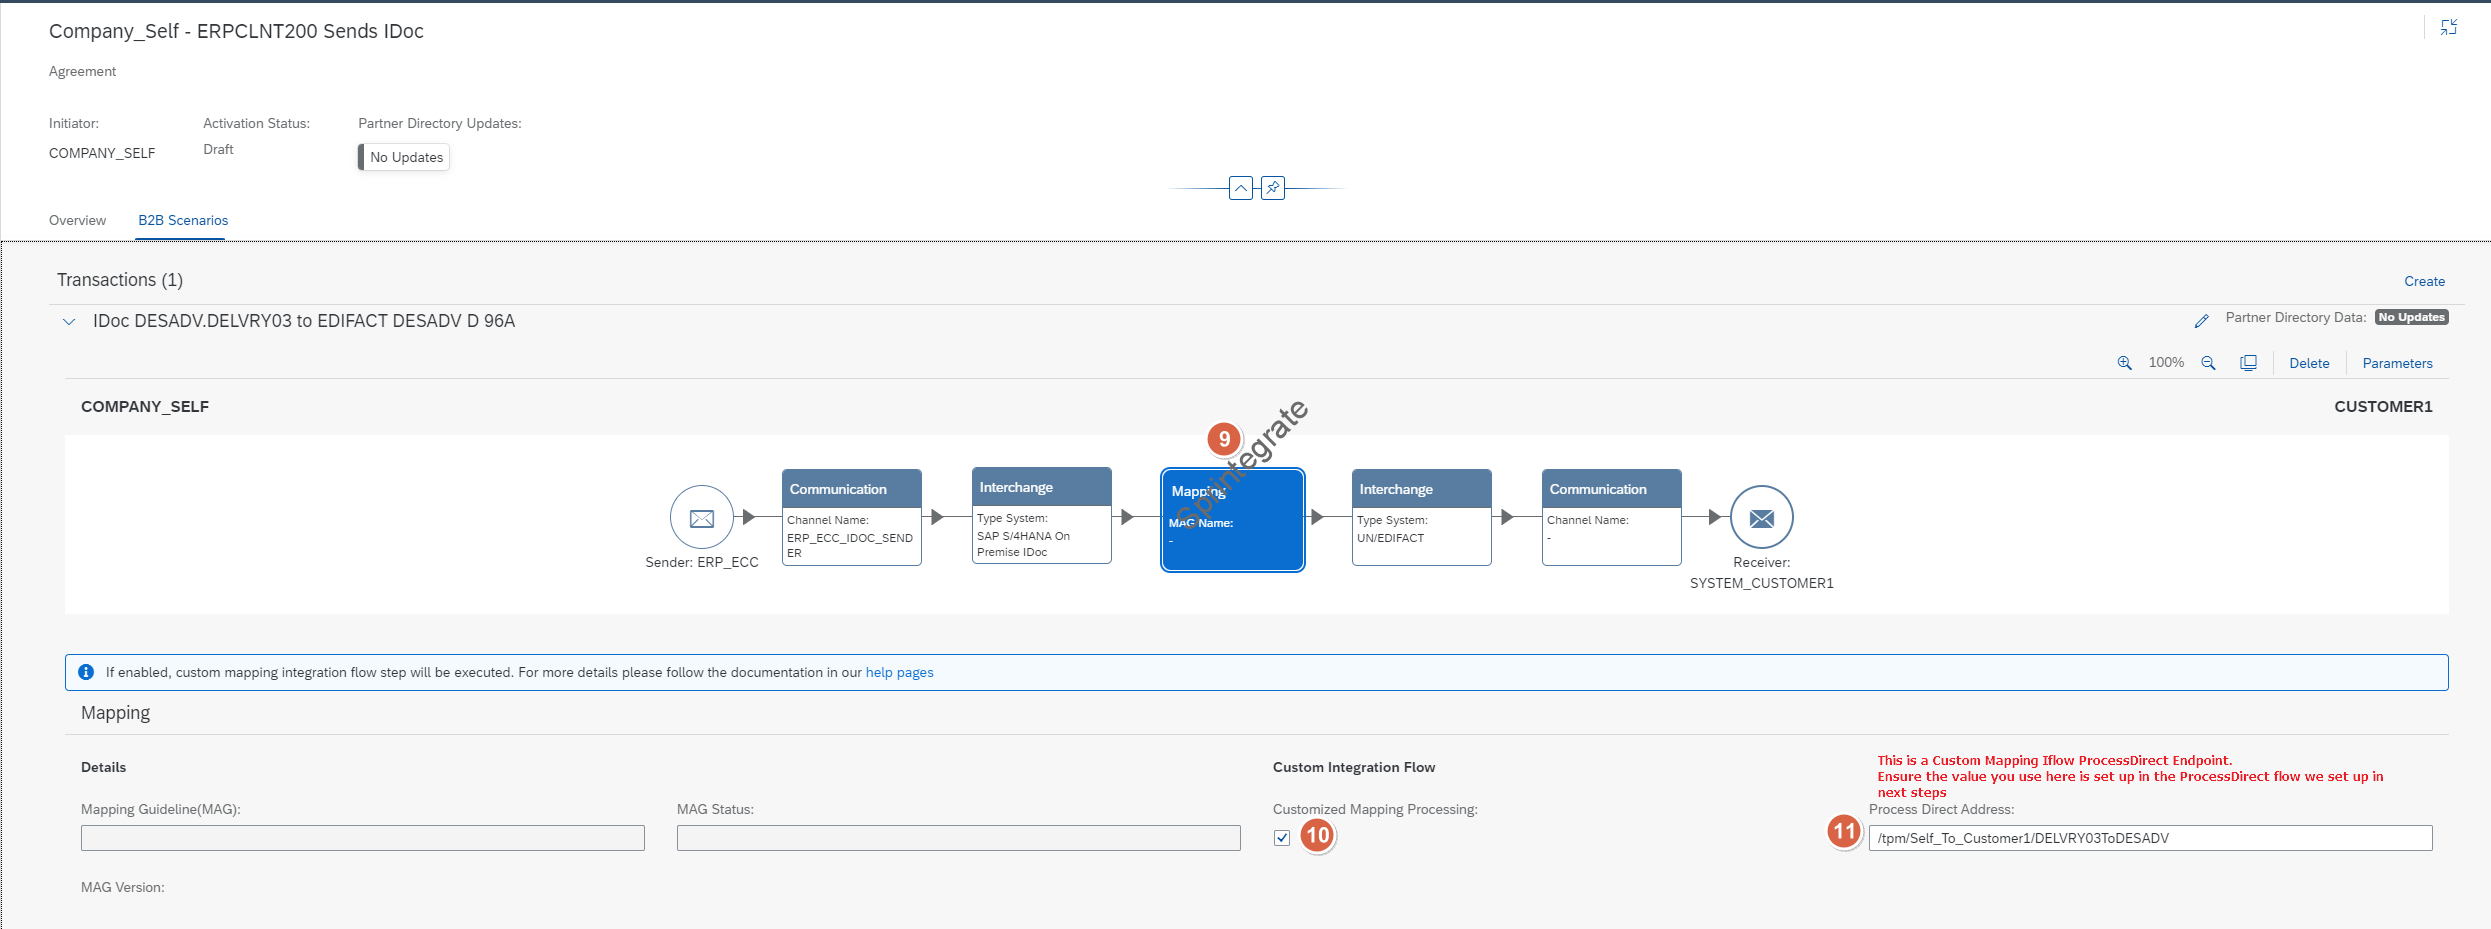
Updated in Nov 2023 to use the Process Direct Adapter instead of the Dummy SOAP Adapter to allow for the newer feature
Configure / Customize Standard Trading Partner Management Iflows
Navigate to Discover -> Integrations and Copy the Standard Package
Cloud Integration – Trading Partner Management V2 to your tenant

Deploy the Following from the Standard Content AsIs without any changes [[Updated Nov 2023 to allow for Standard Process Direct Flows]]
- Reusable Groovy Scripts V2
- Step 1 – Sender IDOC Communication Flow V2
- Step 1b – Write Message to Message queue
- Step 2 – Interchange Processing Flow V2
- Step 3 – Receiver Communication Flow V2
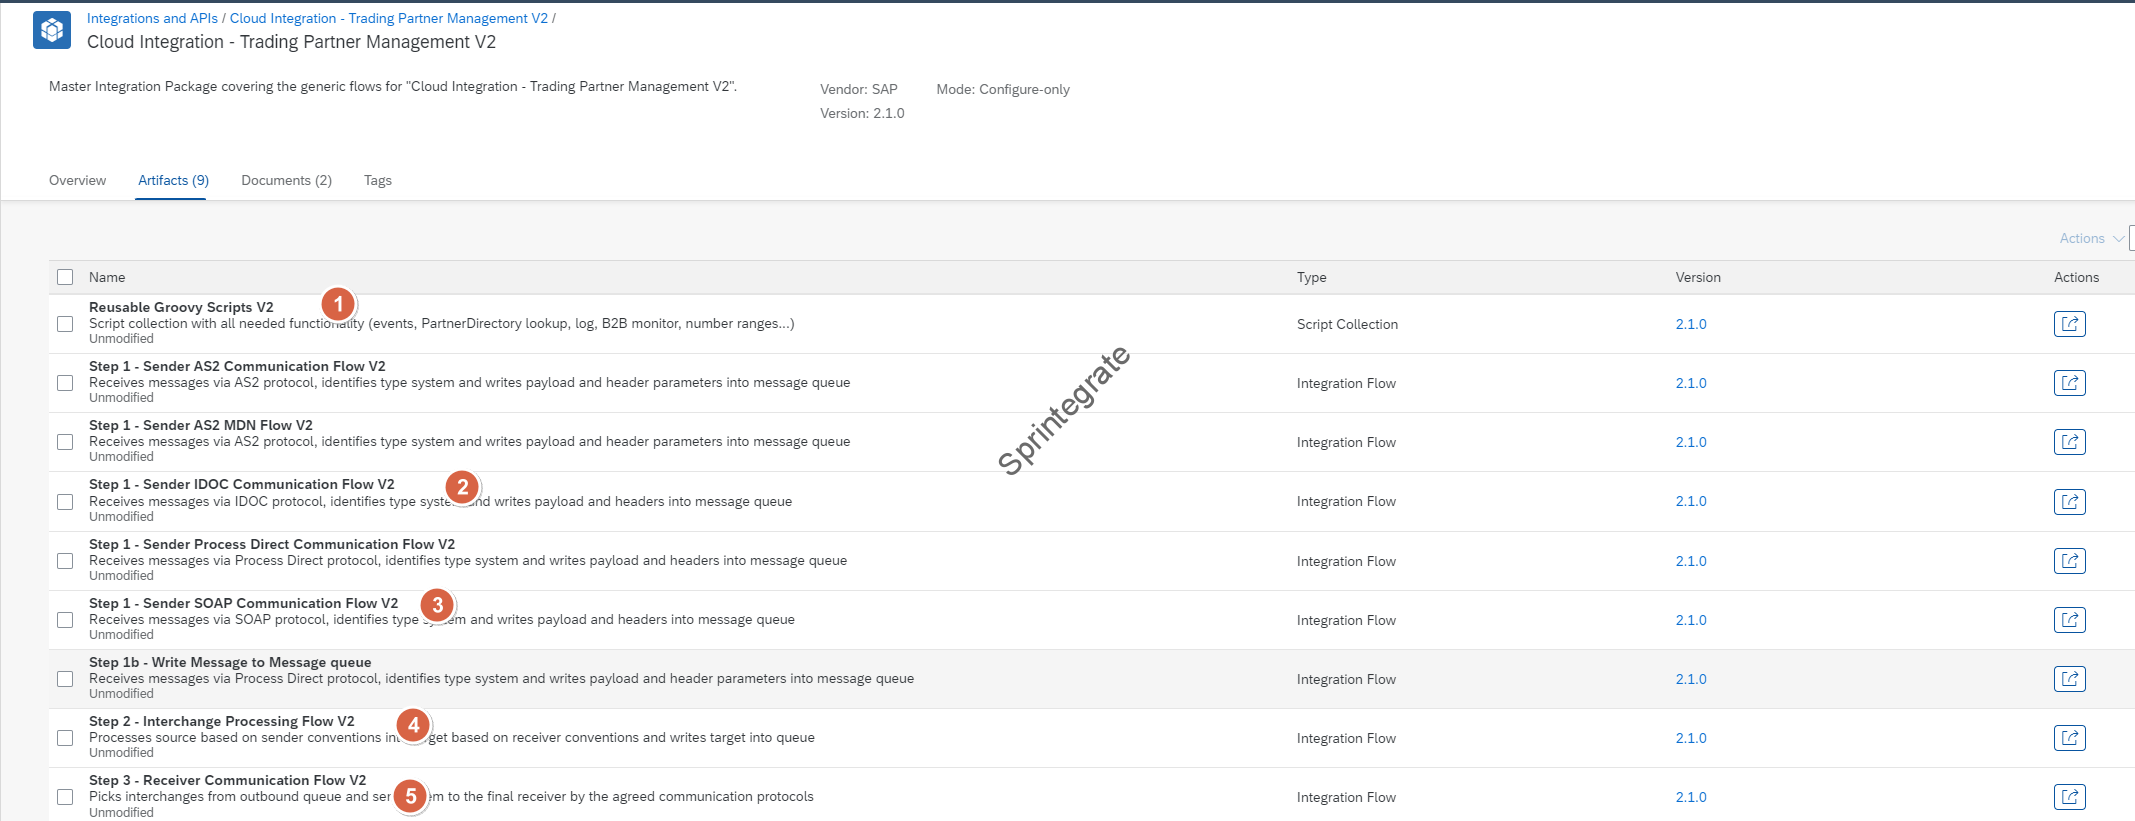
As mentioned previously we want to deliver the EDI file to a SFTP Channel and unfortunately at this moment STP is not supported out of the box ( it is in the roadmap). Till then we would need to copy the Iflow : Step 3 – Receiver Communication Flow V2 to a custom Package and modify this for SFTP.
In the standard Iflow from SAP we will modify this to check for a SOAP 1.x message if the message is XML. If it is XML, then it will process through SOAP but if the message is not XML, we will deliver it to SFTP. This can be modified additionally as you deem fit. This iflow can be downloaded here. I am not going into the details here of this iflow as its self explanatory once you download the iflow and import into your tenant.
Ensure you import this Iflow into your tenant and deploy this iflow.
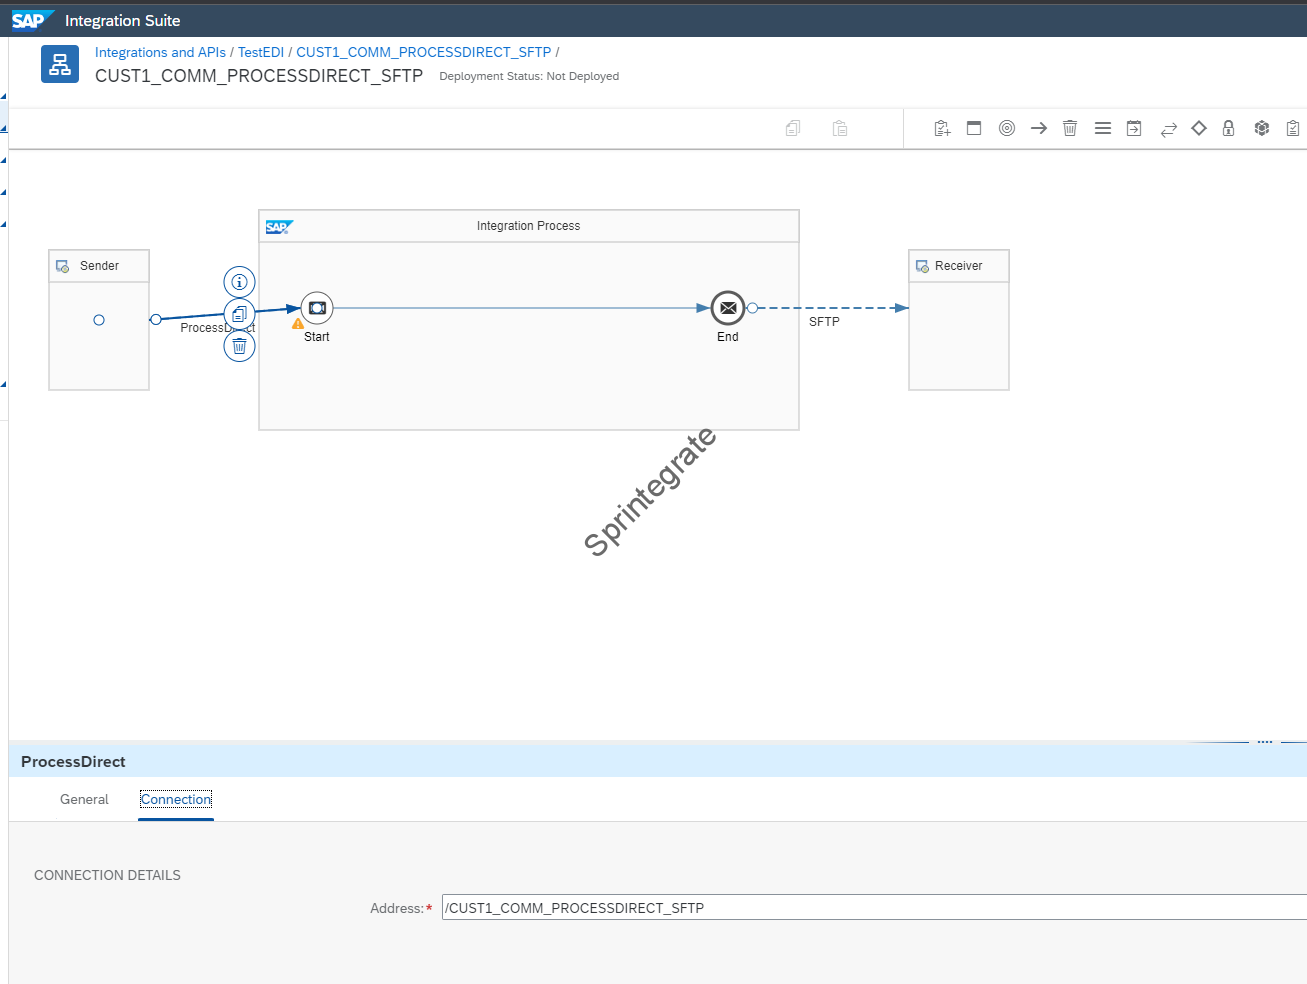
Create your ProcessDirect to SFTP IFlow
As seen in from Nov 2023, we have the support for a Receiver Process Direct Flow. So we will use that to send the data over SFTP. Create a ProcessDirect to SFTP Flow as per below screenshot. Note the ProcessDirect Address should match what you use in the Communication Details of your Trading Partner.
In Summary in this section you have
- Deployed the below standard flows / scripts
- Step 1 – Sender IDOC Communication Flow V2
- Step 1b – Write Message to Message queue
- Step 2 – Interchange Processing Flow V2
- Step 3 – Receiver Communication Flow V2
- Reusable Groovy Scripts V2
- Deployed the Custom
ModifiedFlow for SFTP ReceiverStep 3 – Receiver Communication Flow V2 SFTP Modified- CUST1_COMM_PROCESSDIRECT_SFTP
Create your Mapping Iflow
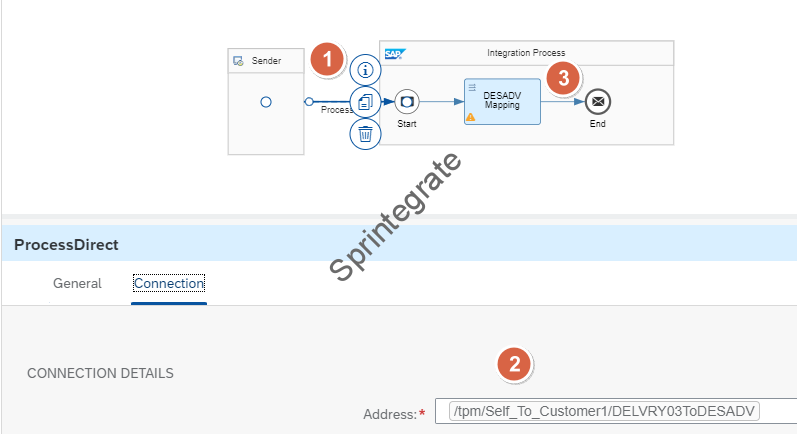
As we saw in the previous section(s) we have chosen not to use MAGs. So your IDoc to EDI conversion has to be a custom Graphical Mapping that you need to define in your iflow. When we set up the Trading Partner Agreement –> B2B Scenarios, we had provided a custom mapping Exit. We need to define an Iflow with ProcessDirect Pointing to this endpoint. See below screenshot where I have my Custom Mapping Iflow for the IDoc to XML EDI Conversions.
Test your Flow
Thats it. You are now ready to test your Flows. The IDoc from your ERP should point to the Endpoint of the Step 1 – Sender IDOC Communication Flow V2. When you push the IDoc to this endpoint, the flow should get processed end to end.
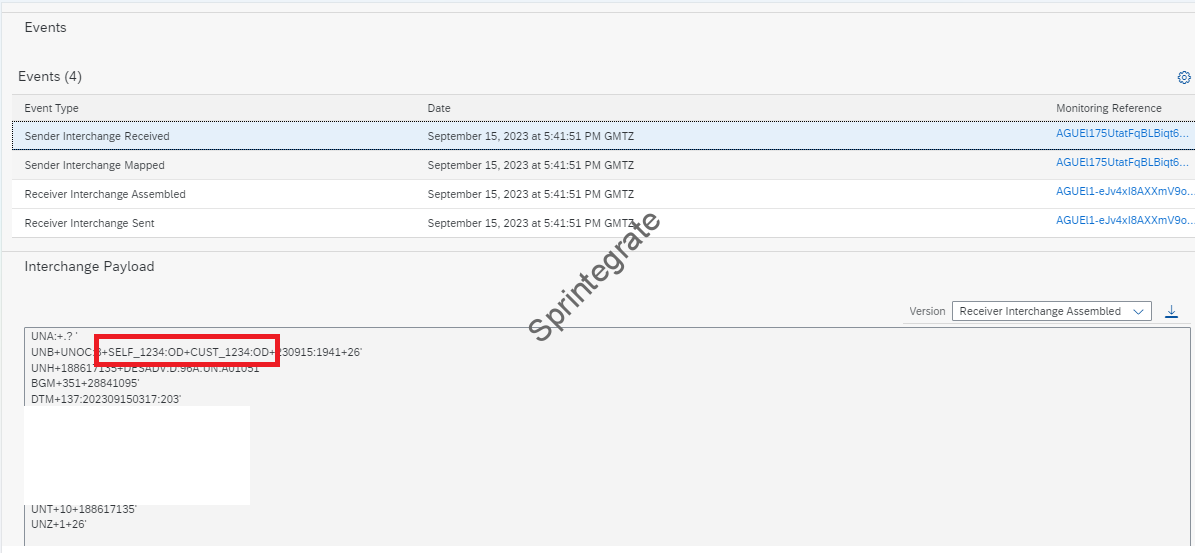
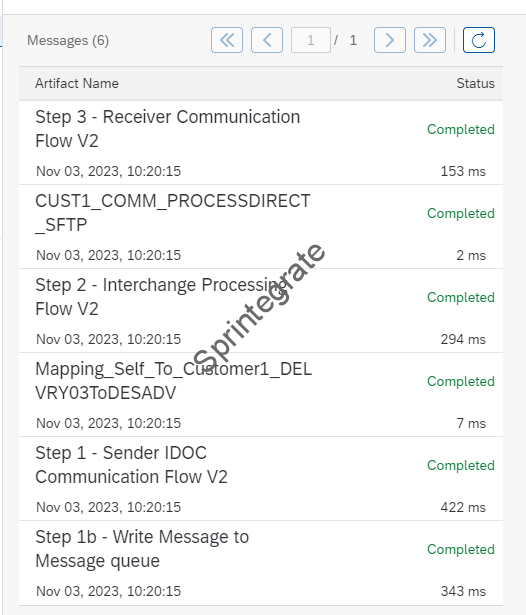
You can view the B2B transaction in B2B monitoring.
Message Overview In B2B Monitoring
- Sender Name, Receiver Name, Sender /Receiver Message Type, Document Standards are all populated as per our Configuration
- Sender Identifier and Receiver Identifier are also different in the Sender and Receiver section in line with out Configuration.
- In the Sender Section they match the IDoc Control Record (SNDPRN and RCVPRN)
- In the Receiver Section they match the EDI Header ( EDI Sender ID and EDI Receiver ID )

- Identifier for the Sender in ERP : SNDPRN ->ERPCLNT200
- Identifier for the Receiver in ERP : RCVPRN –> CUSTOMER1
- Identifier for the Sender in UN/EDIFACT: SELF_1234
- Sender Identifier Qualifier in UN/EDIFACT: OD
- Identifier for the Receiver in UN/EDIFACT: CUST_1234
- Receiver Identifier Qualifier in UN/EDIFACT: OD
- Sender Interchange Control Number : IDoc Number
- Receiver Interchange Control Number: Number Range defined in CPI
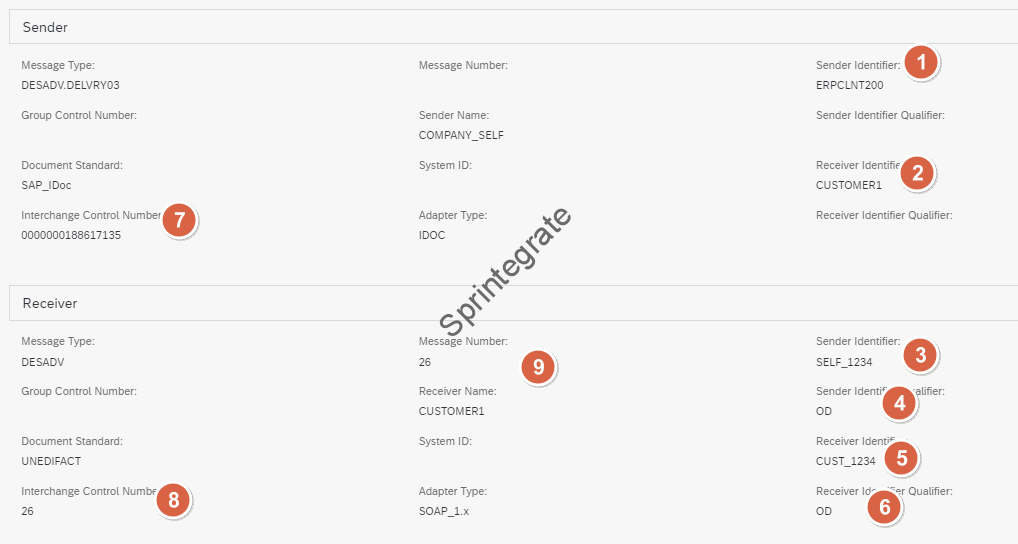
Sender ID and Receiver ID are taken from the Trading Partner Management in the EDI Message
CPI Messages in Message Monitoring
Final Thoughts and Next Steps
B2B set up on Integration Suite is not straight forward but once you set it up for your Environment once, you just need to configure your partners and you are on the way. While this post is an attempt to make this as simple as possible, somethings are not always that simple I guess.
I personally have liked what SAP has created in the B2B Space but because it is flexible and caters to a wide range of scenarios, it also becomes complex.
In the next posts ( See Next Post here : B2B on SAP Integration Suite – Cloud Integration – CPI – using Trading Partner Management – Part 2 – EDI to IDoc Flows(s)) , we will look at an Inbound EDI flow where a EDI message needs to be translated to a IDoc and posted into ERP.
References from SAP Documentation
- SAP Integration Advisor
- SAP Trading Partner Management
- Integration Flow Configuration
- Terminology & Glossary for SAP Trading Partner Management
Additional Blogs from this Series
- Trading Partner Management – Part 2 – EDI to IDoc Flows(s)
- Trading Partner Management – Part 3 – EDI over AS2 to IDoc Flows(s)
- Trading Partner Management – Part 4 – IDoc to EDI over AS2 Flow(s)
- Trading Partner Management – Part 5 – Custom IDoc Flow
- Trading Partner Management – Part 6 – Custom Search Attributes
- Trading Partner Management – Part 7 – EDI Functional Acknowledgements for Inbound EDI Messages
- Trading Partner Management – Part 8 – EDI Functional Acknowledgements for Outbound EDI Messages
- Trading Partner Management – Part 9 – Outgoing IDoc Bundling
- Trading Partner Management – Part 10 – Outgoing IDoc Bundling With EDI Bundling
- Trading Partner Management – Part 11 – Handling Parameters
- B2B on SAP Integration Suite – Part 12 – Migrating SAP PI / PO B2B Mappings without TPM
- Trading Partner Management – Part 13 – Migrating SAP PI / PO B2B Mappings with TPM
- Trading Partner Management – Part 14 – Handling Bundled Incoming EDIs
- Trading Partner Management – Part 15 – Handling Message Retries
- Trading Partner Management – Part 16 – B2B Failed Message Alerting
- Trading Partner Management – Part 17 – TPM Naming Convention Guideline