Introduction
In the previous 2 posts, we covered an Outgoing EDI Flow and an Incoming EDI Flow over SFTP. We will now continue on our EDI journey by looking at Using EDI Over AS2.
In this post, we will define a new Trading Partner “Customer2“, who will push EDI Files over AS2 into Integration Suite / CPI. As we have seen in the Part 2 we will receive an EDIFACT ORDERS D96B File from a Trading Partner and process them as an IDoc into ERP. We will leverage the same mapping as we used in Part 2. While there exists tons of content on both the SAP Community and help documentation from SAP ( see Further reading section at the end ), I would like to start from scratch here where we Install Mendelson AS2 to simulate our CUSTOMER3 and set up security rules for this Customer3. In other words, what we are doing is,
- Install and set up Mendelson AS2 for AS2 Sender.
- Leverage same MIG and Mapping from Previous Post
- Leverage same Agreement Template from Previous Post
- Create a new Trading Partner called CUSTOMER2 and define AS2 Parameters for this.
- Create a new Agreement for CUSTOMER2 to process EDIFACT D96 B ORDERS Message.
Scenario in Scope
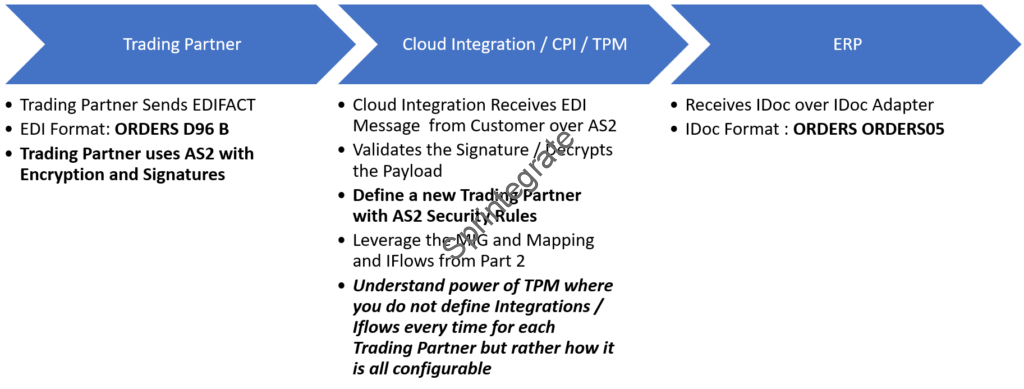
You will build an AS2 (EDI) –> CPI –> IDoc flow and leverage TPM to handle the Trading Partner Details.
Pre-requisites from Previous Post
If you are starting directly on this post, you would need to ensure that the below pre-requisites from the previous post (Part 2 ) are already handled as highlighted below.

High Level Steps in Scope
- IntegrationSuite: Deploy the Standard Iflow: Step 1 – Sender AS2 Communication Flow V2 from Package Cloud Integration – Trading Partner Management V2
- IntegrationSuite: Export Public TLS Certificate of your AS2 endpoint
- IntegrationSuite: Export public certificate from Keystore for sap_cloudintegrationcertificate
- IntegrationSuite: Create a Service Instance and Service Key for our new Customer: CUSTOMER2
- MendelsonAS2: Download and Install
- MendelsonAS2: Configure Certificates
- MendelsonAS2: Configure Partners
- IntegrationSuite: Define a new Trading Partner
- IntegrationSuite: Define a new Agreement
- Test Your Flow
IntegrationSuite: Deploy the Standard Iflow: Step 1 – Sender AS2 Communication Flow V2
Just go to the Standard Package Cloud Integration – Trading Partner Management V2 and Deploy the Iflow: Step 1 – Sender AS2 Communication Flow V2.
Note down the Endpoint of your Integration Flow you just deployed. You will use this in the next step and in Mendelson AS2.


IntegrationSuite: Export Public TLS Certificate of your AS2 endpoint
The AS2 Endpoint of your Integration Flow is the it-rt runtime of your Integration Suite tenant. You would need the TLS Certificate of this endpoint to be loaded into Mendelson AS2 at the next section (s) and hence you need to download the TLS Certificate of this endpoint. There are multiple ways to do this but I used the Connectivity Tests of Integration Suite.
You will get a .zip file with 3 certificates. Unzip it and have them handy!


IntegrationSuite: Export public certificate from Keystore for sap_cloudintegrationcertificate
To enable Decryption of payload on Integration Suite, our AS2 Partner will require our “Public Certificate“. In our scenario I assume that we will use the standard sap_cloudintegrationcertificate to decrypt the message and hence we need to export the Public Certificate of this Key from Integration Suite KeyStore.
In real world, you will of course create your own “Signed” Key Pair but for the purpose of this post lets use sap_cloudintegrationcertificate .
- Login to Integration Suite -> Monitor -> Integrations -> Keystore
- Click on sap_cloudintegrationcertificate
- Download -> Certificate
- Save this file for use in Mendelson AS2


IntegrationSuite: Create a Service Instance and Service Key for our new Customer
At the moment of writing this post, AS2 in Integration Suite only works with User Authentication. Unlike on Process Orchestration where you could turn off User Authentication for AS2 endpoints, on Integration Suite, you need to have this protected via Basic Authentication. There are workarounds that can be built to make AS2 Sender channel without Authentication ( Use SAP API Management) but for the sake of this post, we will stick to using Basic Authentication for AS2 Sender Channel.
Create Service Instance
We will now create a new Service Instance and Service Key on BTP Subaccount of your Integration Suite. These are standard steps and hence I wont go into details of these except with some screenshot.
- Service: Process Integration Runtime
- Plan: integration-flow
- Name: CUSTOMER2


Create Service Key
Create a Service Key and note down the client_id and client_secret. We will use them subsequently.
You can choose to use external certificate as well here but I am sticking to Basic Authentication ( clientid / secret ). Check the blog in further reading section if you are an expert user on partner directory and want to avoid using Basic Authentication.

Mendelson AS2 – Download and Install
Download Mendelson AS2 Community Edition
We will use Mendelson AS2 Community edition as our Testing Tool to push AS2 messages. While this has been covered in multiple posts on the SAP Community and this tool has been around for a long long time, to make it easy I also show how to set up Mendelson AS2. I do not go into each setting of this tool nor do I explain the basics of AS2 but I try to make sure you can set this up and run your flow.
Download the community edition of Mendelson AS2 from this link .
Install Mendelson AS2 Community Edition
Once you have downloaded the executable file, go ahead and install it. I have changed the Installation Directory ( as I have a previous installation) but you can choose to use the default Installation directory as well. Just make sure you know where the tool is Installed!


Start Mendelson AS2 Community Edition
Navigate to the Installation Directory of Mendelson AS2 and run the file AS2.exe. Allow required Network Access if you use Windows Defender blocks it!


MendelsonAS2: Configure Certificates
Load the TLS Certificates of Integration Suite
In previous section you had downloaded the 3 TLS Certificates of Integration Suite IT RT runtime. You would need to load them on Mendelson AS2. Select TLS –> Import Certificate and import the 3 certificates ( certificate chain) into Mendelson AS2. If you get a error that the Certificate already exists, then you can ignore that cert as that means that the Certificate is already in your Keystore in the TrustedCAs.
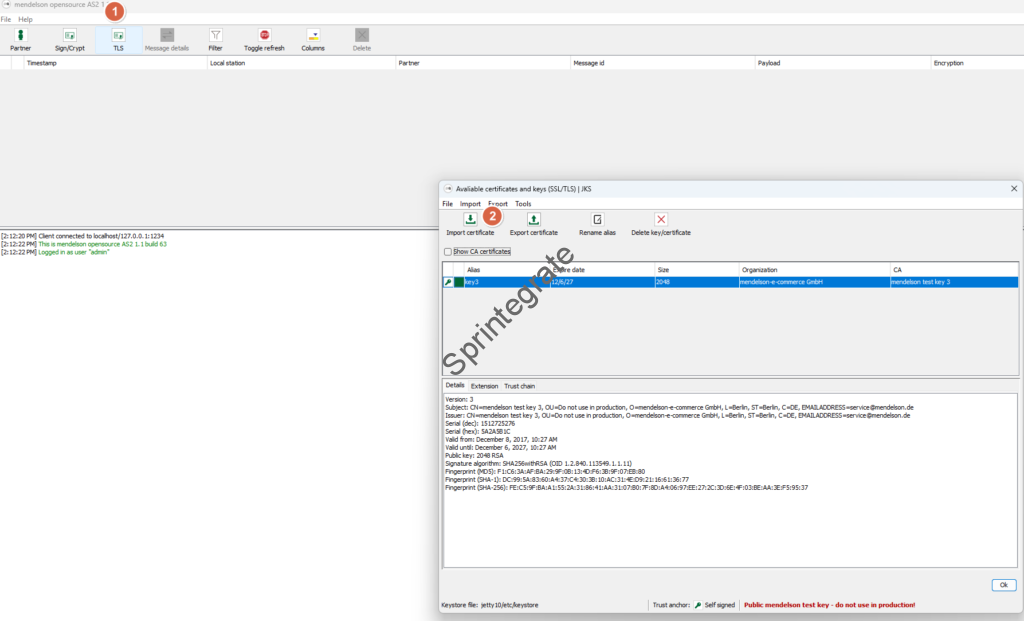


Load Sign/Crypt Certificates into Mendelson AS2
As we have looked at in the previous section we will use the sap_cloudintegrationcertificate as our Decryption Certificate for Integration Suite. We will import this as our Sign/Crypt Cert.
Note: Change alias to sap_cloudintegrationcertificate when you import to make it easy to identity this certificate.


MendelsonAS2: Configure Partners
Define a Partner for CPI ( Reactor)
Define a partner for CPI by changing the existing mendelsontest partner with below details
- Name: COMPANY_SELF_CPI
- AS2 Id: COMPANY_SELF_CPI
- Email Address: Change to any Email Address
- Partner Certificate (Outbound..) : sap_cloudintegrationcertificate
- Partner Certificate (Inbound..) : sap_cloudintegrationcertificate
- Receipt URL : AS2 Endpoint of Iflow: Step 1 – Sender AS2 Communication Flow V2
- HTTP Authentication User : client_id of Service Key created in previous steps
- HTTP Authentication Password: client_secret of Service Key created in previous steps
- Click Ok


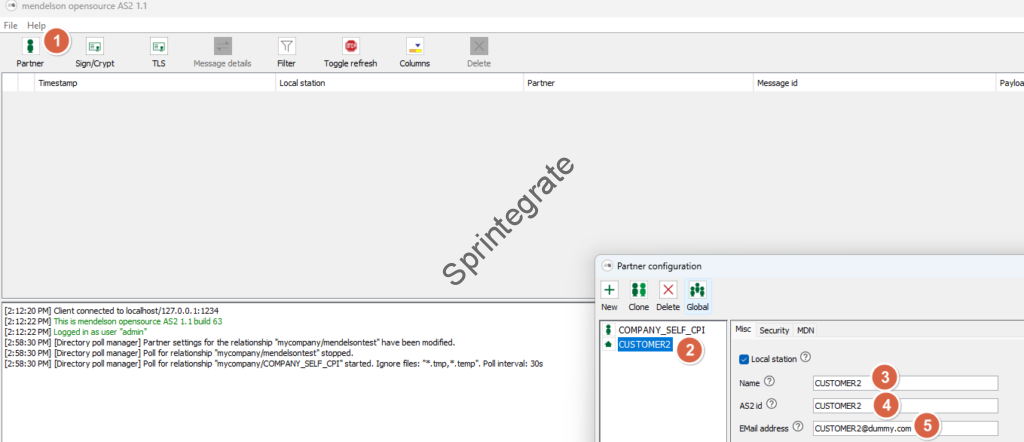
Define a Partner for CUSTOMER2 ( Initiator)
Define a partner for CUSTOMER2 by changing the existing mycompany partner with below details
- Select Partner
- Select mycompany ( the name will change the moment you change the Name in Step 3)
- Name: CUSTOMER2
- AS2Id: CUSTOMER2
- EmailAddress: Any email
- Click Ok!
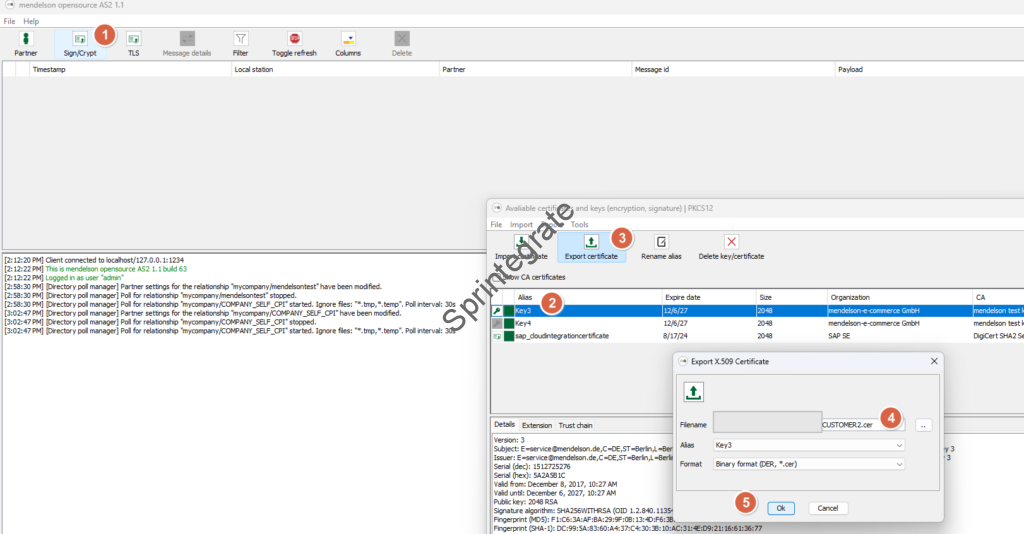
MendelsonAS2: Download Public Certificate
Download Mendelson AS2 Sign Certificate key3. Save the file locally. We will use this when we define our Trading Partner in Integration Suite.
Integration Suite: Define a new Trading Partner
Create Trading Partner
- Navigate to B2B Scenarios –> Trading Partners –> Create
- Provide Name and Short Name as : CUSTOMER2, CUSTOMER2 and Save.

Create Identifiers for EDIFACT
- Go to Identifiers and Define EDI Identifiers ( like in Part 2)
- Identification: CUSTOMER2
- Alias: CUSTOMER2_EDIFACT
- Type System: UN/EDIFACT
- Scheme: 30

Create Identifiers for IDoc
- Go to Identifiers and Define EDI Identifiers ( like in Part 2)
- Identification: CUSTOMER2
- Alias: CUSTOMER2_IDOC
- Type System: SAP S/4HANA On Premise IDoc
- Scheme: N/A

Create System And Type System
- Go to Systems and Create a System
- Name: CUSTOMER2_MENDELSON
- Alias: CUSTOMER2_MENDELSON
- Purpose: DEV
- Type System: Create New
- Name: CUSTOMER2_MENDELSON
- Description: CUSTOMER2_MENDELSON


Create Type System
- Name: UN/EDIFACT
- Version: D.96B.S3 ( We will receive ORDERS EDI Of version D96 B )

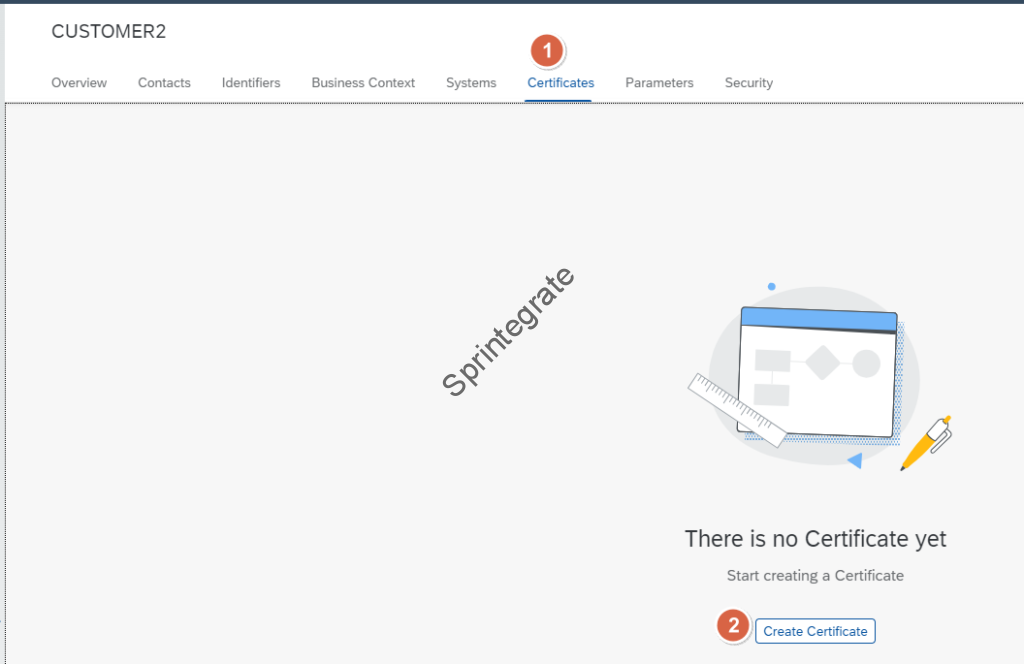
Create Certificates
Before we configure Communication Systems, we need to load our Certificates. This will be the KEY3 certificate we downloaded from Mendelson AS2 in the step MendelsonAS2: Download Public Certificate

Create Security
We will create the Security Profile of our Trading Partner here.


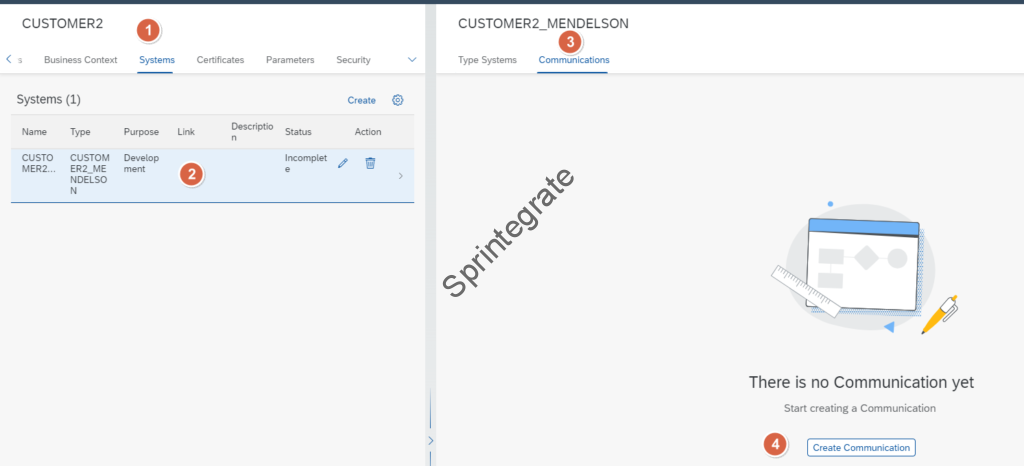
Create Communications ( Sender )
In this step you will need the client_id of the Service Key we created for Customer2 in the previous section. Have that handy.. Go to Systems -> Communications and Create a Communication.
- Name: CUSTOMER2_AS2_SENDER
- Alias: CUSTOMER2_AS2_SENDER
- Direction: Sender
- Adapter : AS2
- Security Configuration Model: Channel
- User Account: <<client_id>> of the ServiceKey
- Security Settings
- Decrypt Message : Selected
- Private Key Alias. sap_cloudintegrationcertificate
- Verify Signature: Trusted Certificate
- Public Key Alias: CUSTOMER2_CERT


Create Communications (Receiver)
After you have created your Communications (Sender), technically you are good to go. But if you look closely you see that your Communication System Status is Incomplete. For some reason Integration Suite expects you to provide both a Sender and Receiver Communication before you can mark a System as Complete.

Hence we will create a Communications ( AS2 Receiver). We will use this in the next blog but for now I will fill this with dummy details.

- Name: CUSTOMER2_AS2_RECEIVER
- Alias: CUSTOMER2_AS2_RECEIVER
- Direction: RECEIVER
- Adapter: AS2
Connection Details of AS2 Receiver
- Recipient URL: https://hostname_where_mendelson_runs:8443

Processing Details of AS2 Receiver
- Own AS2 ID: COMPANY_SELF_CPI
- Partner AS2 ID: CUSTOMER2
- Message Subject: AS2 from COMPANY_SELF_CPI to CUSTOMER2
- Own E-mail address: COMPANY_SELF_CPI@dummy.com
- Content-Type: application/edi
- Content Transfer Encoding: binary

Security Details of AS2 Receiver
- Sign Message : Selected
- Algorithm: SHA1
- Private Key Alias : sap_cloudintegrationcertificate
- Encrypt Message: Selected
- Algorithm : 3DES
- Public Key Alias: CUSTOMER2_CERT

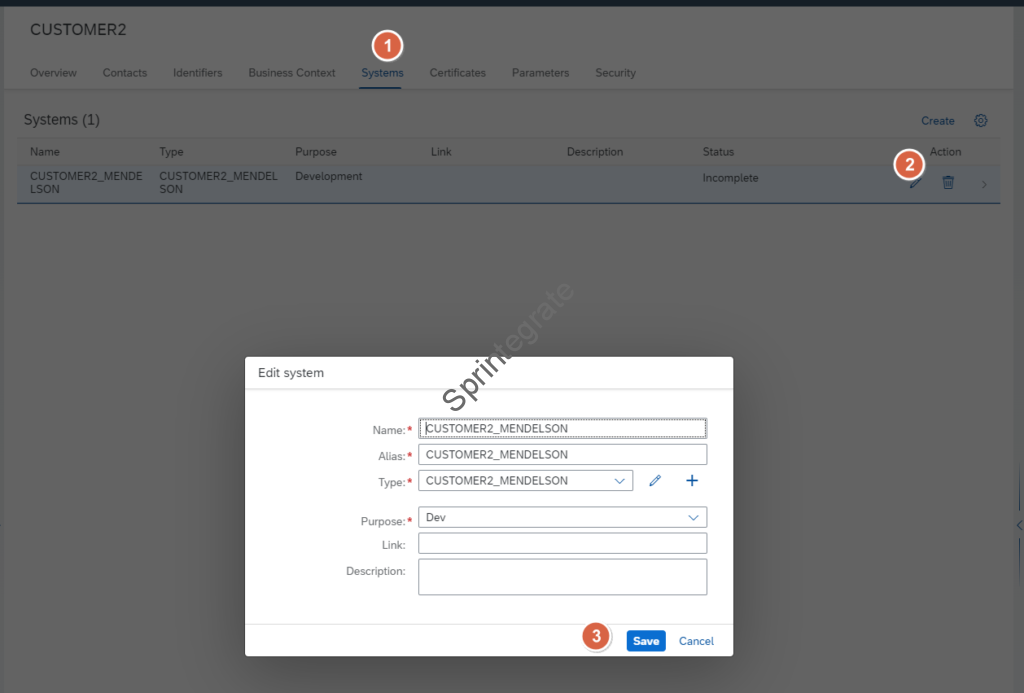
Make System Complete
You would need to go to back to your system, click on Edit, and then save and then your status will change from Incomplete to Complete.

IntegrationSuite: Define a new Agreement
Go to your Trading Partner Management –>Agreements –> Create

Select the Agreement Template from Part 2 – Customer 1 Initiates EDIFACT ORDERS D6B . Ideally I should have named the Agreement Template without any Specific Customer in the previous post but we can still select this and continue.

Note: Change the name to Customer2 Initiates EDIFACT ORDERS D96B and select the required details in the same order as below.
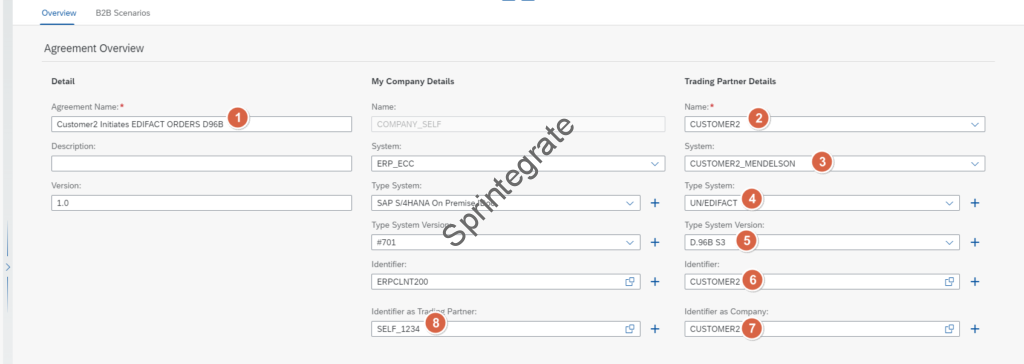
Select the B2B Scenarios and Transaction details as below.

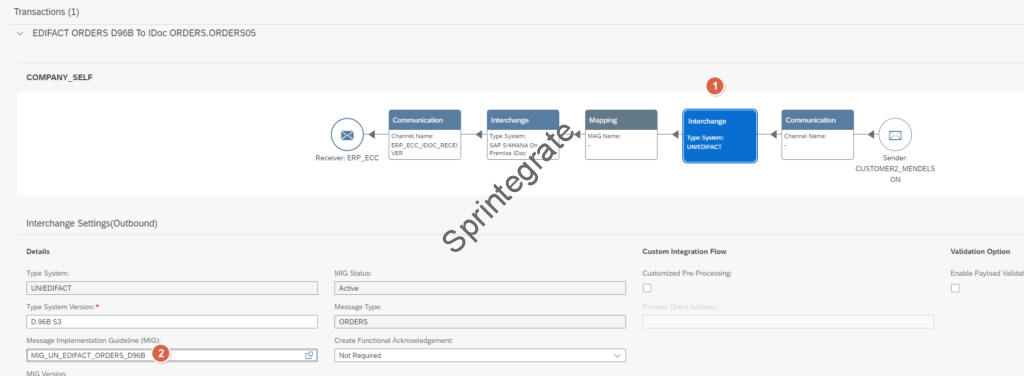
Provide Custom Mapping Processing Details. This ideally should have been without Customer details in Part 2 when we created the Mapping Iflow with Process Direct but for now , lets leave it as is and provide value as : /tpm/Customer1/EDIFACT_ORDERSD86B/IDOC_ORDERS_ORDERS05

Thats it, click on Save! Now Activate your Agreement!
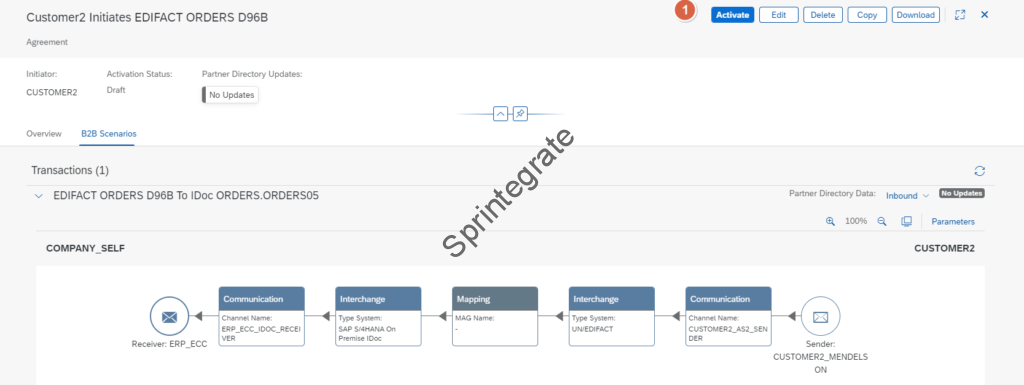

Test Your Flow
You are now ready to test your flow. We will now send a message from Mendelson AS2 that will be encrypted and signed. The message will be a EDI file of ORDERS D96B format. Remember to change the Sender Interchange ID to the Identifier we have defined for Customer 2 in the raw EDI File ( CUSTOMER2).
- Select Option : File -> Send File to Partner
- Select the file you want to send ( Note – make sure it is a EDI ORDERS D96B File) or equivalent EDI file as you have configured your MIG and Mapping.


Logs in Mendelson AS2
Message was successfully sent to Integration Suite ( Encrypted and Signed). MDN was received back ( Signed and validated)


Logs in Integration Suite
Go to B2B Monitoring and check your message.

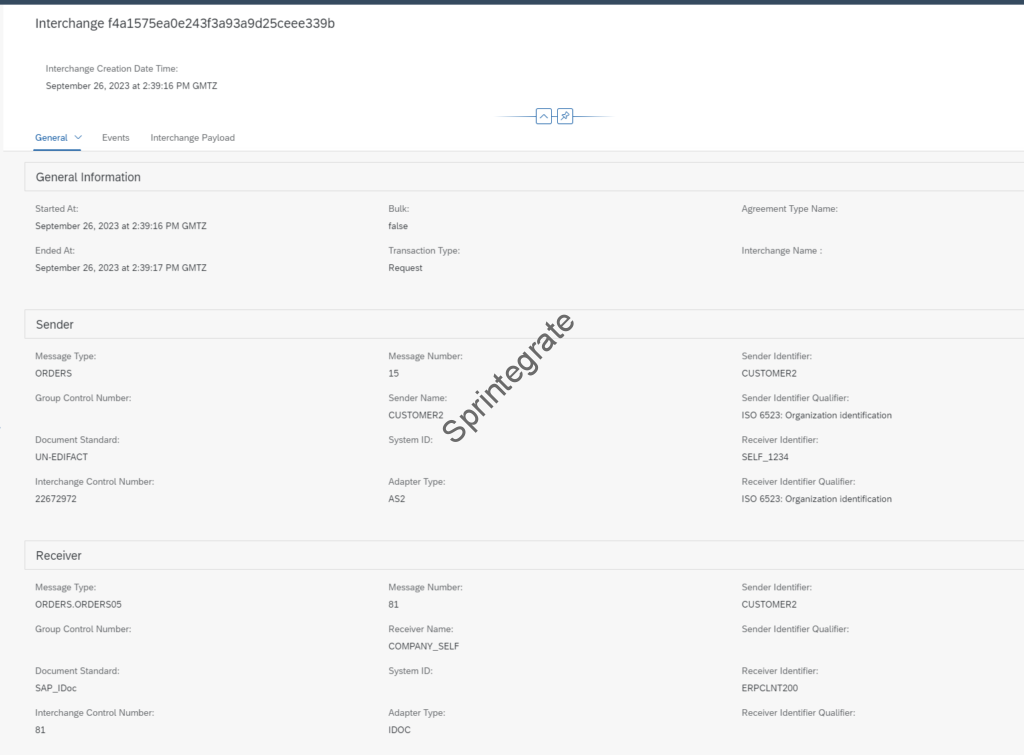

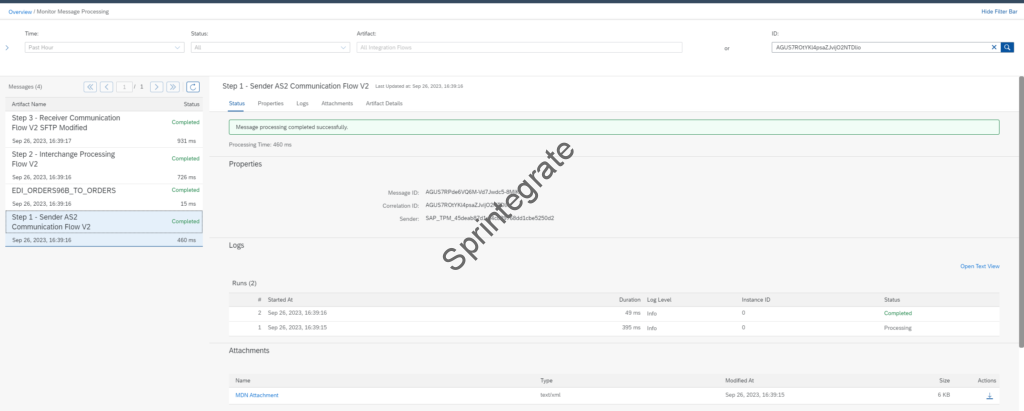
Final Thoughts
What we have done is used an existing MIG and Mapping in Integration Suite and configured it for another Trading Partner for another Protocol AS2. The standard flows in Integration Suite in Trading Partner Management need no change at all.
Imagine a scenario where you have a landscape with common mapping for all Trading Partners, you can using Trading Partner Management just configure your Trading Partners and avoid any changes to your Integration Flow. The security keys and certificates are all processed dynamically using Partner Directory ( from Trading Partner Management) and all you as an EDI Technician do is perform certain repetitive steps. In a real world, I would say you can even fathom a situation where super users can onboard new EDI Partners without doing any development. Of course there is a steep learning curve but if done right, this can be copy paste of same steps for different partners.
In the next steps we will extend Mendelson AS2 to receive EDI Over AS2 messages from Integration Suite. We will also look at what happens under the hood and some pitfalls to avoid in an EDI Implementation. But thats for another day!
Additional Blogs from this Series
- Trading Partner Management – Part 1 – IDoc to EDI Flow(s)
- Trading Partner Management – Part 2 – EDI to IDoc Flows(s)
- Trading Partner Management – Part 4 – IDoc to EDI over AS2 Flow(s)
- Trading Partner Management – Part 5 – Custom IDoc Flow
- Trading Partner Management – Part 6 – Custom Search Attributes
- Trading Partner Management – Part 7 – EDI Functional Acknowledgements for Inbound EDI Messages
- Trading Partner Management – Part 8 – EDI Functional Acknowledgements for Outbound EDI Messages
- Trading Partner Management – Part 9 – Outgoing IDoc Bundling
- Trading Partner Management – Part 10 – Outgoing IDoc Bundling With EDI Bundling
- Trading Partner Management – Part 11 – Handling Parameters
- B2B on SAP Integration Suite – Part 12 – Migrating SAP PI / PO B2B Mappings without TPM
- Trading Partner Management – Part 13 – Migrating SAP PI / PO B2B Mappings with TPM
- Trading Partner Management – Part 14 – Handling Bundled Incoming EDIs
- Trading Partner Management – Part 15 – Handling Message Retries
- Trading Partner Management – Part 16 – B2B Failed Message Alerting
- Trading Partner Management – Part 17 – TPM Naming Convention Guideline
Further Reading
- B2B Capabilities in SAP Cloud Integration – Part 1
- B2B Capabilities in SAP Cloud Integration – Part 2
- Install and Configure Mendelson
- Why create a Service Instance and Service Key for each TPM
- Use the AS2 Adapter with Dynamic Encryption and Signature Verification
- Use the Partner Directory Appropriately
- How To .. Configure Inbound AS2 with Dynamic Encryption and Signature Verification using Partner Directory on Cloud Integration
