Introduction
SAP Cloud Transport Management is SAP’s answer to transport your Integration flows from one environment to another. Without going into other alternates lets set up Cloud Transport Management
Enable Cloud Transport Management Service in BTP
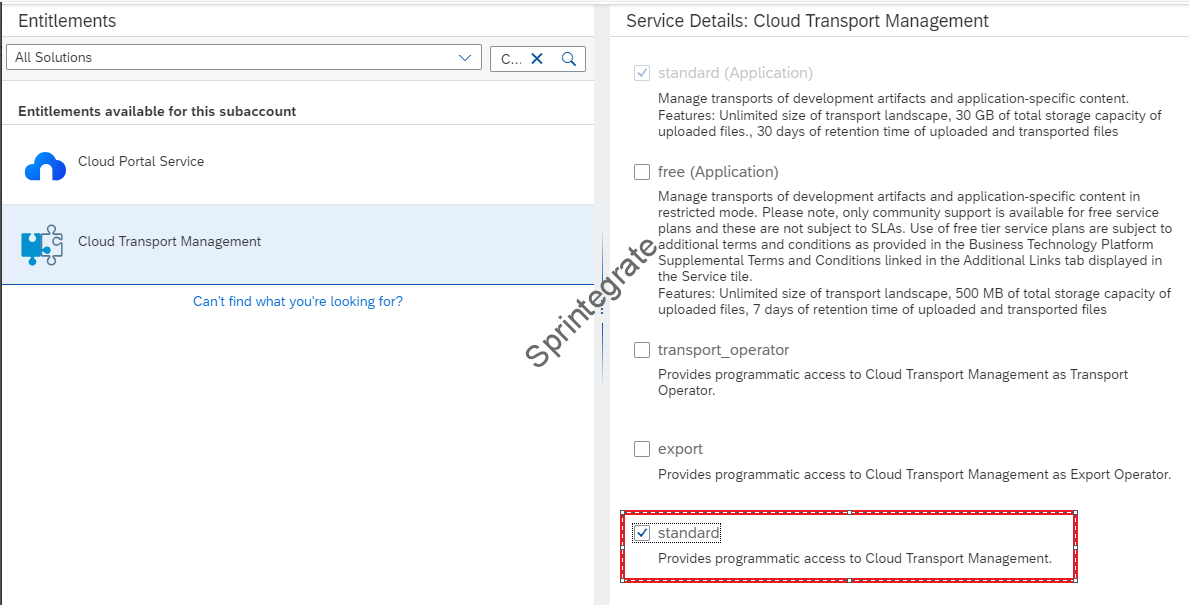
Enable the SAP Cloud Transport Management Service in BTP. This ideally should be done on the Source Tenant or a separate Subaccount. Configure Entitlements in the Source Tenant on BTP and include Standard (Application) Plan and standard plan
Note : You can close free ( Application) if you want to use the free tier.

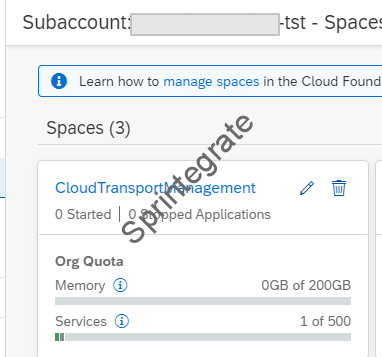
Create a Space for CloudTransportManagement
To enable segregation of Roles and service keys and instances, create a separate Space in your SubAccount called “CloudTransportManagement“. All service instances and service keys you create in for CloudTransportManagementService will be hosted here.

Create Service Instance and Service Keys on Source Tenant
Create ContentAgent Service Instance and ServiceKey on Source Tenant
Go to the CloudTransportManagement Space on your Source Subaccount and create a Service Instance with below details
- Service: Content Agent Service
- Plan: Standard
- Instance Name: ContentAgentService-Dev


Create a ServiceKey for this ServiceInstance that you just created.

Save the details of the Service Key, specifically
- url
- clientid
- clientsecret
- uaa_url ( used as token url)

Create a Process Integration Runtime ( api ) Service Instance and Service Key on Source Tenant
Go to the CloudTransportManagement Space on your Source Subaccount and create a Service Instance with below details
- Service: Process Integration Runtime
- Plan: api
- Instance Name: ProcessIntegration-API
- Roles : WorkpackagesTransport


Save the details of the ServiceKey
- clientid
- clientsecret
- url
- tokenurl

Create a Service Instance and Service Key for Cloud Transport Management in Source Subaccount
Go to the CloudTransportManagement Space on your Source Subaccount and create a Service Instance with below details
- Service: CloudTransportManagement
- Plan: standard
- Instance Name: CloudTransportManagement-Destination


Save the details of the Service Key
- clientid
- clientsecret
- uaa_url
- uri


Summary of Service Instance and Keys created in Source Tenant


Create Destinations in Source Subaccount
Create Destination : ContentAssemblyService
Create a Destination called ContentAssemblyService in the source subaccount. Take the details of the Destination from the Service Key for ContentAgentService created in previous section

Create Destination: CloudIntegration
Create a Destination called CloudIntegration in the source subaccount. Take the details of the Destination from the Service Key for the ProcessIntegrationRuntime ( api) created in previous section.

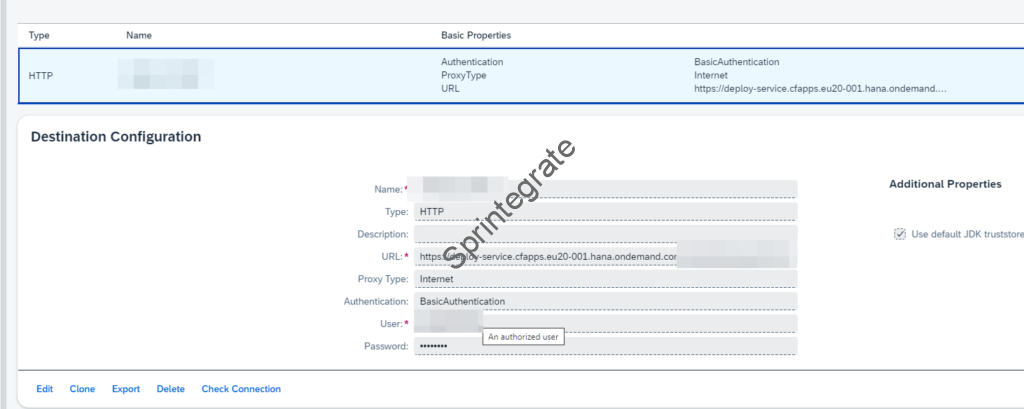
Create Destination: TransportManagementService
Create a Destination called TransportManagementService in the source subaccount. Take the details of the destination from the Service Key for CloudTransportManagement created in the previous section.
Note, you need to add a additional property called sourceSystemId in this destination. The value you put here will be used when you configure Cloud Transport Management. You can put the value as CPI_DEV


Create Destination Pointing to CPI Target Tenant
Note down the CF Org and CF Space in your target tenant as per below screenshot. If you CF Org has a space in it, then add a %20 to the URL.

You can create any CF Space but I would suggest you create a Space called CloudTransportManagement. The User who has a “SpaceDeveloper” role in this space will then be used in this destination.
Create a destination with any name ( XXX_CPI_TEST in my case) . This will be the tenant where your CPI Transports will be imported into. This will be the destination you will use in Cloud Transport Management Service when you configure the Target Nodes.
The Destination will have a URL of the following format https://deploy-service.targetdatacenter/slprot/<cf-org>/<cf-space>/slp
Summary of Destinations Created in Source Subaccount
Below are the 4 destinations you have configured in the Source Subaccount

Settings on Cloud Transport Management
Assign Roles on BTP Subaccount
To be able to configure SAP Cloud Transport Management you need to ensure you have the required roles assigned on your BTP Subaccount. The roles needed are
- Landscape Operator
- Transport Operator

Define Settings In Cloud Transport Management
Click on the link in your BTP Subaccount to open Cloud Transport Management under Instances and Subscriptions

Navigate to Landscape Wizard and select “Two-Node Landscape“. For the purpose of this demo, we will assume this is a 2 tier landscape. For more systems in the landscape you can add select the appropriate option.

Ensure that the name you give here in the Node 1 ( Source Node ) matches the additional property that was defined in the previous section in Destination : TransportManagementService.


Enable Cloud Transport Management in the Source CPI Tenant
Log on to your CPI Source Tenant. Select Settings –> Integration –> Transport. You will have a Edit button all the way at the bottom right corner. Its very easy to miss, but click on Edit.

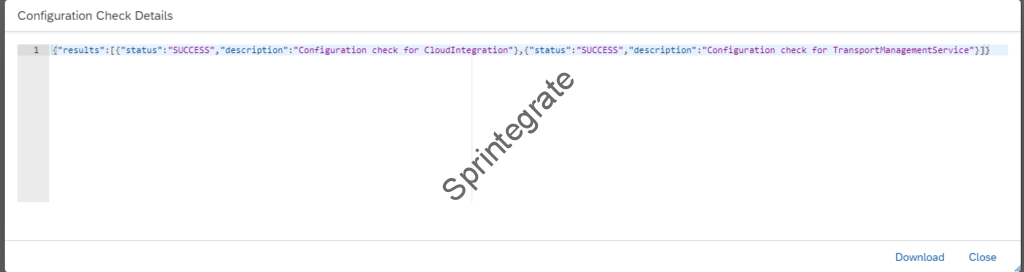
Select Transport Management Service –> Check Configuration. The check should be successful!

Ensure you save!
Transporting your CPI Integration Flows and Packages
You can transport either at Package Level or Individual Iflow Level. You should now see the Transport Button enabled at a package level.


Likewise you should see the Transport option enabled at a iflow level.

Once you have created a transport you can log onto Transport Management Service, select your transport and click on Import!

Final Thoughts
Setting up SAP BTP Cloud Transport Management Service is fairly straight forward for SAP Cloud Integration / CPI Transports. You can also reimport successful transports by re-setting their status and importing them into target systems.
The Transports are all saved and the standard plan provides you with 30GB of storage by default that has worked in most cases! You can choose to increase this strorage or clean up if you see your storage limit hit.
Transporting Cloud Integration Content is very simple with Transport Management Service. If you would like to Transport API Management Content, then please refer to this post.